M33_WiiNnchk_Opener

Today, more and more devices are using motion control. From tablets to cellphones to game consoles, people are getting used to interacting with electronics using gestures. Personal computers, however, have lagged behind a bit. Unable to find a suitable gestural controller for my Windows PC on the consumer market, I set out to build my own.

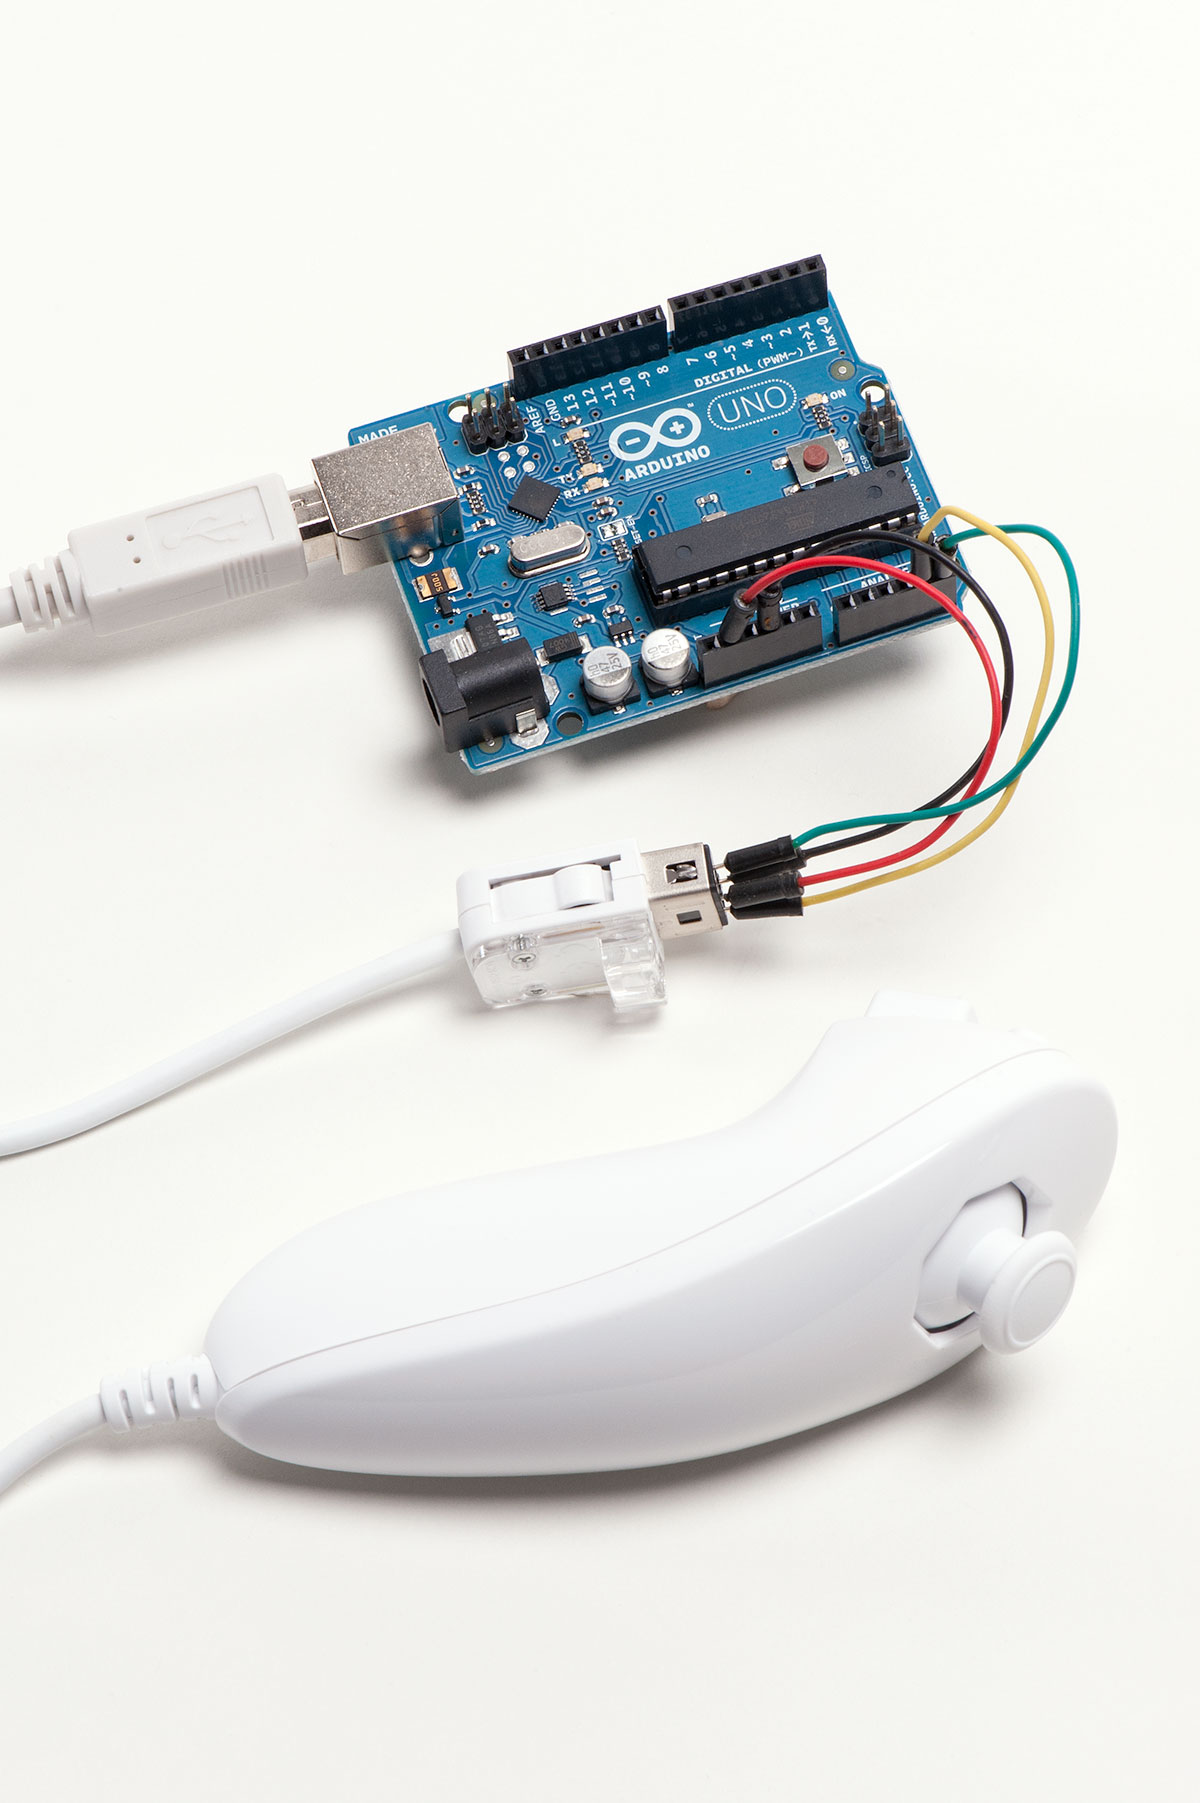
I based my design on the Wii Nunchuk controller for several reasons. First, it’s a versatile, comfortable, well-designed controller; second, it‘s cheap and easy to find; and third, its native I2C serial protocol is easy to interface with Arduino. As a bonus, the connector will accept standard jumper wires, so there’s no need to cut up the cable or use a dedicated adapter.

The Arduino runs a sketch that reads data from the controller and prints to the computer’s serial port. The computer runs a Python script, which receives serial data and emulates a mouse.

Materials

  • Nintendo Wii Nunchuk controller — $17; third-party controllers may not work.
  • Arduino Uno microcontroller — item #MKSP11 from Maker Shed (makershed.com), $35
  • 140mm male/male jumper wires (4) — item #MKSEEED3 from Maker Shed, $9/65

Tools

  • Windows PC — Mac/Linux users will have to adapt the Python script.

Web Materials

MAKE Volume 33 features our special Software for Makers section covering apps for circuit board design, 3D design and printing, microcontrollers, and programming for kids. Also, meet our new Arduino-powered Rovera robot and get started with Raspberry Pi. As usual, you’ll also find fascinating makers inside, like the maniacs on our cover, the hackers behind the popular Power Racing Series events at Maker Faire.

Try your hand at 22 great DIY projects, like the Optical Tremolo guitar effects box, "Panjolele" cake-pan ukelele, Wii Nunchuk Mouse, CNC joinery tricks, treat-dispensing cat scratching post, laser-cut flexing wooden books, sake brewing, growing incredibly hot “ghost chili” peppers, and much more.

On newsstands now, by subscription, or available in the Maker Shed

Buy now!

Project Steps

Install the software.

Download the Arduino IDE for Windows at arduino.cc/en/Main/Software. Extract the arduino-1.0 folder to your hard drive. Inside this folder you’ll find arduino.exe.

Download the ArduinoNunchuk library at github.com/GabrielBianconi/ArduinoNunchuk. Extract the ArduinoNunchuk folder to your hard drive. Open the Arduino IDE and select File → Preferences. Note the folder under Sketchbook folder and open it in Windows Explorer. Look for a folder named libraries. If there isn’t one, you should create it. Move the ArduinoNunchuk folder into libraries.

Download Python 2.7.2 for Windows at python.org/ftp/python/2.7.2/python-2.7.2.msi and run the installer. You can find IDLE, the Python IDE, at Start → Python 2.7 or launch it at C:Python27Libidlelibidle.pyw.

NOTE: You should not download Python 3. The script used in this project won’t work with this version.

Download the pyserial module at pypi.python.org/pypi/pyserial. Extract the pyserial-2.6 folder to C:. Launch the command prompt window at Start → Accessories → Command Prompt. Type cd /d c:pyserial-2.6 and hit enter. Now type c:Python27python setup.py install and hit enter again.

Download pywin32 at makezine.com/go/pywin32 and run the installer.

Connect the controller.

We’ll use 4 colors of jumper wires to simplify the instructions. Insert the jumpers into the Wii Nun-chuk’s connector as shown.

On your Arduino, connect the red wire to +3.3V and the black wire to GND. Connect the green wire to A5 and the yellow wire to A4.

Upload the Arduino sketch.

Connect your Arduino to your computer via USB. If this is the first time, you’ll need to install the required driver. Windows will not be able to install it automatically, so you’ll need to select it in arduino-1.0/drivers.

Open the Windows Control Panel and search for the Device Manager. You can find the port in which your Arduino is inserted under Ports (COM & LPT). Open the Arduino IDE and select the correct port under Tools → Serial Port.

Relaunch Arduino. Select your Arduino model under Tools → Board.

The ArduinoNunchuk library that you’ve installed has an example sketch that prints the data from the Wii Nunchuk to the computer’s serial port. Open the exam-ple file by selecting File → Examples → ArduinoNunchuk → ArduinoNunchukDemo. Upload this sketch to your Arduino.

Open the Serial Monitor. At the bottom right, change 9600 baud to 19200 baud and wait a few seconds. You should see 7 columns of values that change if you move the Wii Nunchuk, move the analog stick, or press a button. If it’s working correctly, close the serial monitor.

Set up the script.

Download the Python script at makezine.com/go/nunchuk.

Open it with IDLE (Right-click → Edit with IDLE). Look for the line which says port = ‘arduino_port’ and write the correct port (leave the quotes). It should look like port = ‘COM10’ (use the same port as set up in the Arduino IDE). Save the script (File → Save or Ctrl+S).

Press F5 to run the file and wait a few seconds. Enjoy using the Wii Nunchuk as a computer mouse!