gettingstartedwitharduino

This project has been excerpted and modified from Make: Getting Started with Arduino — 3rd Edition.


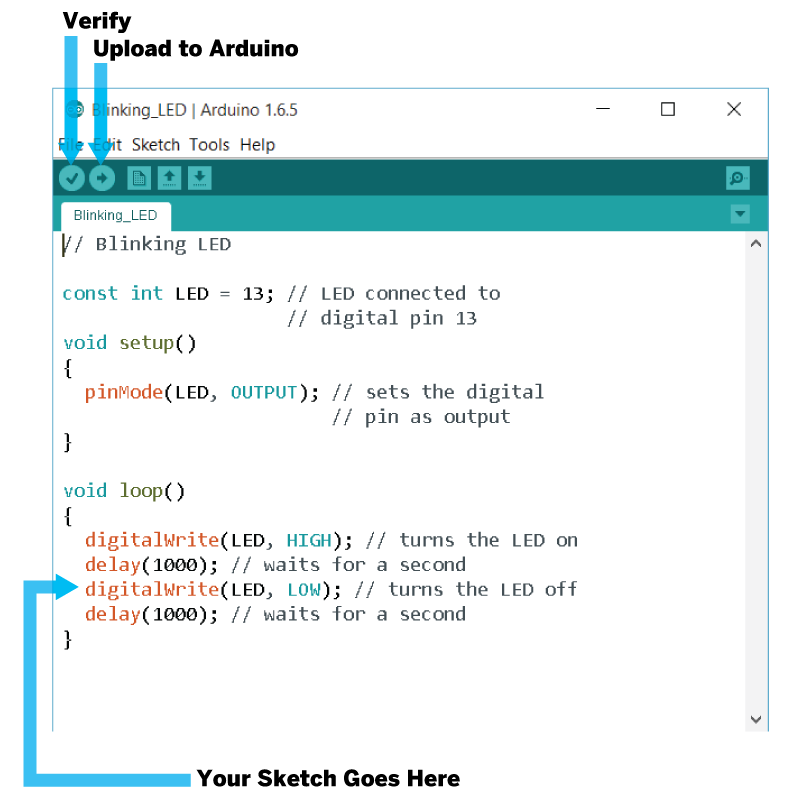
Once you’ve installed Arduino’s Software IDE (Integrated Development Environment) onto your computer, you’re ready to begin! This is a great first project for those new to Arduino.

What You’ll Be Making

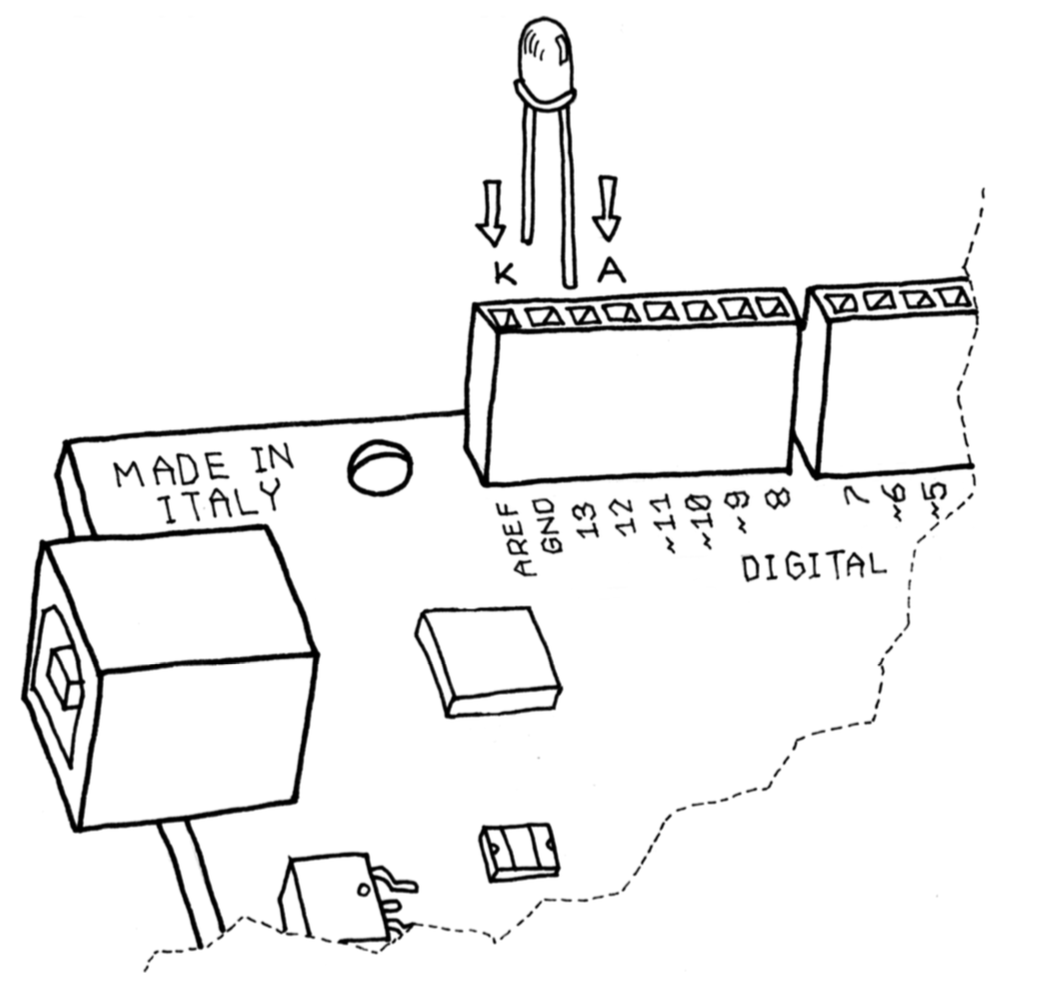
Very simply, you’ll make a light blink on and off on your Arduino board. It might not seem like much, but learning how to do this will give you a solid foundation as you work towards learning how to code and experimenting with electronics. An LED (light emitting diode) is a small electronic component that’s a bit like a lightbulb, but is more efficient and requires a lower voltage to operate. While a lightbulb uses a filament, which eventually burns out, LEDs create light using a totally different mechanism.

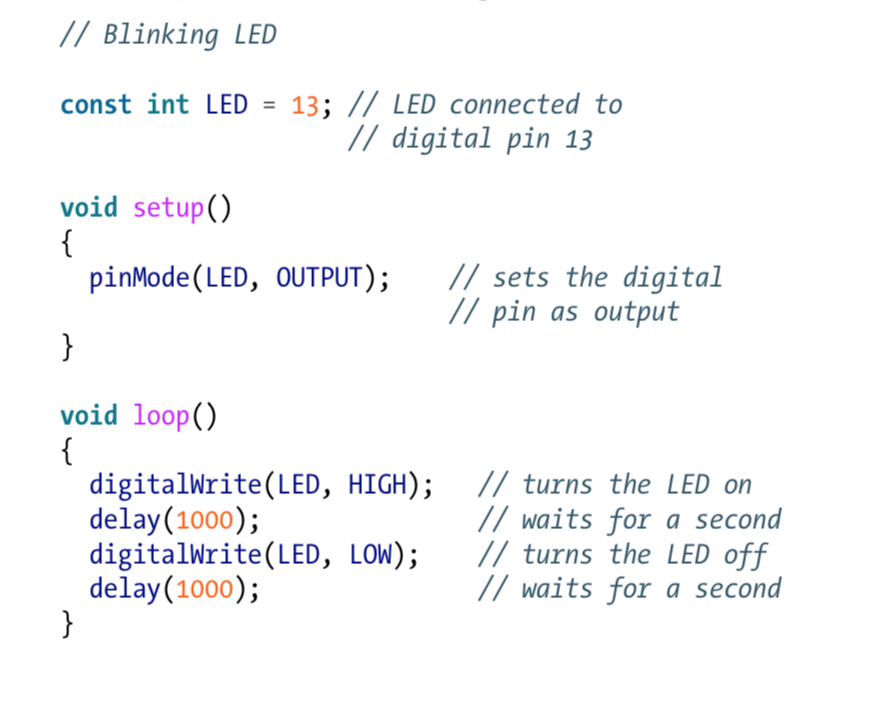
This project also allows you to test whether your Arduino board is working and is configured correctly. It’s also a good first programming exercise for learning how to program a microcontroller.

How This Project Relates to the Real World

You know how flat screen TVs and monitors have those little red and green lights to indicate whether they are on or off? Those lights are LEDs!

Project Steps

Connecting an LED

Your Arduino board comes with an LED pre-installed. It’s marked L on the board and is connected to pin number 13. The Arduino board uses this LED to show if your code, or sketch, is running properly.

There are also two additional LEDs, marked RX and TX, pre-installed on your Arduino board; these flash every time a byte is sent or received by the board (see the first image). When you upload your software they will flicker.

We suggest that you add your own LED (of any color) to create a bigger blinking light! Connect it as shown in the second image. Be sure to plug it into the pin hole that is labeled 13. K indicates the cathode (negative), or shorter leg; A indicates the anode (positive), or longer leg. Note that the term “lead” is also used to refer to an LED’s leg.

Creating Your Code

Once the LED is connected, you need to tell Arduino what to do. This is done through code: a list of instructions that you give the microcontroller to make it do what you want. The words code, program, and sketch are terms that can be used interchangeably.

On your computer, run the Arduino IDE (on the Mac, it should be in the Applications folder; on Windows, the shortcut will be either on your desktop or in the Start menu).

  1. Select File→New. (The first time you save your file, you’ll be asked to choose a sketch folder name: this is where your Arduino sketch will be stored).
  2. Name it Blinking_LED and click OK.
  3. In the main window of the Arduino IDE, which is the sketch editor (see Image 1), type the sketch in Image 2. The sketch code is case and space sensitive so be sure to enter it as shown.
  4. Alternatively, you can also load this sketch simply by clicking File→Examples→01.Basics→Blink, but you’ll learn better if you type it in yourself!

Checking Your Code

Now that the code is in your IDE, you need to verify that it is correct.

  1. Click the Verify button (see above image for where this button is located).
  2. If everything is correct, you’ll see the message “Done compiling” appear at the bottom of the Arduino IDE. This message means that the Arduino IDE has translated your sketch into an executable program that can be run by the board, a bit like an .exe file in Windows or an .app file on a Mac.

Troubleshooting: If you get an error, most likely you made a mistake typing in the code. Look at each line very carefully and check each and every character, especially symbols like parentheses, braces, semicolons, and commas. Make sure you’ve copied uppercase and lowercase faithfully, and that you’ve used the letter O and the number 0 correctly.

Uploading Your Code to Your Arduino Board

Once your code verifies correctly, you can upload it into the board by clicking the Upload button (see above image for where this button is located).

This will tell the IDE to start the upload process, which first resets the Arduino board, forcing it to stop what it’s doing and listen for instructions coming from the USB port. The Arduino IDE will then send the sketch to the Arduino board, which will store the sketch in its permanent memory.

Troubleshooting: If you get an error uploading to your Arduino board it may be related to how you installed the Arduino IDE. Refer to the section in Chapter 3 starting with “The Software Integrated Development Environment (IDE)” for guidance.

Your Code At Work!

Once the IDE has sent the entire sketch, the Arduino board will start running your sketch. This happens fairly quickly. If you keep your eyes on the bottom of the Arduino IDE, you will see a few messages appear in the black area at the bottom of the window, and just above that area, you might see the message “Compiling,” then “Uploading,” and finally “Done uploading” to let you know the process has completed correctly.

Assuming that the sketch has been uploaded correctly, you will see the LED L turn on for a second and then turn off for a second. If you installed your own LED, that LED will blink too. What you have just written and run is a computer program, or sketch.

Once the code is in your Arduino board, it will stay there until you put another sketch on it. The sketch will survive if the board is reset or turned off, a bit like the data on your computer’s hard drive.

Troubleshooting

  1. If you don’t see the LEDs flicker, or if you get an error message instead of “Done uploading,” then there is a communication problem between your computer and Arduino.
  2. Make sure you’ve selected the right serial port in the Tools→Serial Port menu. Also, check the Tools→Board menu to confirm that the model of Arduino you are using is selected there.
  3. If you installed your own LED, and it’s not blinking, take it out and twist it 180 degrees to ensure you have the right legs in the right place.

Understanding Your Code

To understand your code in detail, refer to Make: Getting Started with Arduino — 3rd Edition. Start with the section in Chapter 4 titled “Pass Me the Parmesan.” The book will take you through best practices and will define important functions.

Here’s something to keep in mind about any Arduino program. Arduino executes code sequentially from top to bottom, so the first line at the top is the first one read; then it moves down. Arduino can do only one thing at a time, one instruction at a time. As Arduino runs your program, it’s executing, or running, only one line. Arduino can’t run two sets of instructions at the same time.