Make your own Matter

This article appeared in Make: Vol 92. Subscribe for more great projects.

If you want to make a home automation device that’s compatible with Google Home, or Amazon Alexa, or Samsung SmartThings, Apple HomeKit, Tuya, etc., then you can join their developer programs and get busy. And if you want to build a device that works with all these home automation platforms, well, you have a lot of development work to do! No surprise, these developer programs are intended for commercial manufacturers, not so much for makers.

But wait — with many new home automation products implementing the Matter protocol, you might only need to support Matter. The Matter standard offers “One protocol to connect compatible devices and systems with one another. Smart home devices should be secure, reliable, and seamless to use.”

Standards are great — is that why there are so many? (The Connectivity Standards Alliance manages Matter, Zigbee, and several other home automation/IoT standards.) But, seriously, will Matter end up as the ubiquitous platform for home automation? It’s not clear yet, but with a growing number of affordable development boards and software stacks, it’s looking more possible for makers to get into Matter.

The Matter specification includes link layer support for Ethernet, Wi-Fi, and Thread 802.15.4 networks.

Ethel the turtle — my Matter project

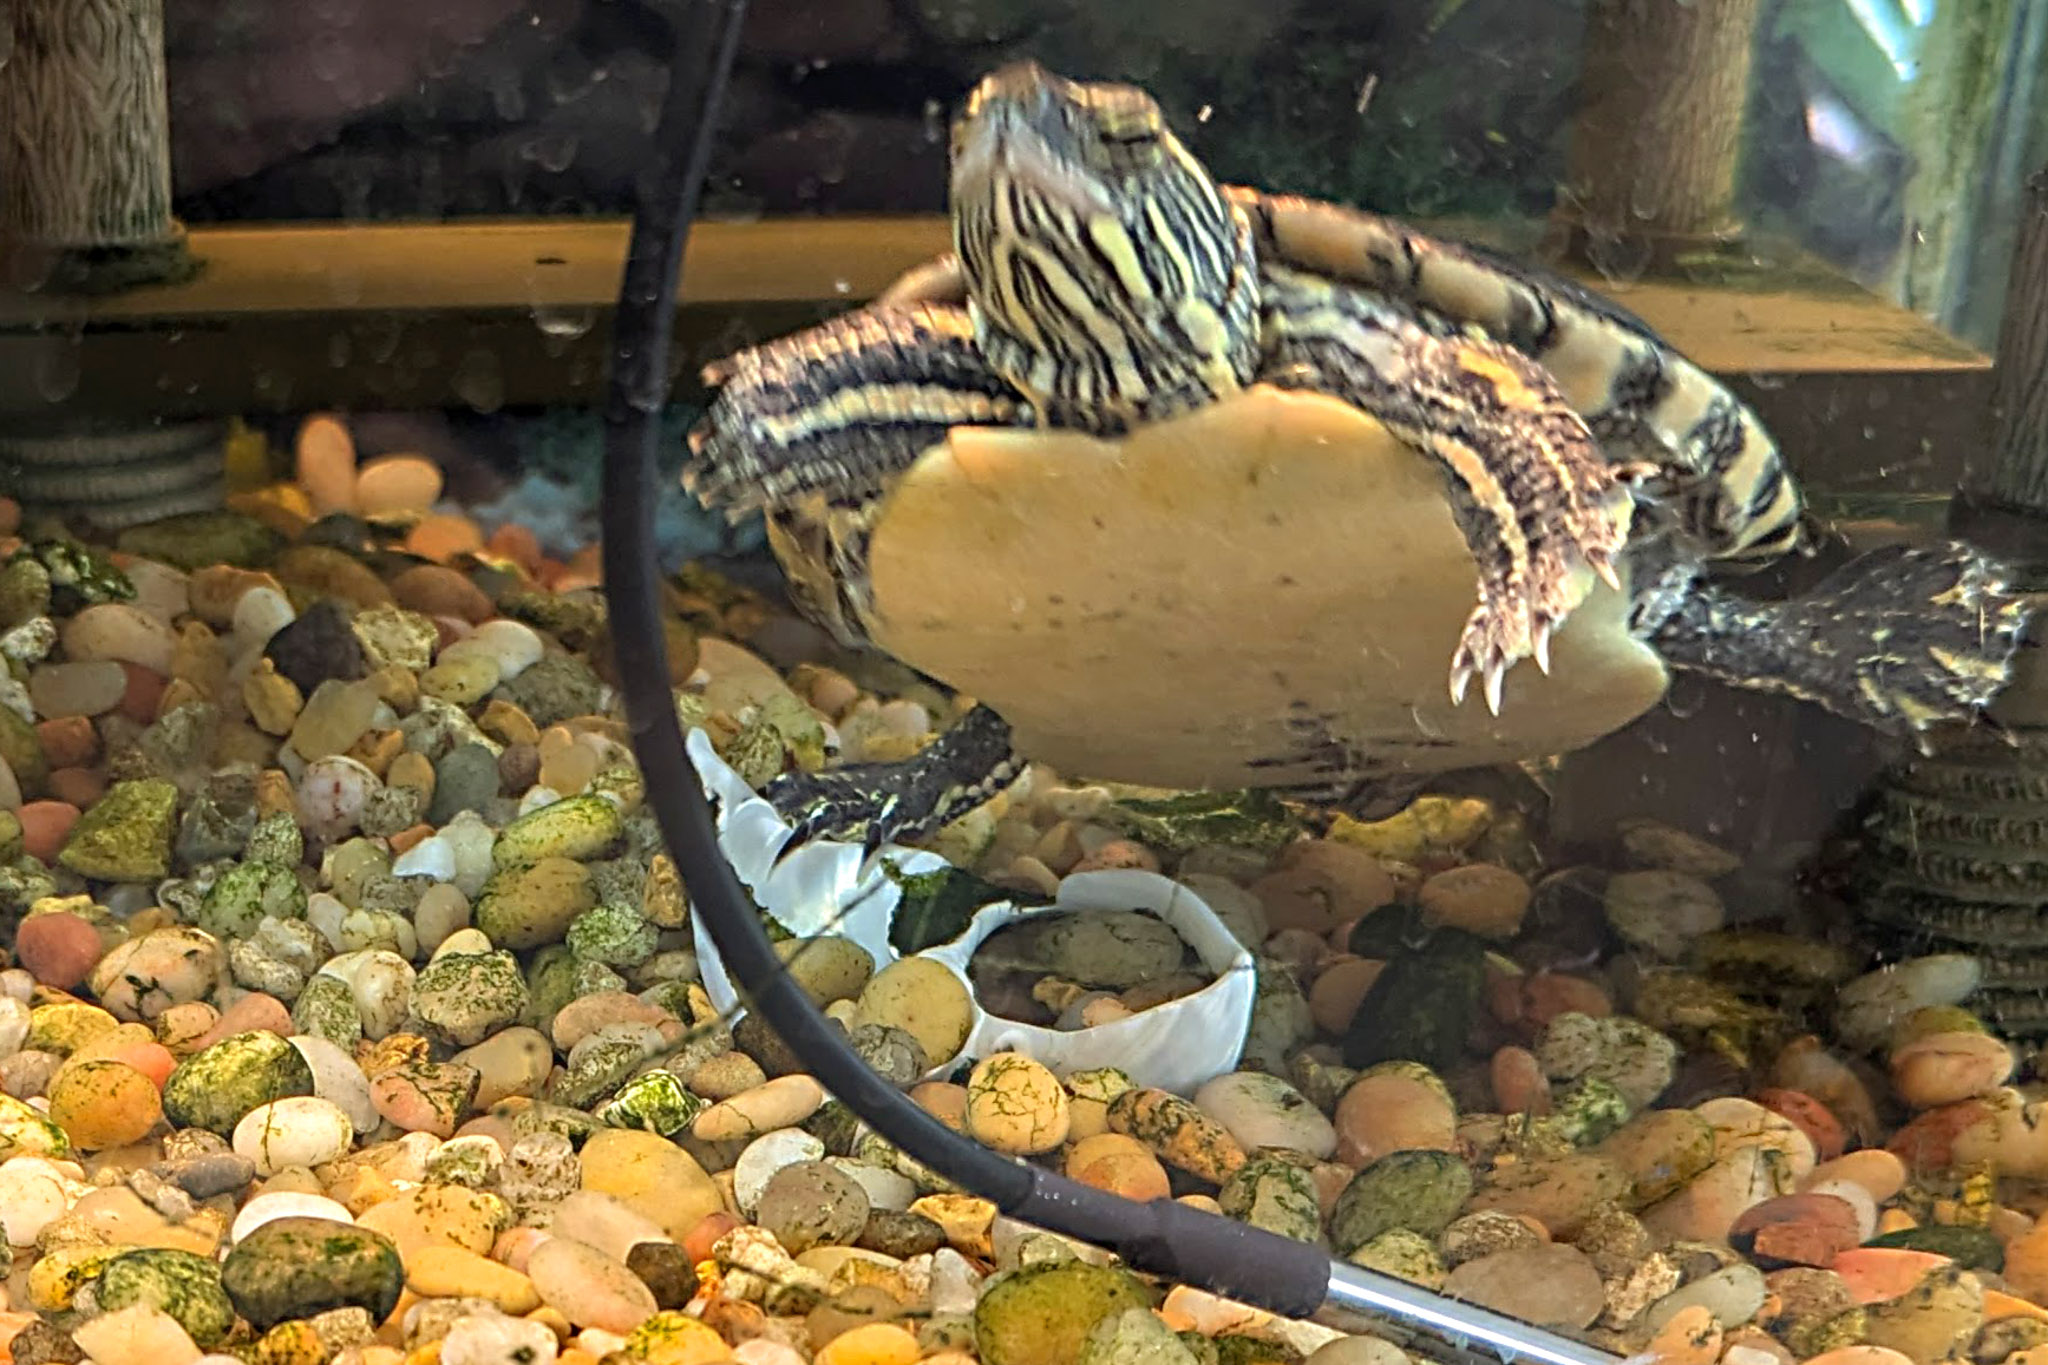
It’s always better to have a specific use case in mind when evaluating technologies. Here’s mine: My wife Jackie takes excellent care of her pet turtle. Ethel is a painted turtle, 20+ years old, and lives in an aquarium with an automatic feeder, automatic water pump, and a submersed water heater. We have a temperature sensor with an alarm for over and under temperature events, but if no one is home, the alarm goes unanswered. We need a solution when we are traveling. If the temperature is too low, perhaps the heater has failed; we would need to ask a friend to replace it. If the temperature is too high, we should turn on the air conditioner in Ethel’s room. We can do this with our existing Home Assistant system.

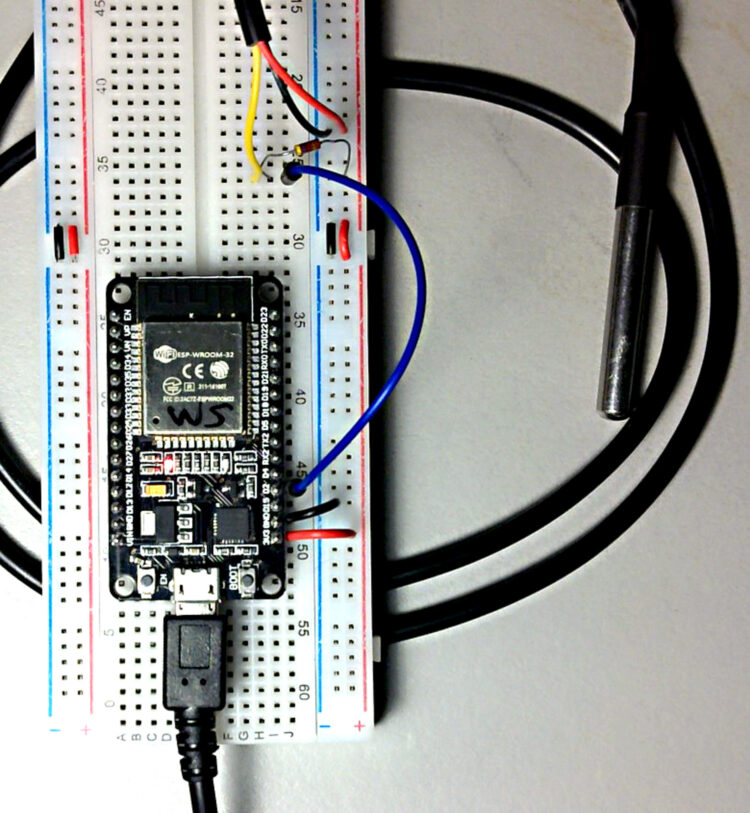
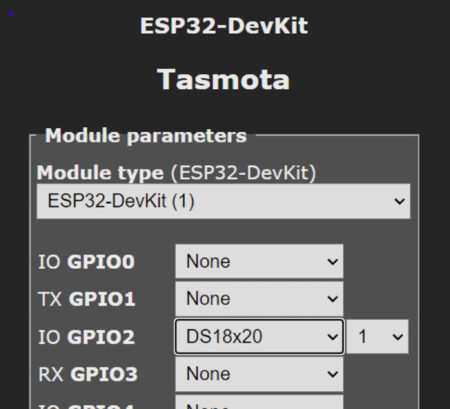
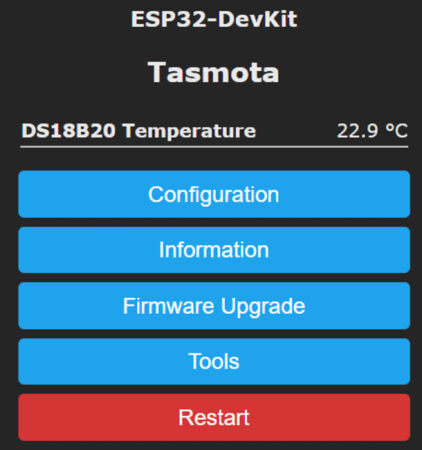
So, here are two attempts to build a Matter temperature sensor for Ethel; one very simple and limited, using Matter over Wi-Fi, and one much more challenging, using Matter over Thread with the possibility for many add-on features.

Matter for sale

In Make: Volume 85, “Home Automation for Makers,” we took a look at making Matter devices using the Espressif ESP32 Matter 1.x SDK. It worked, but had quite a few bugs. One year later, there are more options for purchasing and making your own Matter devices. Let’s take a look.

It’s encouraging to see a growing number of Matter-compatible smart devices on the market. Do they deliver the promise of multi-vendor home automation integration? More importantly, will they work with your home automation network? It’s hard to say without testing first.

  • Shelly Humidity and Temperature Sensor ~$39
    • 
Includes an e-paper display with temperature, humidity, time, and battery status.
Promises: “Matter-upgradable”
  • TP-Link Tapo Smart Light Switch, Matter Compatible ~$15

    • “Replaces your existing single pole light switches providing smart control from anywhere.”
“With Matter certification, it’s compatible with all major smart home platforms – Apple Home, Amazon Alexa, Google Home, and Samsung SmartThings.” 
Caution: Product description includes “Frequently returned item”
  • arre Smart Button with Matter & Thread Support ~$35

    • 
$35 for a button? Hmm. And, also “Frequently returned item”

Project Steps

Board #1: ESP32 Temperature Sensor Over Wi-Fi Using Tasmota

There are several development boards based on the Espressif ESP32 microcontroller that can be used to build Matter devices, thanks to programming tools and libraries that have been created to make this possible.

Let’s start with a simple design to build a Matter temperature sensor using the ESP32 Dev Kit board and the DS18B20 1-wire temperature sensor. These parts are easy to find and inexpensive.

Hardware Wiring

If you search for “ESP32 Dev kit temperature sensor DS18B20 waterproof” you’ll find many project examples. Here’s my breadboard prototype. Connect the components like this:

  • DS18B20: black to GND, red to VCC, yellow (signal) to ESP32 pin D2.
  • Pullup resistor 47K: between DS18B20 signal and VCC.

Tasmota Matter

The easiest way to develop the software for this simple Matter temperature sensor is to not write any code at all!

Tasmota is open-source firmware for Espressif ESP8266 and ESP32 microcontrollers to create home automation devices. Originally it was developed as a hack to replace cloud-based firmware on commercial products for local control. Now it has support for many products and can be used to make your own devices — and it includes support for Matter.

Get more details here.

Note that Tasmota’s Matter support is Wi-Fi-only at this time; Thread is not supported.

TASMOTA setup Instructions

    1. Install the Tasmota firmware on the ESP32. It’s easy to use the Tasmota Web Installer to flash Tasmota using a Chrome-based browser.
    2. Configure the Wi-Fi.
    3. Click on Visit Device and be sure to remember/bookmark the device’s IP address.
    4. Click on Configuration → Configure Module. For GPIO2, select DS18x20 – this configures the temperature sensor. Then click Save.
    5. After the device restarts, you should see the temperature displayed. If you’re not seeing the temperature, check your wiring.
    6. If you’d prefer to display the temperature in °F, use Tools → Console and type: SetOption8 1 Go back to the Main menu and you should now see the temperature displayed in °F.
    7. You can use Configure Other to change the Device Name and Friendly Name 1, as suitable for your project.
    8. Review the supported platform list for the specific instructions to pair your Tasmota Matter device with your home automation network. Note that Google Home has some extra instructions.
    9. Follow the instructions to enable Matter in your Tasmota device, enable Commissioning, then add your Matter device to your existing home automation network. Note that your device can be paired with more than one network or fabric. The Tasmota web interface shows the number of active associations.
    10. You can connect other devices to the ESP32’s GPIO pins (buttons, sensors, relay on/off controls, etc.) and they will appear in the Matter device, accessible to your home automation network.
    11. You can also add various displays (OLED, LCD, etc.) and create Tasmota rules to control the display. See the Tasmota documentation.

EspHome and Matter?

ESPHome is another popular platform for developing home automation devices. It works well with Home Assistant. Matter is not yet supported, although it is an open feature request at this time.

Board #2: SparkFun Thing Plus Matter Over Thread Using Arduino

Let’s take another approach, using some programming to create the Matter device as we’d like, adding some other user interface components.

The SparkFun Thing Plus Matter combines SparkFun’s Qwiic I2C module ecosystem with Matter, via the MGM240P wireless module from Silicon Labs. The microcontroller is a low-power (as little as 15µA) 32-bit Arm Cortex-M33 running at 39MHz, and the board includes a LiPo battery connector and charge circuit and a microSD card slot. These are all the features you need to make a wireless, rechargeable Matter device that interfaces with just about any imaginable component.

Programming environment possibilities include Silicon Labs Arduino Core, Thing Plus Matter CircuitPython, and Simplicity Studio with Matter, but let’s check out the Arduino option, as this is most familiar to the maker community.

SparkFun Thing Plus Matter — Arduino

In January 2024, Arduino and Silicon Labs teamed up to provide an Arduino Matter library. We’ll use this for our Sparkfun Thing Plus Matter project.

Software setup Instructions

    1. On your computer, install the Simplicity Studio software. You need it to flash the Sparkfun Thing Plus Matter board.
    2. Install the latest version of the Arduino IDE.
    3. Install the Silicon Labs Arduino Core by following the “Installation” and “Getting Started” instructions.

As the instructions say, “If you see the built-in LED blinking, you’re ready to go!” Otherwise, review the previous instructions and try again.

The Silicon Labs Arduino Core repository includes several example Arduino sketches. Download the raw file matter_temp_sensor.ino, then open it in the Arduino IDE. Compile and upload this sketch to your Thing Plus board. Open the Serial Monitor and you should see:

Matter device is not commissioned
Commission it to your Matter hub with the manual pairing code or QR code

We have to get Home Assistant or some other Google, Amazon, etc. home automation device that is a Thread Border Router (TBR) configured for Thread before we can commission this device.

Matter using Thread

Our Tasmota example used Matter over Wi-Fi. The Silicon Labs Arduino Core uses Bluetooth Low Energy (BLE) for commissioning Thread/IPv6 for communications. We’ll need a TBR to make this work. My home automation system is Home Assistant and I have a Home Assistant Connect ZBT-1 device to use as the TBR. Google Home and Amazon Echo devices also support Thread, but alas, all my devices are older models without TBR capabilities.

Follow these instructions to configure Matter Thread on Home Assistant using the ZBT-1 router:

You should now have a Matter device visible in Home Assistant. I also added this device to Google Home and Amazon Alexa. Nice!

This completes a “Hello, World!” project for Matter using the SparkFun Thing Plus Matter using Arduino. Now we can move ahead to build our turtle temperature sensor device.

DS18B20 Temperature Sensor

Using the same temperature DS18B20 sensor we used with the ESP32 project, we would expect this to be an easy implementation with the SparkFun Thing Plus Matter as there are several DS18x20 Arduino libraries available. Except, they didn’t work. I’m not the first one to notice the problem:

“The OneWire protocol requires strict microsecond timing — which usually cannot be achieved through the Arduino APIs. This is why each chip vendor has their direct GPIO register access functions in the OneWire library,” explained Silicon Labs engineer Tamas Jozsi (reply to TomInIowa).

The fix is to install an updated OneWire Arduino library (Caution: Alpha software!) for the MGM240P on the Sparkfun Thing Plus Matter board. Download it as a .zip file then install it in the Arduino IDE, under Sketch → Include Library → Add .ZIP Library.

Another surprise: The USB serial interface on the MGM240P module on the Thing Plus Matter runs at 115200 bps. Therefore, an Arduino sketch must use Serial.begin(115200) — any other baud rate will result in unreadable output.

There are several Arduino libraries that support the DS18B20 Temperature Sensor. I used Dallas Temperature. In the Arduino IDE, Tools → Manage Libraries, search for “Dallas Temperature” and install the library.

Now try the “simple” example to be sure your hardware and IDE are set up correctly: File → Example → Examples from Custom Libraries → Dallas Temperature → Simple.

This slideshow requires JavaScript.

Connect the DS18B20 signal line to the Thing Plus D2 pin. But wait — this is actually the GPIO pin D10 in the Arduino library! So, in the simple.ino sketch, change the line:

#define ONE_WIRE_BUS 2

to read instead:

#define ONE_WIRE_BUS 10 // sensor connected to pin labeled D2, which is input 10 in Arduino

Also change:

Serial.begin(9600);

to:

Serial.begin(115200);

Compile and upload the sketch. You should see the temperature displayed in the Serial Monitor.

Now we can combine this DS18B20 sketch (simple.ino) with matter_temp_sensor.ino to build our project. Here’s the combined sketch.

Bonus: Add an OLED temperature display

It would be useful to have a local display of the turtle aquarium temperature, and it’s easy and inexpensive to add an OLED display that uses the I2C interface via the Qwiic connector on the Sparkfun Thing Plus Matter board. We’ll use a 1″ display such as Adafruit 326 or Amazon B0B4DHCCKC.

There are lots of examples using these and similar displays in Arduino. The u8g2 Arduino library works with the Thing Plus Matter board.

And here’s a working sketch that adds the OLED display.

Other ideas to take it further

    • Add a check to detect if the Matter network disconnects and try to reconnect. Display something on the OLED to indicate a Matter connection problem.

    • Create rules in your home automation system to send notifications on high/low alarms.

    • Add a piezo buzzer for a local over/under temperature alarm.

    • Add a button to “snooze” the alarm.

    • Expose the high/low temperature thresholds as attributes of the Matter device, controllable from your home automation system.

    • Add a rechargeable battery to the LiPo jack. Send the battery charge level to Matter. (Note that the Matter specification defines a cluster for the “Power Source.” However, it is not yet available in the Silicon Labs Arduino Core library. Check the release notes.)

    • What else would you add to this project?

Conclusion

What’s next?

Matter for makers has improved a lot in the last year! But there’s lots more to do — support of more development boards for both Wi-Fi and Thread, certifying as an approved Matter implementation, qualification testing with the various home automation products on the market — and we need more example projects to help people get started with their own designs.

If you want to build your own Matter device, we’ve shown two possible approaches:

    • ESP32 Wi-Fi with Tasmota: inexpensive, easy, limited to the components known to Tasmota.

    • Sparkfun Thing Plus Matter: more expensive, Thread only, unlimited possibilities leveraging the Arduino world.

There are more board choices to look at —Arduino Nano Matter, Seeed Xiao ESP32C6 —and more programming languages and development tools to choose from. Want to implement a Matter device in Python? CircuitPython Matter is available and includes some useful examples.

We’ll keep exploring. Meanwhile, the Make: community looks forward to learning about your Matter project on the Make: Discord.


This article appeared in Make: Vol 92.