ALEXIS SUGDEN is an animator, comic creator, and embroiderer. Currently an animation director on Disney Junior’s T.O.T.S., she’s an Australian living in Vancouver, British Columbia. linktr.ee/alexisdraws
About a year and a half ago, I started getting into embroidery. Once I got the hang of it, I realized that embroidery is just like drawing, with thread. And if I can draw, I can animate!
I’ve done a few different embroidery animations, including a joyful (and nonbinary) dancing Office Bat that went viral last year. This took 24 separate embroideries and about 3 months of my spare time to make. Of course I am working on more. You can see my embroidery animations and other work here.
If you can animate and embroider, or you’re curious about the process, this how-to is for you.
This project is from the magazine! Subscribe now to make sure you don’t miss out on any of our awesome builds.
Project Steps
1. DESIGN AND TEST
Design your character and do a little test to see what size works well, what colors of thread, what fabric, etc. It’s easiest to figure that out before you start, rather than changing your mind when you’re 10 embroideries deep.
I recommend starting with a very simple character, using only a few colors. You can sew everything quite small, as long as it’s captured with a good camera. You can also make things easier by just stitching the outline of a character, or by creating the fills with long stitches rather than many small stitches that will take a long time. Remember that whatever you plan to sew, you will sew many, many times, so you want to make it as easy for yourself as possible.
The three images above show some color tests I did for my Embroidery Cat animation.
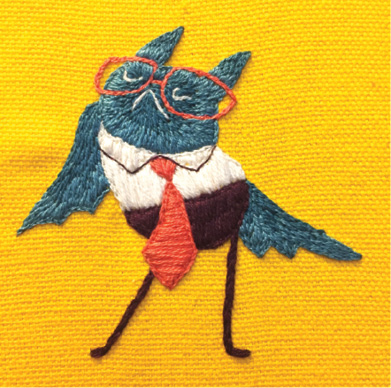
Here is the design I used for my Office Bat Boogie animation. As you can see, the cat design is much simpler. Both animations took me the same amount of time, but I was able to stitch twice as many frames with the simpler, smaller cat design.
When choosing fabric, look for one that
won’t warp too much when you take it out of the embroidery hoop. I found that felt, for example, warped a lot, but cotton with a thick weave
worked better.
2. ANIMATE!
In order to create embroidery animation, you need to animate. I prefer to animate in 2D for my embroidery animations, but you could also animate in 3D. Personally, I think this would give a rotoscoped feeling, so I’ve avoided using 3D for this reason.
There are several different programs you could use to create your animations. On your computer you could use TVPaint (my personal favorite), Adobe Animate, Toon Boom, or Photoshop; if you’re on an iPad or tablet, you might use ProCreate. Pencil2D on the computer and RoughAnimator on the iPad are free animation software, if you don’t plan on animating often, and don’t want to sink money into expensive software.
If this is your first time doing embroidery animation, I recommend creating a short loop, so you can get the most out of your embroideries. For my first embroidery animation, I made an 11-frame loop of a jumping Frog, to keep things easy for myself.
I also recommend animating on threes or fours, to help keep the number of embroideries down. The tests I’ve done so far have been on twos, but my next, longer, project will be on threes.
Make sure to clean up your animation so that it has clear, defined lines and isn’t too loose or scribbly. You’ll be using this as a guide to your sewing, so you want it to be as clean as possible.
Another thing to do now is to track the direction of stitches. For example, when animating this cat and ball, I drew guidelines for the stitch directions so that the ball would feel believable when rolling.
The lines on the ball in the drawing are a guide for the direction of the stitches.
3. PRINT AND TRACE
Once your animation is clean and complete, print it all out.
Using a lightbox and a pencil, trace the drawings onto your fabric. I don’t hem my fabric, so I make sure there’s enough room for the fabric to fray without destroying the space I’m using.
I recommend drawing registration points for each frame so that your photographs of your embroideries will be easier to line up later, as well as numbering each frame.
4. EMBROIDERY TIME!
This step is the most time consuming. Because the embroideries need to follow the drawings as closely as possible, I like to stitch the outlines before doing the fills. Otherwise, I would have trouble finding the exact lines after doing the fills.
For example, if I was just doing one embroidery of Office Bat, I would do the fills first, then the lines. But in the animation, I made sure to do the glasses and face before the fills, so that I didn’t lose those important lines.
Make sure to stay consistent with the order in which you stitch everything. For Office Bat, I would first stitch their pants, then shirt, tie, glasses and face, and finally head, body, and wings. Again, with each step I was stitching the outlines before doing the fills.
Also keep the direction of the fill stitches consistent. For example, if you stitch the fill of the tie in one direction in one frame, make sure it’s the same in all frames, otherwise the animation will get too jittery.
Above are work-in-progress shots, as I’m sewing over the pencil lines.
5. IRON YOUR EMBROIDERY
Try to iron out the hoop crease as much as you can.
When working on a piece, I try to release my fabric from the embroidery hoop whenever I’m not working on it, so that it’s easier to iron out later.
6. CAPTURE YOUR EMBROIDERY
At first I tried scanning my embroideries, but I found that photography works much better. I’m not a very good photographer, so I got some help from my friend Will Robson (@_willrobson on Instagram).
Make sure you’re using a tripod so you can take every photograph from the exact same distance. Don’t worry about lining them up exactly, just make sure the registration points are in the photographs so you can line everything up on the computer.
7. ASSEMBLE YOUR IMAGES
Bring the photographs onto your computer, it’s time to assemble your animation! For this, I used Photoshop, purely because I’ve been using it for so long that I’m very comfortable with it, and find it easy to use.
Make a file with the dimensions you want to export at, and size your images to fit. When scaling your images, make sure you scale them all by the same amount.
You can use your registration points to help line up your images. I also keep a layer in there with the original hand-drawn animation so that I can line up the embroidery with the original. Your fabric might have warped a little while sewing, so things won’t always align perfectly. I like to make sure the feet are working, and then the rest seems to work just fine.
8. EXPORT AND ENJOY
Show your animation to everyone and make them pay you compliments, because this process is a lot of work!
ALEXIS SUGDEN is an animator, comic creator, and embroiderer. Currently an animation director on Disney Junior’s T.O.T.S., she’s an Australian living in Vancouver, British Columbia. linktr.ee/alexisdraws