This article is from Make Vol. 73! Subscribe now to make sure you don’t miss out on any of our awesome builds.

Translated from the original German by Niq Oltman

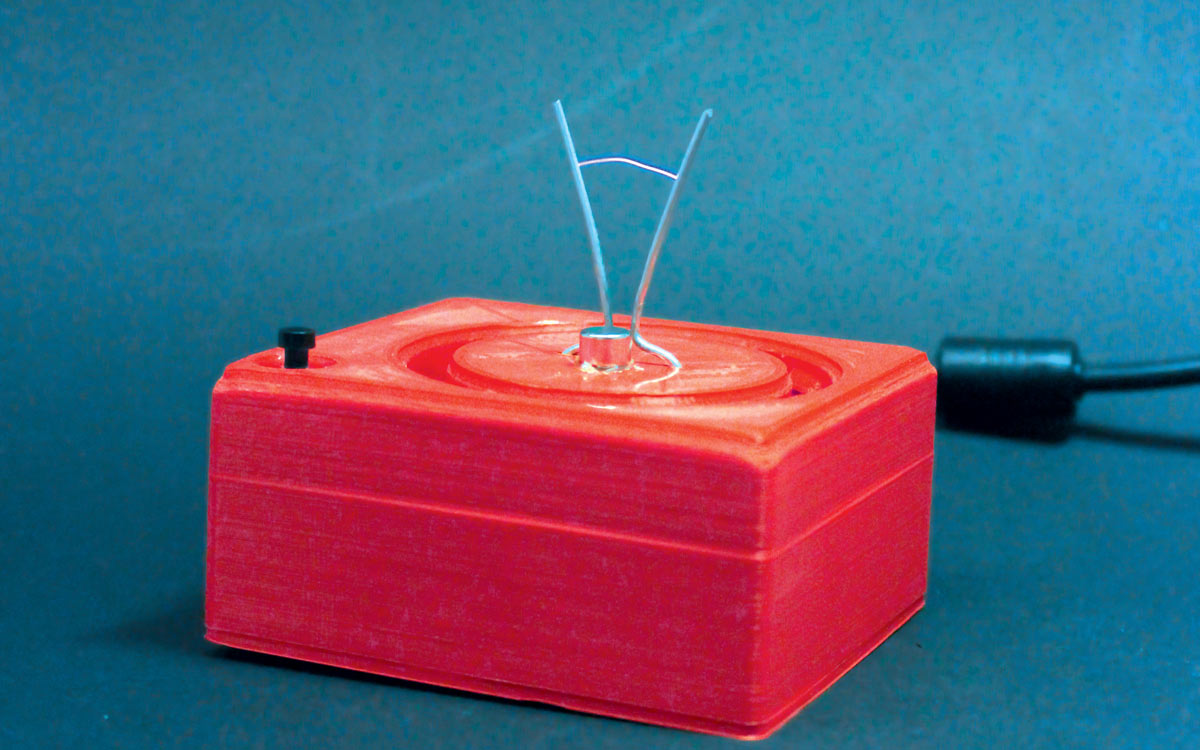
In times past, Jacob’s ladders were often featured in horror flicks for their decorative effect. As the bright purple spark climbs between the electrodes, growing longer as it rises, it crackles with a sound that says “mad scientist”! As a spark gap, the Jacob’s ladder also makes a very good high voltage surge arrester, and they’re still used for this purpose today, such as on overhead wires for trains.

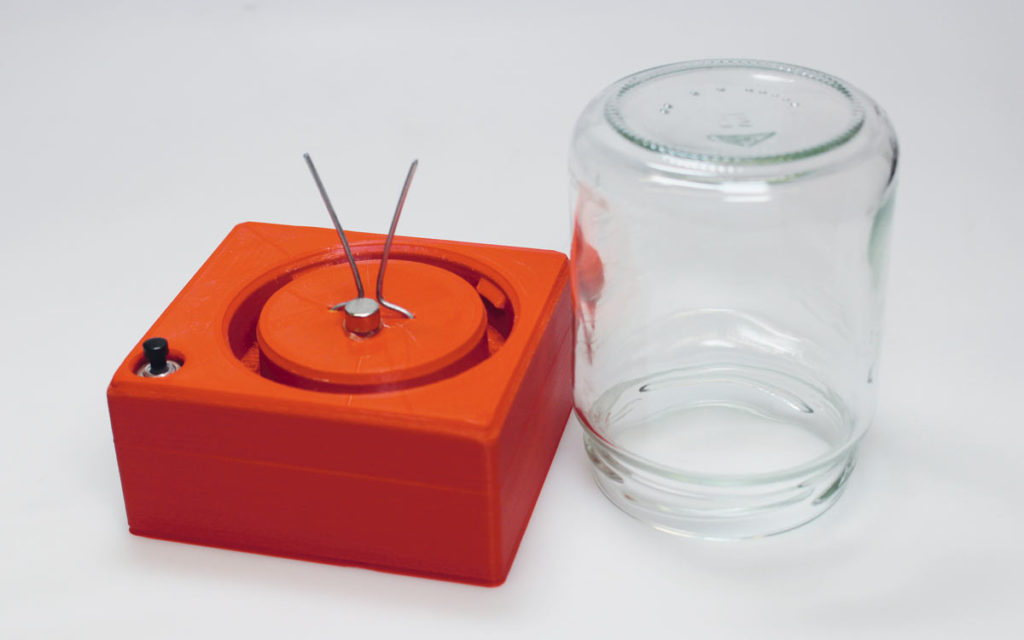
If you’re looking for a home-friendly version, you’ll find one on Thingiverse. Created by Matthias Balwierz, aka bitluni, it’s all packaged inside a 3D printed enclosure; you can see it in action in Matthias’ video. More details on this electrifying project follow below. But first, let’s have a look at how the ladder works.

DANGER: HIGH VOLTAGE! This little ladder generates very high voltage, up to 20kV. It is unsafe for children or users of pacemakers or similar implants.

Ladder Logic

Figure A

The functional principle is pretty simple (Figure A). A voltage is applied to the ladder electrodes from a transformer — say, from a neon sign, microwave oven, or model train, or, in our case, the output from our little high voltage generator. If that voltage is high enough, an arc forms where the gap between the electrodes is shortest. (For an arc to “make the jump” across the gap, you need about 1,000 volts per millimeter.) This arc is simply air that has been ionized by the voltage, making it electrically conductive. The electrical energy flowing across the arc is partly converted to light, heat, and magnetic fields. This causes the voltage across the electrodes to drop significantly, as the resistance of the arc provides a load on the high voltage source.

The arc’s heat — and, to some extent, its magnetic field as well — cause it to travel upward. At this point, the voltage is too low to ignite another arc. As the existing arc travels up, the widening gap between the terminals forces it to stretch. Recall that wider spark gaps require higher voltages for arcing: the arc keeps traveling until the voltage can no longer sustain it, at which point it breaks down. With the arc gone, there’s no load on the voltage source anymore, and the voltage will again begin to rise. Once it’s high enough for a new arc to form, the cycle repeats.

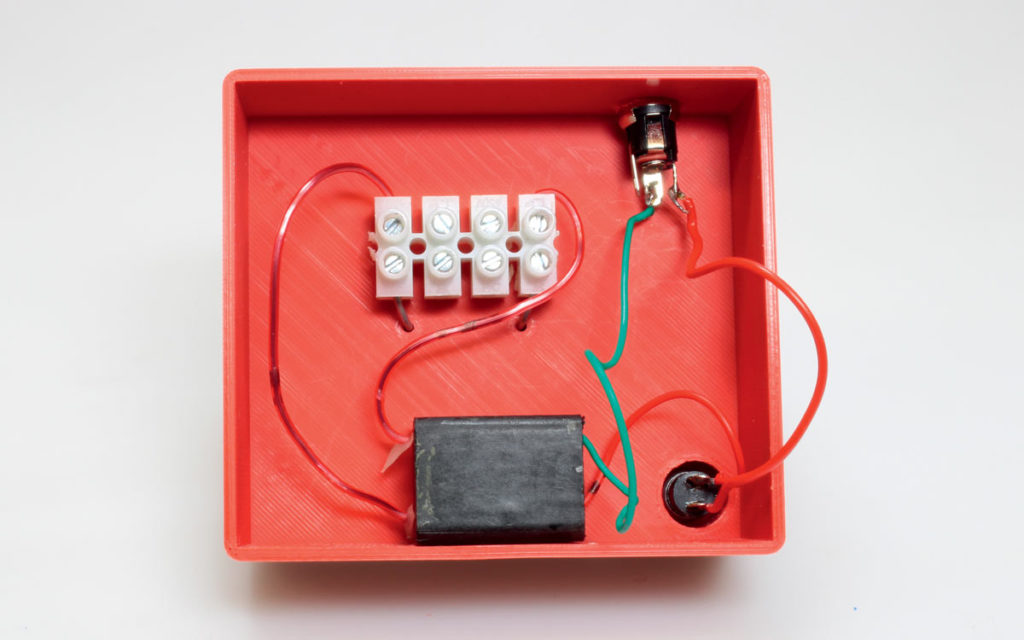
Enough theory; let’s move on to practice. For starters, a word of warning: the Jacob’s ladder requires high voltage. The voltage boosting module we use can supply up to 20 kilovolts! Use great caution when working on this project — avoid any contact with the voltage. Don’t build this project if you wear implants such as pacemakers, insulin pumps, or similar. This build is not safe for children, either.

The parts are cheap. Including the power supply (power brick or LiFePo batteries), you’ll need maybe $20 worth of materials. The build can be completed in about an hour. If you’re going to 3D print your own case, this will take longer (around 6 hours), but it’s not necessary. In principle, you can use any enclosure made from non-conducting materials. You may need to get creative figuring out how to attach the terminals and the glass hood.

Project Steps

Make your enclosure

3D files for printing the enclosure can be downloaded at thingiverse.com/thing:3182601 for the battery version, or github.com/Make-Magazin/Jakobsleiterchen for our power brick version. The top of the enclosure should face the print bed. Print with 20 percent infill and supports added.

Figure B

The enclosure contains a ring-shaped socket that fits the opening of a small empty jam jar turned upside down (Figure B). This jar will serve as a protective hood, keeping onlookers safe from the high voltage. It also provides a draft shield for the ladder: because the rising motion of the arc is caused primarily by its own heat, it’s sensitive to air currents.

Wire the circuit

For the ladder electrodes, the only suitable material is solid wire. The original build by Matthias uses 0.8mm silver-coated copper wire. I’ve used 1mm zinc-coated steel wire, which is harder to bend to shape, but this also makes it more rugged against accidental bends. Start with two pieces about 8cm long; you’ll trim them later. We recommend attaching these electrodes to your circuit using ordinary screw terminal strips; heavy wire is hard to solder securely, and zinc-coated wire is impossible.

Secure the high voltage boost module and the terminal strips inside the enclosure using some glue, making sure there’s still enough room for the battery holder if you’re using batteries.

Figure C

Wiring it up is easy (Figure C). The red wire from the high-voltage boost module is positive (+), the green one is negative (–). Connect the red wire via the pushbutton to the positive (+) output of the power supply. Connect the green wire directly to the negative (–) output of the power supply. The two wires on the opposite end of the boost module conduct the high voltage; connect these to your ladder electrodes via the terminal strips.

Figure D

For the power supply, you can use two AA-size LiFePo cells (3.2V each) in a suitable holder, plus a matching charger. (Note that regular Li-Ion batteries can’t be used here, as their output voltage is too high.) The cheapest solution is to use a power brick (5 volts, minimum 4 amps, Figure D). If you’re going for the latter, use our modified 3D printing file for the enclosure that has an opening to fit a power jack for the brick.

NOTE: In Matthias’ build, there’s also an option to power the device using four plain alkaline batteries, but we couldn’t get this option to work; the current delivered by the batteries was too low.

Bend and cut the ladder

Once you’ve completed the assembly, it’s time to bend the ladder electrodes into the proper shape. At the base, the gap should be about 4mm to 7mm wide. The electrodes should reach up to a height of about 4cm. At the top, make the gap about 2.5cm wide.

Test and adjust

You can now connect the power supply and start the ladder by pushing the button. Observe the spark gap. You probably won’t get the desired effect right away. In that case, you need to adjust the electrodes by bending them.

DANGER: HIGH VOLTAGE! Always disconnect the device from the power supply before touching the electrodes! (Should you accidentally push the start button, your body may act as the resistive load instead!)When using a power brick, it’s not safe to just unplug it from the wall socket. The capacitors inside the power brick retain enough energy for at least one more ignition of the arc! Instead, always unplug the output side of the power brick from the connector jack on the Jacob’s ladder.

Here’s how to adjust the electrodes depending on what you’re seeing:

  • If there’s no spark at all, the bottom gap is too small.
  • If the ladder ignites but the arc fails to travel upward, instead dancing around the base where the gap is smallest, make sure the electrodes are the same shape and height.
  • If the arc travels up but doesn’t break down (extinguish), the top gap is too small.

Don’t despair if your Jacob’s ladder turns out to be stubborn. We have ways to deal with this! The effect works best if the electrode wires are completely smooth. Try cleaning them, or scrubbing them with very fine steel wool. Rubbing them with the tip of a soft pencil lead (graphite) can also improve the effect.

Magnetic motivator

Magnetic motivator

Figure E

Under some conditions of temperature and humidity, the arc will simply refuse to move, as the heat it produces is insufficient. So we’ll take advantage of the fact that it also generates its own magnetic field: we can use an external magnetic field to make it budge! Placing a small permanent magnet underneath the electrodes (south pole facing up) will literally push the arc away, setting it in motion. Since this works so well, we also provide a modified 3D print file that’s got a recess for fitting a small neodymium magnet (8mm diameter, 5mm high). Glue the magnet in place (Figure E) to keep it from sticking to steel wires.

Sweet Baby Jacob!

Your mini Jacob’s ladder is now ready for use. Before you go wild, note that it’s not made for permanent operation: the high voltage generator will begin to overheat after about 1 minute of continuous use, which will shorten its lifespan considerably.

The arc also produces some ozone (O₃) and nitrogen dioxide (NO₂), which can be very hazardous, particularly if allowed to accumulate. We strongly recommend that you operate the ladder only with the glass hood mounted, and ventilate the room after use. Have fun!