
The kazoo falls into a category of musical instrument that I would describe as “very easy to make noise, deceptively hard to sound good.” All you have to do to make a kazoo do its thing is to hum into it! But in order to play in tune, you have to hum in tune. In other words — you have to be able to sing well.
I recently watched my 2-year-old figure out how to get one buzzing and thought to myself: “Given the ubiquity and accessibility of this little plastic instrument, how could I make it easier to sound good?” And then I thought: “Well, how do we make it easier for singers to sound good?” Autotune. In 2024, we use autotune!
Now, when I say “autotune,” what I really mean is real-time pitch correction. Auto-Tune is a proprietary software audio plugin developed by the company Antares. It is a specific implementation of real-time pitch correction, which means it is an algorithm that takes sound as its input, analyzes that sound to determine the most prominent frequency within it, and then modulates that sound to make the detected frequency match one of the frequencies in a given musical scale. In other words, it constantly moves the pitch of an instrument or vocal track up or down so that it’s never out of tune.
So I embarked (and eventually succeeded!) on a quest to create a kazoo with “autotune” built in. In my YouTube video I demonstrate each of the kazoo’s features (sometimes in an embarrassing fashion) and tell the complete story of how I arrived at the current design. I wanted it to look, play, and sound like a normal kazoo as much as possible, which meant no visible wires or obvious modifications.
Here’s what I ended up with:

The kazoo
I searched “jumbo kazoo” on Google and bought the first thing that popped up. It ended up being a pack of these Chochkees brand 8" kazoos from Amazon. I knew that, at least for the first prototype, I would want as much room as possible to fit the electronics inside. The size didn’t end up being too ridiculous so I never swapped it out.
The microcontroller
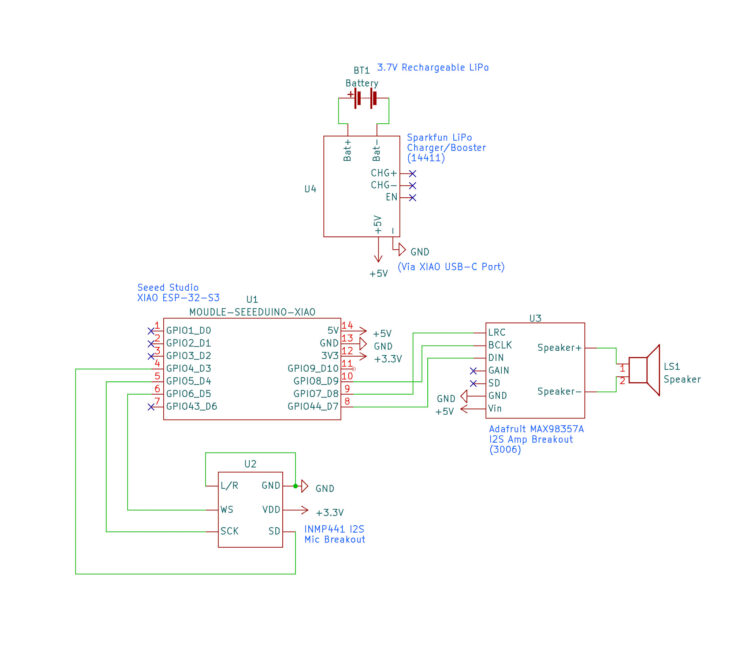
I knew I’d need something small and fast, since I would be piping audio in, processing it, and then piping it back out in almost real-time. I reached for the Seeed Studio Xiao ESP32-S3 because it’s super small, supports I2S for audio I/O, and can be clocked at 240MHz! As a bonus, it has built-in support for Bluetooth Low Energy, which I was able to leverage for some extra functionality — more on that later.
Speaker and amplifier
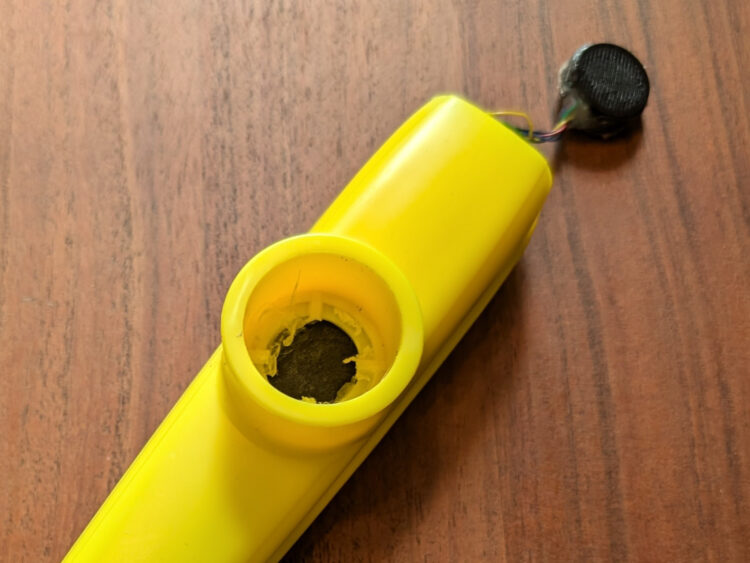
I ended up using one of these mini oval speakers and a MAX98357-based I2S amplifier from Adafruit. Both were perfectly sized to slide inside the mouth of the kazoo. I ripped out the kazoo’s buzzy plastic membrane (in the circular port at the top) and hot-glued the speaker in its place.
Battery and charger
I used a cylindrical 2200mAh lithium ion battery that I found on Adafruit. I ran that through SparkFun’s LiPo Charger/Booster board, which provides a steady 5V to power both the amplifier and microcontroller. It has a built-in on-off switch and Micro USB port for charging, both very handy for this project.
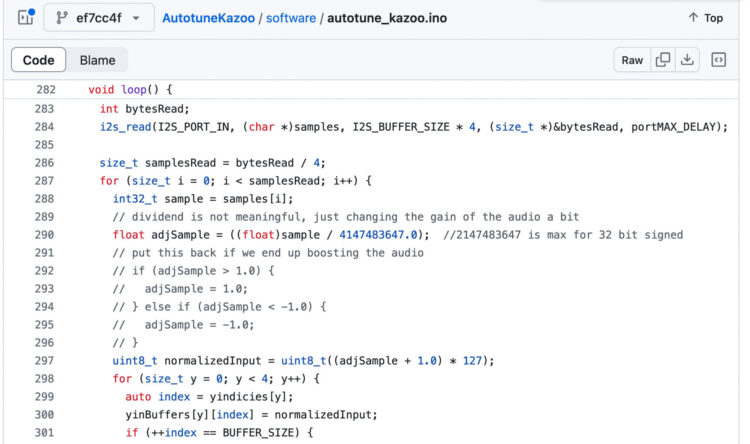
Pitch correction algorithm
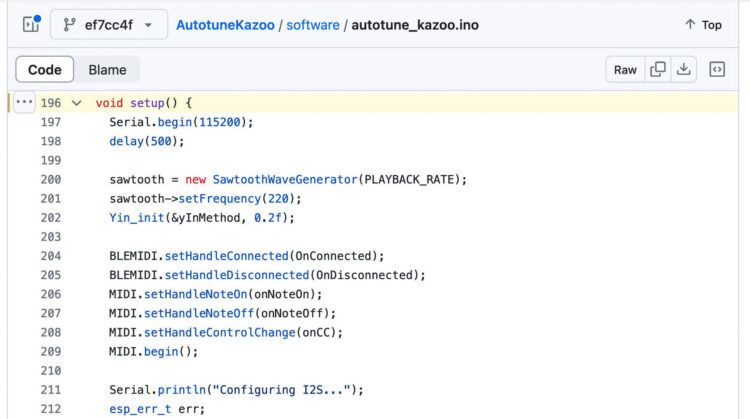
I used an implementation of the Yin algorithm for fundamental frequency estimation. I’m going to be honest — I don’t understand how it works under the hood! I didn’t even really try to, because it worked so well right out of the box. It seems to be both fast and accurate.
For pitch correction, I made slight tweaks to RobSmithDev’s implementation which was originally written to run on the (considerably less powerful!) Arduino Uno. But the Yin algorithm can only determine the frequency of what’s being played, not the frequency of the note that should be played. I added an additional step to the algorithm that takes the output of Yin and selects a desired frequency based on a set musical scale.
The microphone
This was the part of the project I spent the most time getting right, and it ultimately defined how the entire thing came together. After some false starts with analog electret microphones, I ended up using a cheap, generic INMP441 breakout module. At first it might seem like a bad choice — the INMP441 is an omnidirectional MEMS microphone, which means that it is designed to be relatively sensitive and pick up sound from all around. I needed it to pick up sound from my mouth and only my mouth, from a very short distance. In fact, I realized that the only way I was going to be able to isolate the sound of my humming completely from the speaker output and resonant kazoo body was to completely eliminate the distance between mouth and microphone — I decided to literally put the microphone inside my mouth!
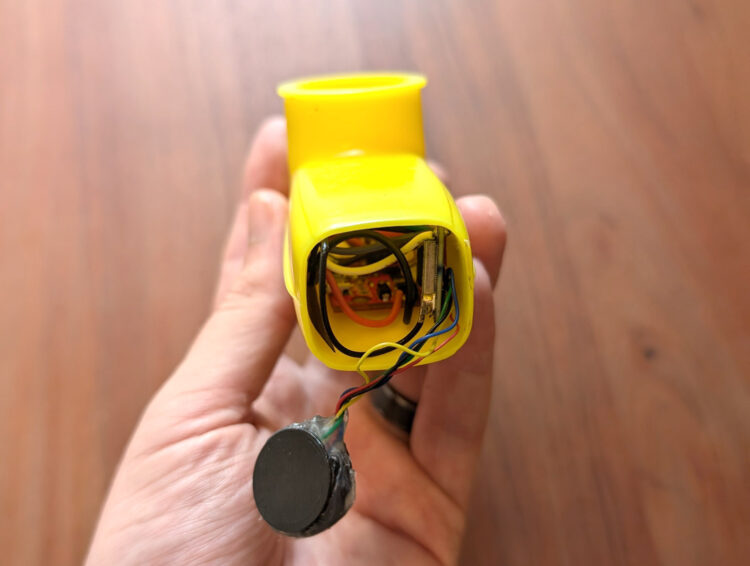
To make this possible, I wrapped the INMP441 in soft foam to dampen the sound a bit, and then I 3D printed an enclosure to go around that to keep my drool out. Note that I am using PETG and hot glue for the enclosure but I don’t recommend putting either of those things in your mouth.

The trick
It turns out that if you stick a microphone in your mouth, run the sound through some pitch correction, and then out through a tiny speaker embedded within a kazoo … it doesn’t really sound like a kazoo anymore! So instead of using the actual audio from the microphone, the speaker actually emits a synthesized sawtooth wave playing at the frequency provided by the pitch-correction algorithm. A sawtooth waveform is very easy to generate and, frankly, sounds exactly like a perfectly played kazoo!
This solution was tough for me to swallow at first — it felt like cheating. The sound wasn’t really my voice! But I realized that I had tried it the “hard” way and it was just … worse. From a player/listener standpoint, the synthesized version sounded more like a kazoo, and it was way easier to control. It’s sometimes hard as an engineer to sacrifice technical “purity,” even when it doesn’t benefit your project in any way — especially when you share your work broadly. But ultimately, you can’t let the opinions of those who’ll fuss about how something is made prevent you from making something.
The bonus
Bluetooth! I mentioned earlier that the ESP32-S3 has built-in BLE support. Since my “Autotune Kazoo” project eventually morphed into a “voice controlled synthesizer” project, I decided to take full advantage. I added code to allow the kazoo to send MIDI note messages based on the output of the Yin algorithm. These are sent over BLE to a host computer and can be used to control any software synthesizer or sampler!
And the connection runs in the opposite direction as well — you can send MIDI notes out from your digital audio workstation and play them through the kazoo’s internal synth. It’s pretty hilarious to set the kazoo down and have it appear to play itself.

Build Your Autotune Kazoo