A couple of years ago, I decided to concentrate my design research on devices that would be useful to poor families in developing countries — easy-to-make tools that address a specific need without disrupting the local economy, culture, or environment.

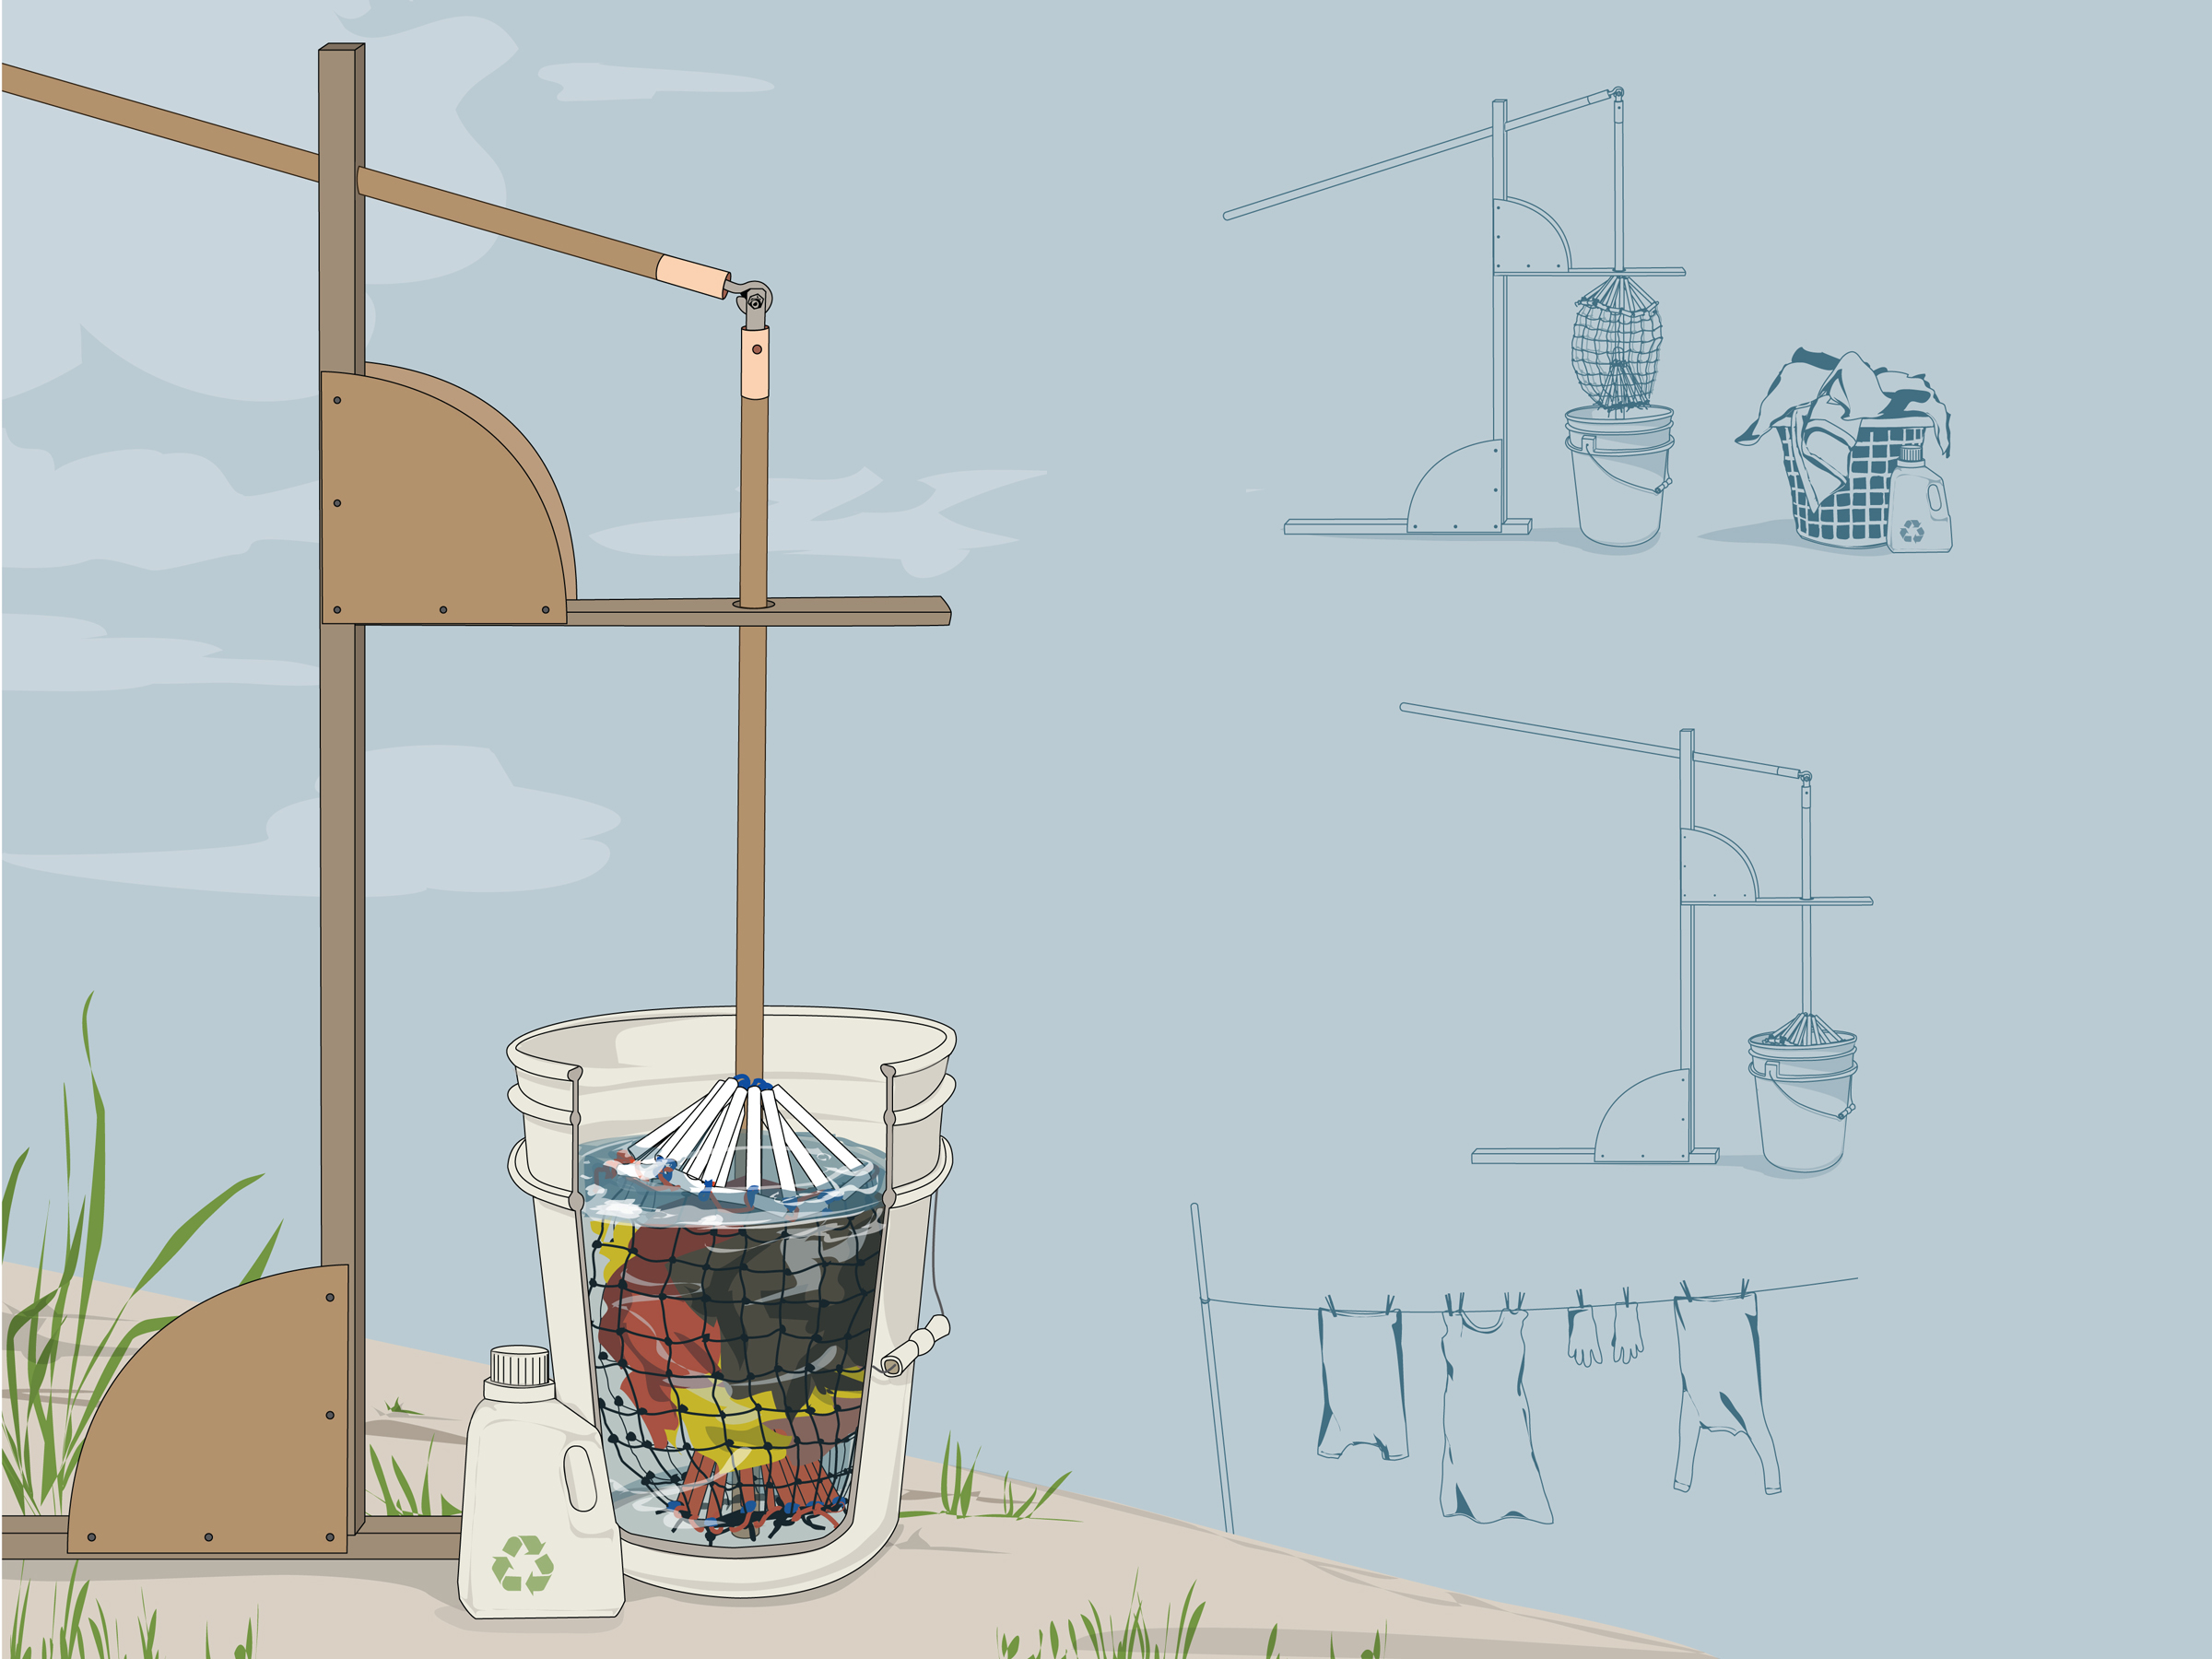
Here’s one of my designs: a manual clothes washer that does a load of laundry in about 20 minutes using no power other than muscle. It’s portable, so you can carry or wheel it to a water source, and if you wash with biodegradable soap, the wash water can easily go to a garden afterward.

They’re now using the washer in Hyanja, Nepal, where I collaborated on designing a localized version. It’s also a neat design if you’re living off the grid by choice in an industrialized area, or just conserving water and power.

Inciting Agitation

The washer consists of 3 main components: a container, a net bag, and a lever-driven shaft mechanism held in place by a simple wooden frame.

The key component is the net bag, which is designed to hold, squeeze, and agitate the clothes. The middle of the net bag is a wide, open cylinder of flexible mesh netting. End-capping the cylinder above and below are semi-rigid cones made from short plastic pipes strung together with rope.

Both cones point upward, so the bottom cone sticks up through the clothes and prevents them from balling together.

While the washer is in operation, the top cone holds fast while the bottom cone is pulled up and down by the shaft, carrying the clothes with it.

Each pump of the lever handle pulls the clothes up out of the water, squeezes them out between the nested cones, and releases them back down. The lever’s 40" length provides mechanical advantage for easy operation.

These instructions show how to build a bare-bones device for less than $50 using materials from any home supply store. You can modify the design to suit available materials and your skill level. A machine of this size can handle only small loads up to 5lbs, but the ones we made in Nepal were larger, and I think that one could be made 2 or 3 times larger and would still be easy to operate. I also built a fancier, wooden version that’s towable, with wheels and a barrel-style container.

Project Steps

Part I - Make the wooden frame.

Saw the 1×3 lumber into one 40″ length and two 20″ lengths.

About 1″ from one end of the 40″ board, drill 2 overlapping 1½” holes and rasp the edges to create a 2″×1½” oval. Bevel and sand the hole on both sides of the board. This is your vertical support.

In one of the 20″ lengths, drill a centered 1½” hole 8″ from one end; this is the top horizontal plate. To help tie it to the wash bucket (optional), cut notches as shown: 1″ from the end nearest the hole, use a rasp or drill bit to make 2 notches ½” wide, one in each edge of the board. Make 2 more notches 4″ from the opposite end of the board, so that the hole is centered between the pairs of notches. The plain 20″ board is the base plate.

Saw the plywood into four 8″×8″ pieces. Cut each piece into a ¼ circle shape (or a right isosceles triangle) with two 8″ sides at right angles. Sand the edges smooth. These are your gussets.

Part II - Make the wooden frame.

Butt the 20″ base plate at a right angle against the bottom of the vertical support (the end without the hole). Drill two 1″ pilot holes, then glue the 2 pieces together and fasten with deck screws.

Butt the top horizontal plate at a right angle against the vertical support, facing opposite the base plate, 17″ from the bottom and with the notched end away from the support. Drill 2 more 1″ pilot holes, then glue and fasten with deck screws.

With ¾” screws, screw and glue the gussets at each right angle, one on each side, to reinforce the joints. The top gussets should stand up, not hang down.

Part I - Make the drive shaft and handle.

Secure the 1″ dowel in a vise. Draw 2 lines on the end, ½” apart and equidistant from the center point. With a handsaw, cut notches along these lines 1¾” deep into the dowel, leaving a gap between the 2 notches of at least 2″. Use a regular handsaw rather than a thinner hacksaw, because you want notches about 1″ wide, to accommodate the aluminum pieces.

About 3″ up from the dowel’s opposite end, drill a ¼” hole perpendicular through the center of the dowel, at any angle relative to the notches. This will be used to attach the bottom cone to the shaft.

Now take the tool handle, which will be the handle of the machine. Drill a ¼” hole vertically into the bottom (tool end), as deep as the screw eye shaft is long.

Fit one of the copper connectors over the drilled end of the handle; you may need to sand it a bit. The copper should fit easily but snugly onto the wood. It will act as a ferrule, to keep the screw eye from splitting the wood.

To make the aluminum brackets, cut the 1″×¾” aluminum bar into two 3″ lengths. Drill a 7″ hole through both pieces, centered ½” from one end. Drill them stacked together, so that the holes line up precisely.

Part II - Make the drive shaft and handle.

Put the other copper connector over the end of the dowel with the notches. Insert the aluminum brackets into the notches, hole ends out. Use a mallet or block of hardwood to carefully and evenly tap the brackets into the notches until only about 1½” of bracket sticks out from the dowel. This should expand the wood against the copper ferrule enough to make it snug. If not, you can secure the brackets more by covering the joint with epoxy or by drilling a hole through the ferrule and brackets and securing them with a screw or small bolt.

Screw the screw eye into the hole in the end of the tool handle until the center of the eye is about 1″ from the wood.

To attach the handle to the shaft, fit the nut in the middle of the screw eye to act as a bushing, then put the eye between the 2 aluminum brackets and attach them with the ¼” bolt, using washers on the outside surfaces of both brackets sandwiched between nuts at each end. Tighten the end nuts to keep the joint together, but not so much that they impede movement.

Part I - Assemble the cones.

Cut the PEX tubing into 32 pieces 6″ long and 32 pieces 1½” long. Each cone, top and bottom, uses 16 of each. I used a PEX cutter, but a utility knife will also work.

Part II - Assemble the cones.

Thread 16 of the short pieces of PEX tubing onto the ¼” braided poly rope, then pull the rope through until it runs about 18″ beyond the chain of tubes.

Pull a loop of rope from between the first two threaded pieces of PEX and shove it through one of the 6″ tubes. Feed this extra loop from the long end of the rope, maintaining the 18″ tail at the other end.

Use a cable tie or thin rope to bind off the loop, leaving about ¼”–½” of the loop above the tube.

Repeat the second and third bullet points in Part II – Assemble the cones. (above) with 15 more 6″ tubes, placing a long tube between the short tubes.

Part III - Assemble the cones.

Cut the rope, leaving about an 18″–24″ tail, and thread the ends of the rope back around through all the short tubes again to close the circle. Tie the ends together in a tight square knot, and trim them.

Cable-tie or bind every other joint around the ring.

Thread a length of parachute cord or thin strong rope through all the loops and draw them together to form a cone.

Repeat all the bullet points in Part II and Part III – Assemble the cones. to make a second cone.

Part I - Attach the cones to the drive shaft.

On the first cone, tighten the cord running through the loops and tie it so that the top hole is just large enough for the drive shaft to slide through smoothly. Hang the cone just under the wood frame’s top horizontal plate by tying short lengths of cord to each side of the 1½” hole. The cone (actually, more of a frustum) should hang centered under the hole.

Use parachute cord to lash one long edge of the 12″×30″ netting to the bottom of the cone. When you’ve completed the circle, tie the ends of the cord securely and use cable ties to reinforce the connection.

Slide the handle through the oval hole in the vertical plate and insert the shaft down through the hole in the top plate and the top of the cone, so that it hangs inside the netting.

Part II - Attach the cones to the drive shaft.

Take the second cone and, using the cord threaded through the loops, tie it around the shaft. Thread the ends of cord through the ¼” hole in the shaft.

Weave the ends of the cord back around through the loops, to help keep them arrayed evenly around the shaft. Finish by tying securely.

Lash the bottom of the net to the bottom cone and tie the ends securely. Reinforce the connection with cable ties.

Part III - Attach the cones to the drive shaft.

Drill four 1″ holes 90° apart through the sleeve of the ¾” PVC socket flange. Push the flange over the bottom of the shaft and into the bottom cone. Secure the flange to the dowel with #6 stainless steel screws through the 1″ holes, then cable-tie the flange’s 4 large holes to 4 of the long PEX tubes in the cone, spaced around evenly. This will stabilize the cone and keep it from turning sideways during agitation.

That’s it — you’re done!

Wash time!

To use the washer, load clothes into the opening on the side of the net. Where possible, hook them through the top row of holes in the net, to keep them all from bunching at the bottom.

To close the bag, tie a 24″–30″ cord to the bottom of the net near the opening, and lash the opening shut, tying with a loop knot at the top.

The machine is easiest to operate from a seated position, with one foot on the base to stabilize it. Lower the bag and cones into the container filled with water and soap or detergent, then pump the handle to agitate the clothes until they’re clean, usually about 15 minutes.

You may want to experiment with using both hands for greater action. Switch to a bucket of rinse water and pump until clothes are free of soap.

Finally, untie and “unzip” the bag cord, remove the clothes, and hang them to dry.

Conclusion

This project first appeared in MAKE Volume 18, page 60.