Every chemist (and arguably every scientist, and arguably everyone else in the world), whether amateur or professional, should have an elements collection. Theodore Gray has written eloquently about the hows and wherefores of collecting the chemical elements, so I won’t belabor the point here other than to say: chemistry has been called the central science, and arguably, chemistry’s greatest achievement has been the discovery of the chemical elements, the realization of the periodicity of their properties and its implications for atomic structure, and the isolation of each of those elements in its pure or “standard” state. Collecting the individual elements lets you participate in that incredible story in a way that no amount of book-learnin’ ever will.

When I first started collecting elements six years ago, as an undergraduate chemist, I stuffed them into vials in a shoebox on the top shelf of my closet. As my collection grew, I began to consider the problem of properly storing and displaying them. It’s an ongoing problem for any element collector. Many elements, in their standard states, are rare, reactive, radioactive, or some combination of the three. I don’t claim to have solved all the problems associated with collecting the elements, and would be the first to admit that there are some elements my collection will almost certainly never contain. But what I have learned is this: generally speaking, smaller is better. Smaller element samples are cheaper, and in the case of reactive or radioactive elements, less hazardous. I very much admire Theo Gray’s Periodic Table Table, but for my purposes, it’s much too big to be practical.

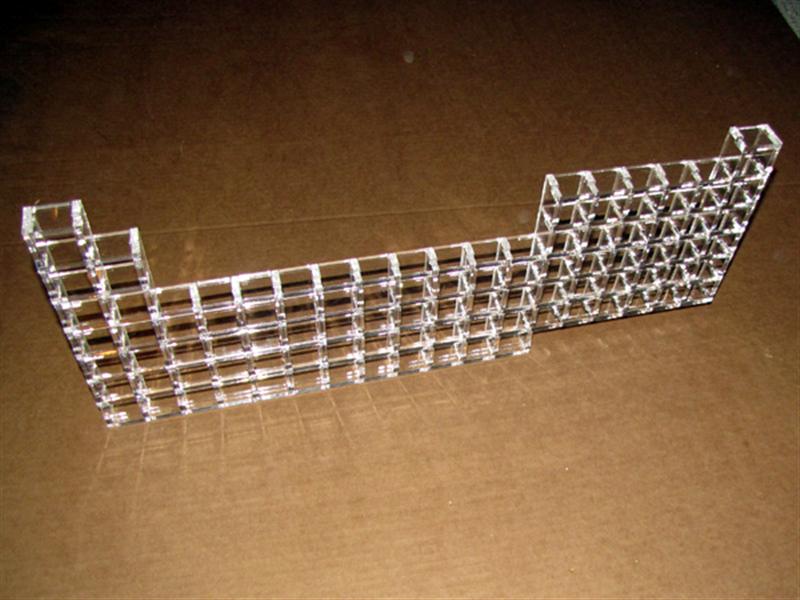
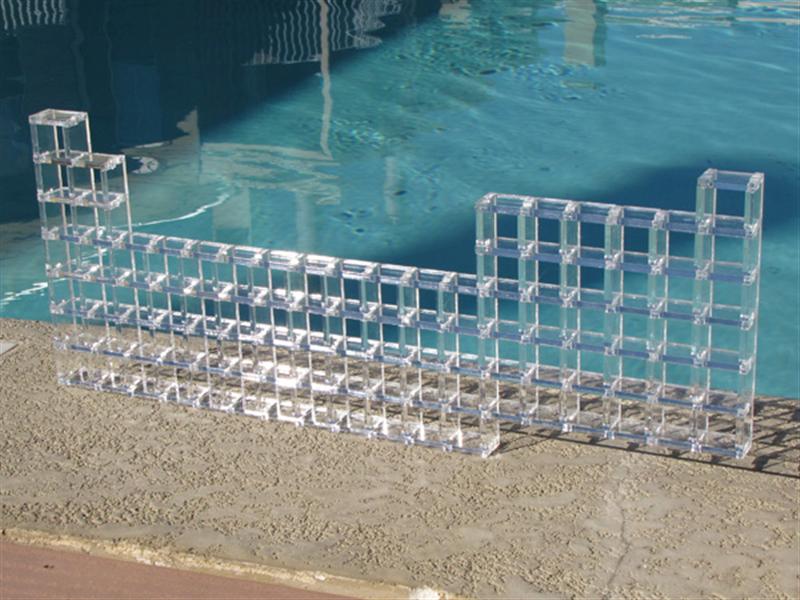
About two years ago, it first occurred to me that what I wanted to display my elements was something like a spice rack, but in the shape of the periodic table. I looked around online for a suitable commercial product and couldn’t find one at a reasonable price that met my expectations. So I decided to build my own. This article is about how I did it. The finished cabinet measures 24×9.5×1.1″, but I think when I do it again, I’ll make it only 3/4″ thick (see below).

Now, some of you may protest that this project amounts to “1. Have a bunch of parts laser cut. 2. Glue them together.” A fair criticism. But this is just a prototype really, and there are lots of ways to skin a cat. If you don’t have access to and/or don’t want to pay for laser-cutting services, there are other ways to make these parts, and I’ve provided the plans and critical dimensions. If you have the tools and the skills, for instance, it would be straightforward to make the pieces from wood, and I’ve included some thoughts on how it might be done below. And, as always, if you have suggestions about how to do this cheaper or better, by all means leave me a comment.

Project Steps

Cut the parts

I designed the parts plan to produce the largest possible cabinet from a 24×12″ sheet of material, which is a common upper size limit for commercial laser-cutting services. You can download the original parts plan in DXF format from Thingiverse and laser-cut them yourself. The prototype, however, has persuaded me that the 1.1″ depth of the pieces is excessive. A 3/4″ depth would work just as well or better, and it would use less material and less laser time. So I’ve also provided a modified version of the original plan with 3/4″ deep pieces.

I did not allow for laser kerf when I designed the parts plans. When the pieces first arrived, I was a bit annoyed because they slotted together more loosely than I liked. I assumed at first that this was due to the kerf, but some measurements with the micrometer revealed that, in fact, the nominally 0.25″ thick acrylic I’d ordered was in fact closer to 0.230″. Compared to this discrepancy, the laser kerf of 0.002″ was really insignificant. But I resolved to go ahead and build it anyway, and in the final analysis the looser-fitting pieces worked out well. The finished cabinet is quite solid.

I flirted with the idea of making the pieces from wood, using the method illustrated in the second picture. Starting with a piece of 1″ hardwood stock, first rout a series of 19 equally-spaced 1/4″ grooves across the grain. I was imagining building a jig to insure precise spacing of these grooves. Then rip the grooved blank off in 1/4″ thick slices, as shown. Finally, cut off the resulting slices into appropriate lengths: 4×18 units, 1×12 units, 2×7 units, 6×6 units, 4×5 units, 9×4 units, 2×2 units, and 2×1 unit. Remember that each piece needs an “open” slot at each end to form the corner.

Prepare parts for gluing

My laser-cut acrylic came with the protective covering still applied. This needs to be removed before gluing. It is not difficult to peel off with the fingers.

Test assembly

I decided, purely for aesthetic reasons, that I wanted the finished cabinet, when viewed from the front, to have the horizontal halves of the slotted members in front. I also realized that, when gluing the joints together, it was easier to apply glue to the shorter, vertical members and slot them into place that to attempt gluing in the long horizontal pieces. The upshot of both these facts is that the table needs to be assembled upside down, as shown, with the noble gases to the left and the alkali metals to the right.

So assemble the pieces as shown, without glue, on a flat surface you won’t mind spilling a spot of glue on when the time comes.

Square up corner

As I said, there was a bit of wiggle in my pieces when they slot together, which creates the possibility of “rack” in the finished cabinet. So after dry assembly, take a moment to check one corner of the cabinet against a square. It only has to be “eyeball” square, so I used the nearest handy 90-degree corner. A real carpenter’s or machinist’s square is naturally a better choice.

Glue and assemble

Here’s the tricky part. Proceeding from one side to the other, lift out each vertical piece and apply a spot of cement to the bottom of each of its slots. I used the tip of the glue tube for this at first, but found it provided inadequate control–it was way too easy to squirt too much glue onto the thing. So I switched to Q-tips, which work OK as long as you don’t use the same one for very long–otherwise they tended to leave fibers in the glue. A toothpick turned out to be just the thing.

Once the glue is applied, carefully slot the piece back in place. You may want to use a coin or other marker that you can move along to mark your progress. During the long stretch of the d-block, it’s especially easy to lose track of where you are and accidentally remove a piece you’ve already glued. Stop periodically and make sure the top and bottom horizontal pieces are fully seated into the “open” slots at the ends of the vertical members.

Once all the pieces have been glued in place, leave the assembly overnight to allow the cement to set up. When dry, the bond is incredibly strong.

Mount on wall

The finished cabinet measures 24″ across, so even if your studs are on 24″ centers (which is unusual), you should be able to get a pair of anchors into the studs that will hold it. Figure out where you want it to hang, then use your studfinder to locate the nearest convenient studs. Hold the cabinet up to the wall with one hand and position it level, across the studs, and then mark two drill holes, over the studs, immediately underneath the cabinet. Make sure they both are aligned “between columns” so that the vertical ends of the hooks will not block any of the openings in the cabinet.

Drill into the studs where you’ve marked. Using your fingers at first, and then switching to a pair of pliers once the threads start to bite into the wood, screw the hooks into the wall. Once the threads have vanished into the wall, set the cabinet in place. Then use the pliers to turn the hooks down as far as the depth of the cabinet permits, aligning them vertically with the last turn.

Conclusion

The openings in the finished cabinet are 1.0625" square, which is the perfect size to accept the small lucite magnifying boxes, shown above, commonly used to display insect and mineral specimens. These are pricey--you're doing well if you can pay less than $1 apiece--but look absolutely great. They can be sealed with acrylic cement or, as I prefer, with a loop of scotch tape around the edge. If you want to go this route, I recommend making the 3/4" deep cabinet instead of the 1.1" deep cabinet shown here. The bug boxes are only about 7/8" deep and they can be difficult to remove from the deeper cabinet.

This cabinet only includes s, p, and d-blocks. Eventually I'm going to design a separate f-block cabinet for the lanthanides and actinides, which I will post on Thingiverse. Unless somebody else beats me to it!