I’m always on the lookout for those teachable moments. Inspiration struck me when my 5-year-old asked for help in keeping his little brother from sneaking into his room. I spotted the perfect time to teach him about inputs, outputs, and programming. Learning is easier when the lesson centers on solving a personal problem.
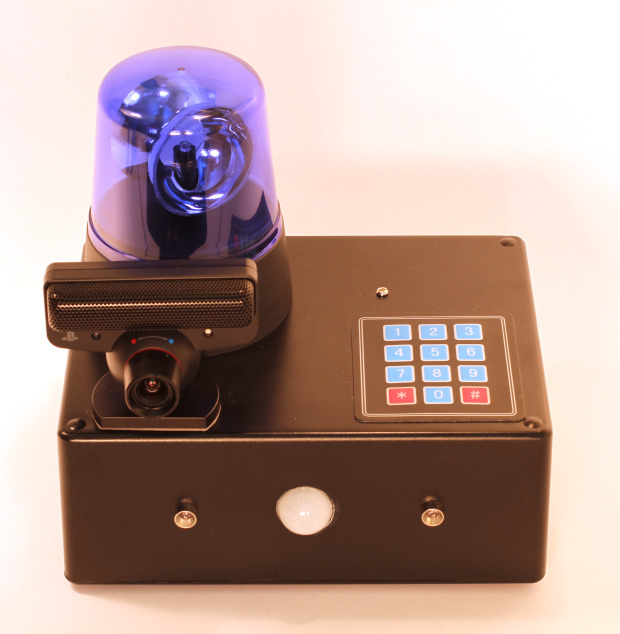
I could have built a simple alarm system any number of different ways, but I knew that I wanted the system to be an all-in-one unit for versatility beyond my son’s original request. I chose the Raspberry Pi as the controller because it is easy to connect to the internet, it can play MP3 files, it interfaces with USB peripherals like cameras, and it has general purpose inputs and outputs for connecting to simple electronic components like buttons, sensors, and lights.
My alarm system’s code, which you can view on GitHub, is rather simple. To take advantage of Linux’s multithreading, I split the tasks between two Python scripts. One python script (keypadd.py) monitors the keypad for valid codes. Upon boot, the system is set up as “disarmed”. Anytime the arm/disarm code is detected, it toggles the status of the system by flipping a byte in a text file called “armed.txt”.
The second Python script (alarmd.py) monitors the passive infrared sensor via the Raspberry Pi’s GPIO. If motion is detected, it checks the armed.txt file to see if the system is armed. If the system is armed when motion is detected, the alarm is sounded.
I built this alarm system to fit my own needs. Following are the step-by-step instructions for building one like mine. When you build yours, be sure to customize it to fit your own needs, maybe by adding a laser tripwire or a cellular radio.
Project Steps
Setup Raspberry Pi
Setting up a Raspberry Pi from scratch is beyond the scope of this project, but fear not, help awaits. You can find web tutorials but I recommend you read the book “Getting Started With Raspberry Pi” by Matt Richardson and Shawn Wallace. This book will help you not just with the PiLarm project, it will also help you discover the capabilities of the Raspberry Pi, so you can combine its various powers into your own new and interesting creations.
Install GPIO
This library will let you control the Pi’s GPIO pins to use the passive infrared sensor and the keypad as inputs and use the revolving light as an output. Use the following three terminal commands to install it:
sudo apt-get update sudo apt-get install python-dev sudo apt-get install python-rpi.gpio
Install fswebcam
If you are using a third party webcam like the Playstation Eye, fswebcam will let you use it to take still photos. If you use the raspberry Pi camera, look at their instructions for installation instead. Use the command:
sudo apt-get install fswebcam
You can take a picture manually with the command:
fswebcam -r 640×480 -d /dev/video0 testpicture.jpg
Then use the “ls” command to see if your picture appeared in the working directory.
Install mgp123
mpg123 is a command line audio player that alarmd.py uses to play audio files such as, “System armed,” and “Motion detected. Please enter passcode.”
sudo apt-get install mpg123
Add PiLarm Code
Now add the code that I created to perform the PiLarm functions. It is located at:
https://github.com/BabyWrassler/PiLarm
sudo apt-get install git-core
And then use the “clone” command to download it to your Pi:
git clone https://github.com/BabyWrassler/PiLarm.git
You’ll now have a directory called PiLarm containing the python files and audio files for the PiLarm.
python /home/pi/Alarm/keypadd.py & python /home/pi/Alarm/alarmd.py &
Setup Twitter
Set up an “App” to get a Twitter API key: https://dev.twitter.com/apps/new
Solder Up Perma-Proto
The Perma-Proto from Adafruit is great because it comes with a connector for the Pi’s GPIO. The pins are labeled on the board by the connector, which makes connecting things easy.
Full System Test
You may be eager to get things into a box and finish the project, but you should test the components before mounting them in a cramped enclosure that will make troubleshooting difficult.
Mount in Enclosure
Most alarm systems are installed as permanent fixtures, but I designed this one to be portable for added versatility and ease of repurposing. I chose the smallest box that would fit everything.
Share, Inspire Others
Congratulations on finishing! Send us pictures or video of your completed project. Let us know how you customized the design to suit different needs. Show your project to some folks whom you think might be inspired to become makers themselves.