Halloween is a big deal at our house and every year it gets bigger! For better than a decade, we’ve been the scariest, noisiest, and spookiest house in town. Over the years, our haunt has evolved from a few pneumatic-powered zombie props on the front lawn to ghostly AV displays and multiple rolling, radio-controlled animated props trolling for victims up and down the street.

This project appears in Make: Vol. 74. Subscribe today for more great project delivered right to your mailbox.

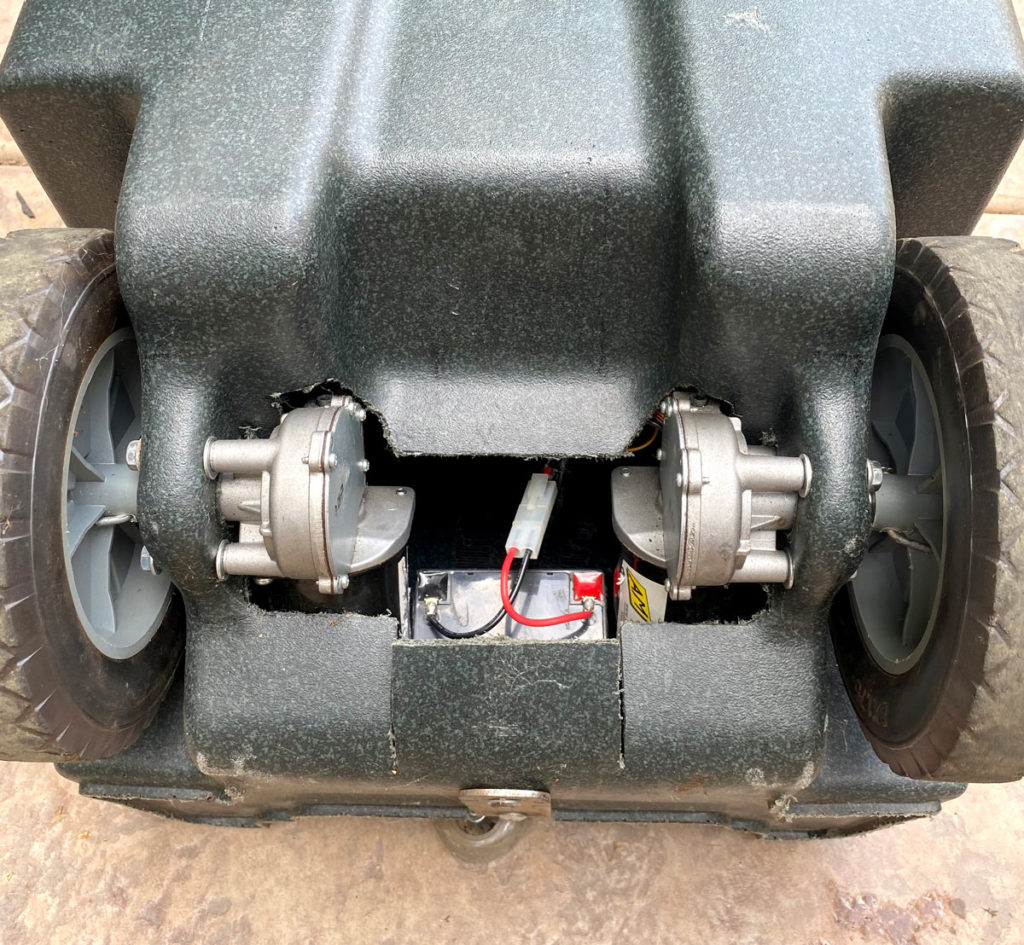
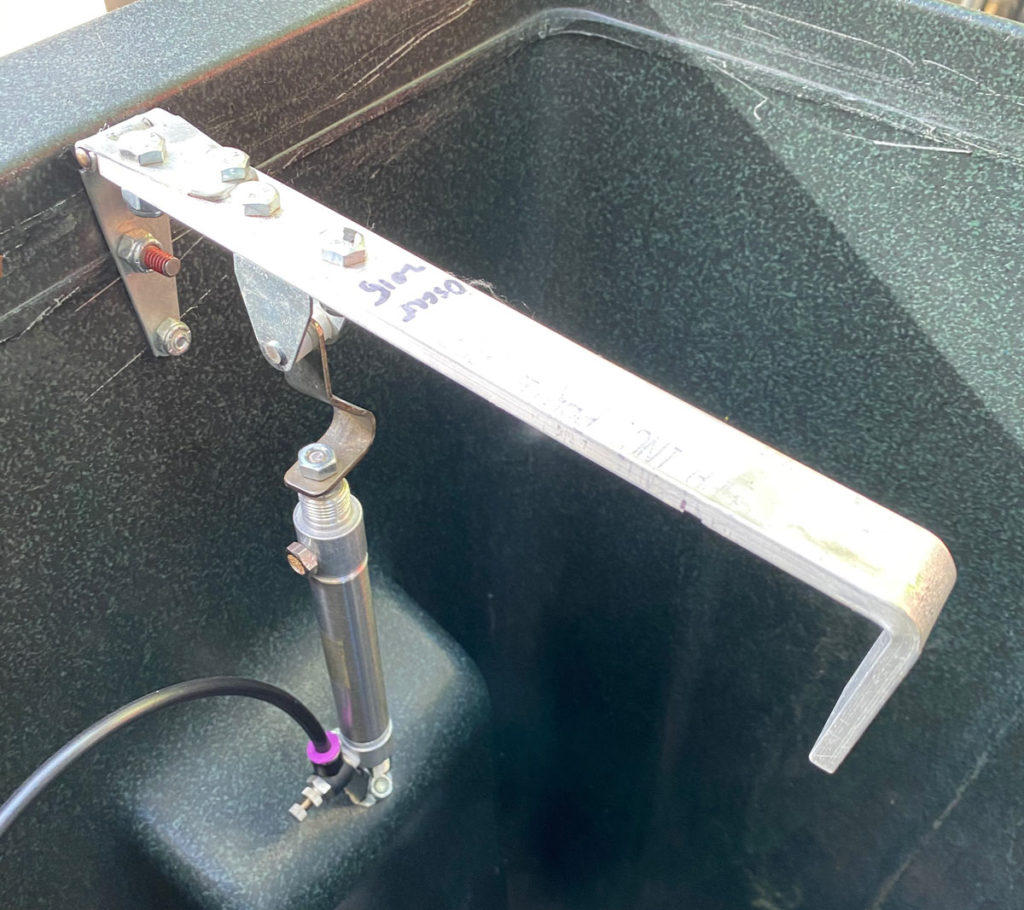
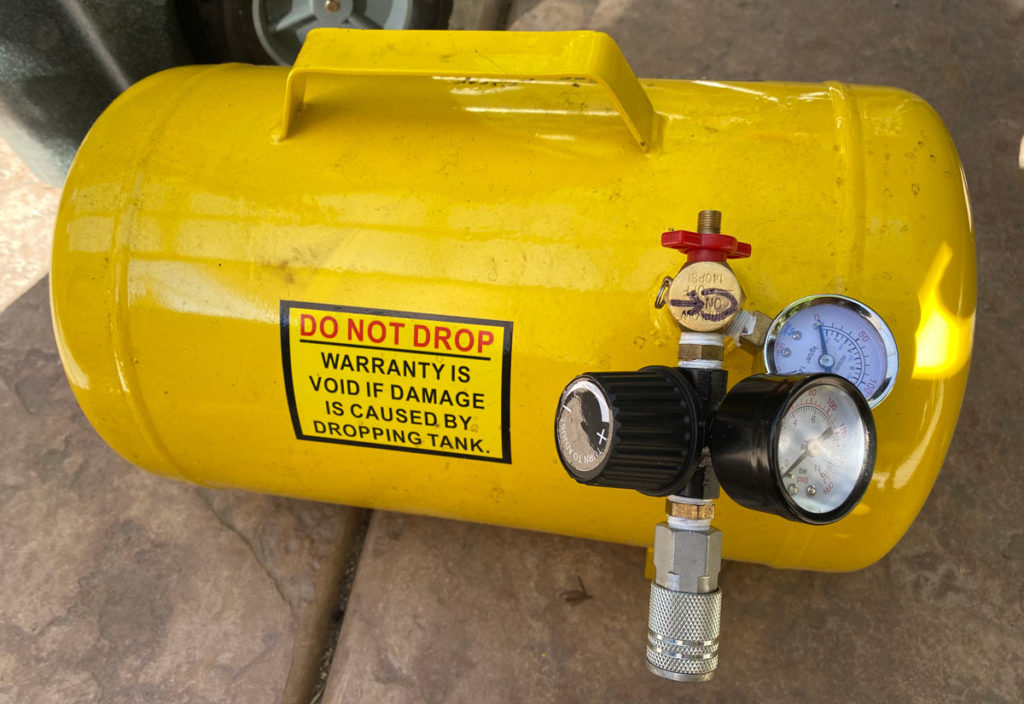
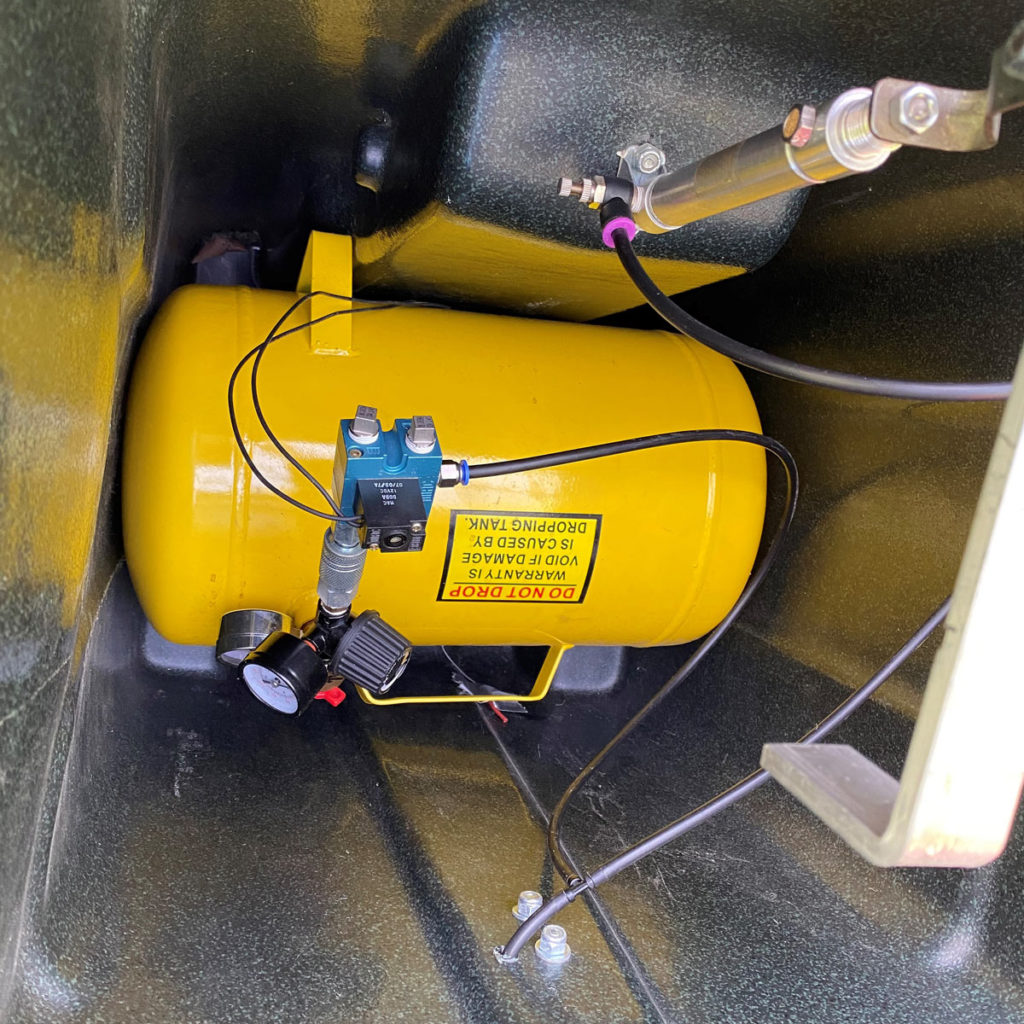
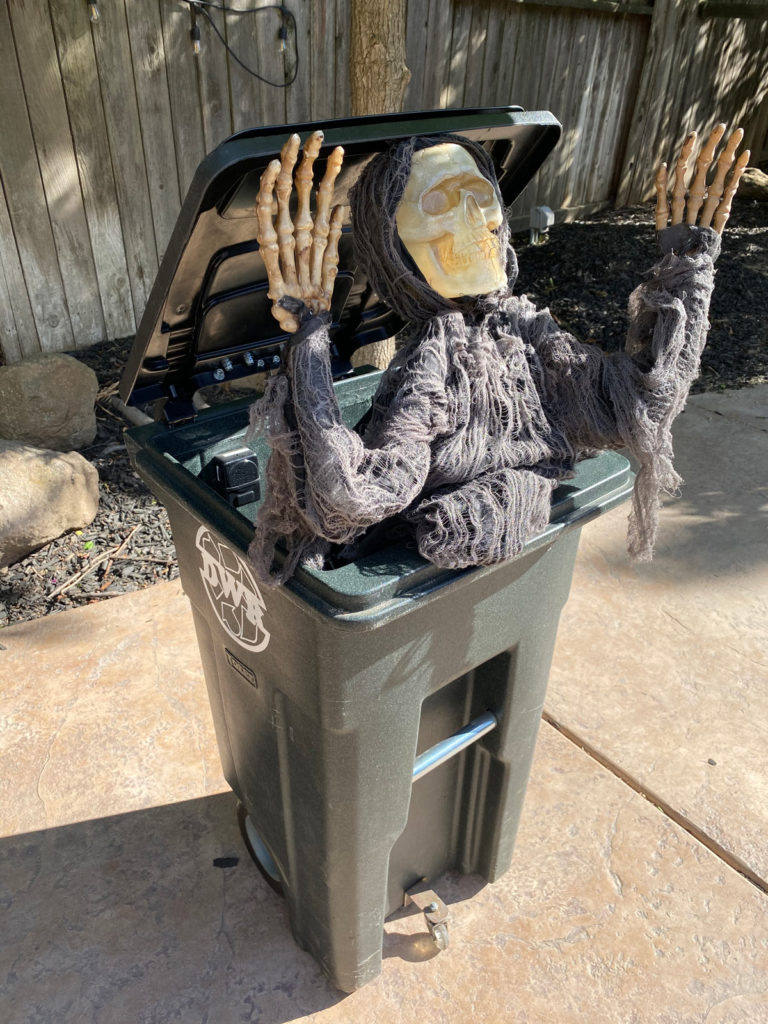
One of our all-time favorites is a mechanized device we affectionately call Oscar — a radio controlled, roving flip-top garbage can with a zombie prop that pops out with startling speed on command. It’s powered by a small 12V sealed lead acid battery providing juice for the wheel motors, with a compressed air tank providing for the rapid deployment of Oscar the zombie when unsuspecting trick-or-treaters are nearby.

We often park Oscar next to the sidewalk alongside some real garbage cans and let the fun begin. Alternatively, we slowly roll up behind unsuspecting kids and their parents and let Oscar pop as they turn around. Either way, there’s plenty of dropped candy at the end of the night. We were fortunate to share Oscar and our other props with our local maker community at the 2018 Maker Faire Bay Area and it was nonstop fun all three days.

Oscar’s “screaming success” comes from its ability to easily move from place to place, its initial benign appearance, and its very quick compressed air mechanism. It’s a higher-tech update of the classic “Trash Can Trauma” prop, and a worthwhile build if you’re looking for the ultimate Halloween prop this year.

Scary Driver

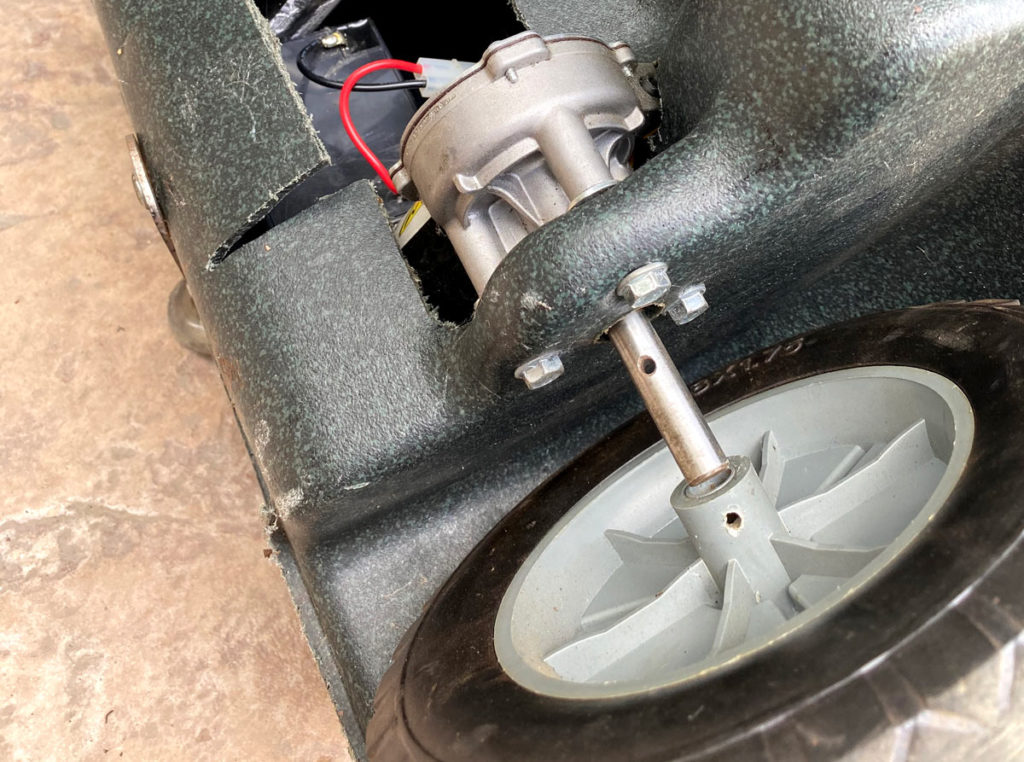
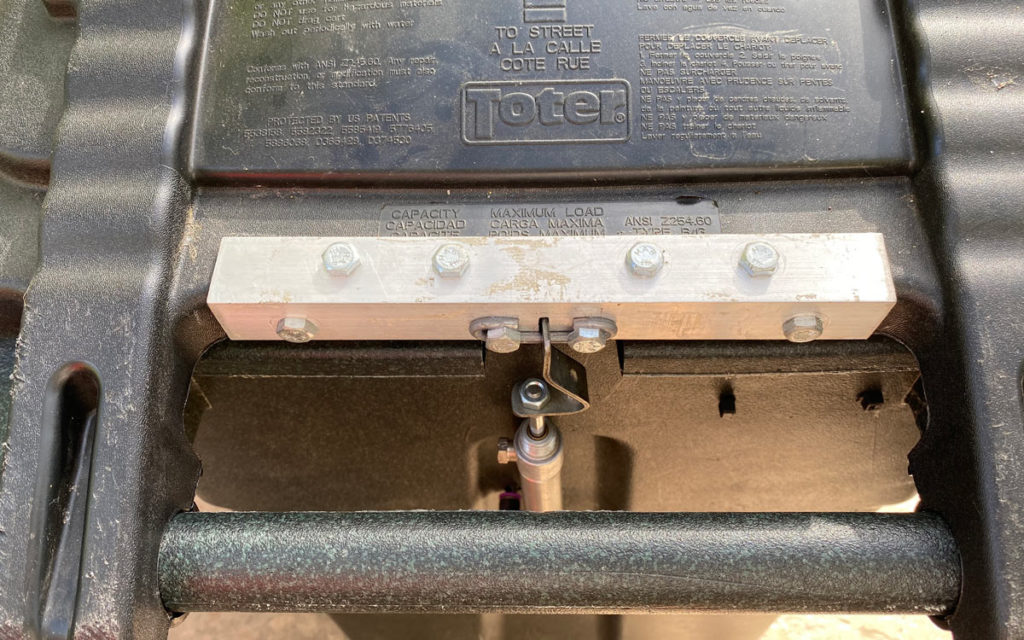
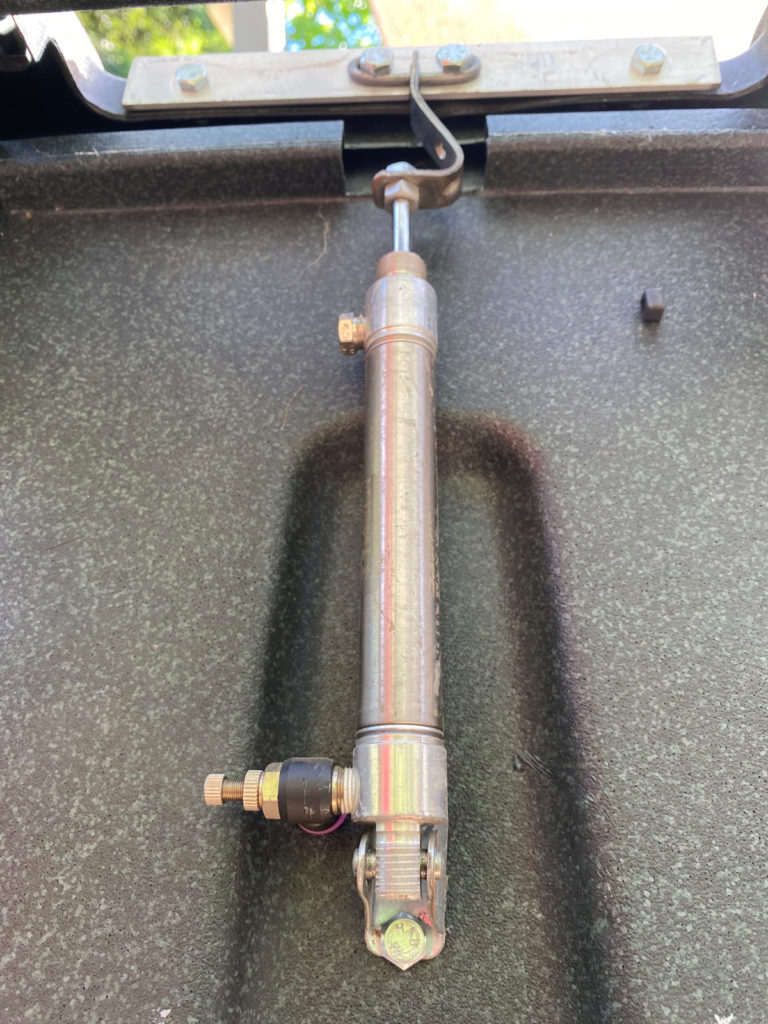
Oscar is made up of an electrical component that uses a 12V battery to power two electric motors for mobility of the garbage can, and a mechanical component that uses compressed air to power two air cylinders. One cylinder opens the garbage can’s lid and the other deploys the zombie or scare prop of your choice.

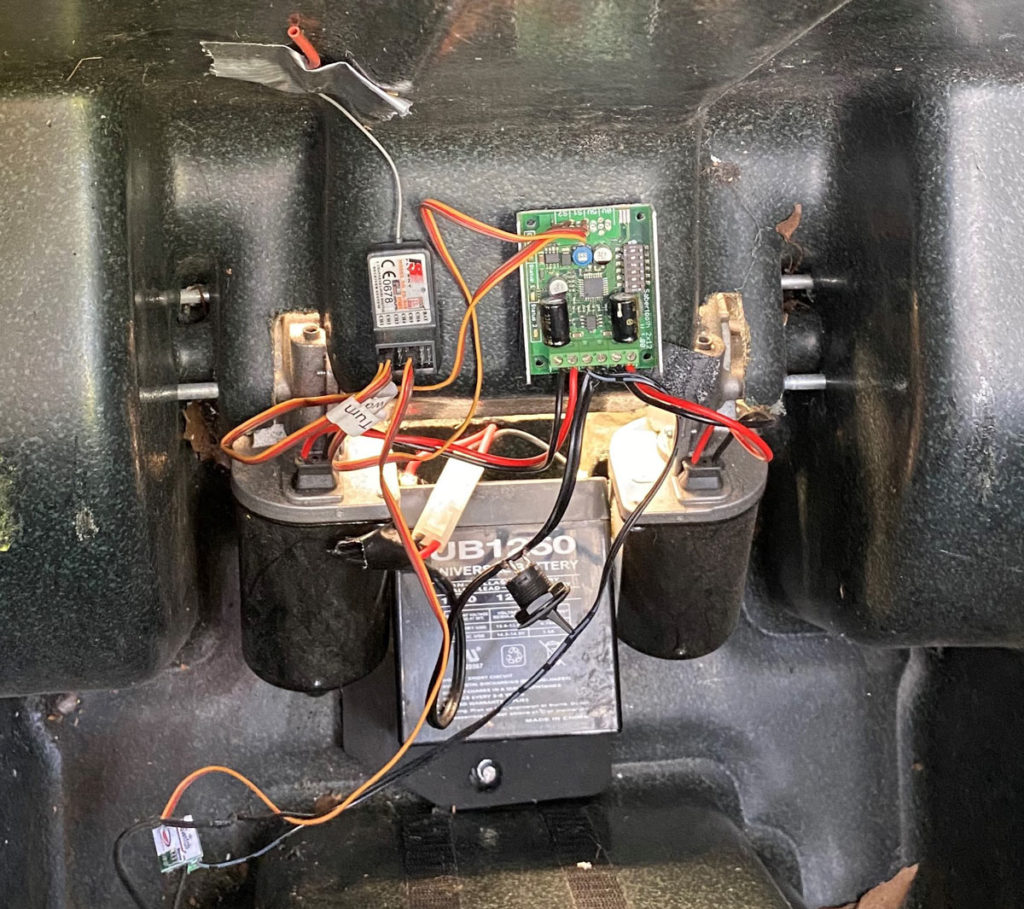
Both electrical and mechanical components are remote controlled via a hobby R/C transmitter and receiver. The motors are driven via a dual motor driver board which plugs into the R/C receiver. The compressed air is released in short bursts via a 12V solenoid air valve to activate the zombie and lid. This valve is controlled by a relay switch, which also plugs into the R/C receiver.

Although I refer to specific materials and methods, please use this tutorial only as a guideline. You may already have some of the necessary materials lying around in the garage, or you may have specialized skills like 3D printing, machining, and welding; adjust your build accordingly. The most expensive components are the motors which can set you back about $120 each if bought new. However, less expensive windshield wiper or car seat motors would work as long as they spin about 100rpm and their shafts are at least 2½” long to allow for wheel mounting. Of course, motor and wheel mounting will vary.

Project Steps

Mount the motors and wheels

Remove the plastic wheels and steel axle from the Toter garbage can, and store them for other projects. The plastic wheels don’t provide enough traction for this project and are more difficult to mount on the motor shafts. Besides, what maker couldn’t find some other use for an extra couple of wheels and a solid steel rod?

Figure A

Using a keyhole saw or reciprocating saw, cut a window with a flap on the bottom rear of the garbage can (Figure A) for installing the motors and accessing the electronics.

The specified drive motors have 3 equally spaced mounting holes that you’ll use to bolt them to the thick plastic surrounding the garbage can’s axle holes. To drill matching holes on the can, first measure the center-to-center distance between two of the holes in the motor. On a piece of cardboard, draw an equilateral triangle with sides measuring this same distance and cut out a triangular hole. Center this triangular hole over the can’s original axle holes and use a Sharpie to mark the three corners. These marks are where you’ll drill holes; position them so that the body of the motors will end up lying somewhat against the bottom of the garbage can when mounted. Drill holes for each of the bolts at the three marks.

Push the motor shafts through the axle holes and secure each motor with three M6×40mm bolts with 1.0 thread (or whatever bolts fit your specific motors).

The drive motors have long shafts onto which each wheel can be mounted. Push a wheel onto each shaft and test-fit so that there’s about a ¼” gap between the wheel and the garbage can wall; this allows for some sagging of the axles under load, otherwise the wheels will rub against the can. Using a 1/8″ bit, drill through the plastic wheel collar (on the inside surface of the wheel). Continue until the bit begins to mark the surface of the steel motor shaft, then stop. Repeat this process on the other wheel.

Remove both wheels and motors to finish drilling through the hard steel shaft. Clamp the motor shaft in a sturdy vise with your drill mark facing directly upward. Use the center punch to make a dimple at your mark, then carefully drill a 1/8″ hole entirely through the shaft. Use cutting oil or a little WD-40 when drilling through metal to keep the bit cool and sharp. Repeat this process for the other shaft.

Figure B

Use the 1/8″ bit to complete the drilling process through both wheel collars by drilling a hole opposite to the first hole drilled into the wheel collars. Reattach motors to the garbage can using the bolts; these may be tightened or loosened a bit to make the motor shafts horizontal on both sides. Slide the wheels onto each shaft, align the holes on the wheel collars and motor shafts, and use cotter pins or nails to secure the wheels (Figure B).

Figure C

Cut and finish the steel strap for the caster wheel, using your hacksaw/angle grinder and file. Drill appropriately sized holes in the strap (again using cutting oil) and garbage can. Bend the strap using the bench vise and hammer in a Z shape as shown, so that the garbage can travels relatively upright when the caster wheel is mounted. Install the front caster wheel and fasten the steel strap using nuts and bolts (Figure C).

Connect the electrical components

Connect the positive and negative leads of each motor to the appropriate motor driver terminals. Solder the inline switch in series to the positive (+) lead of the 12V quick-connector and then connect it to the appropriate motor driver battery terminals. Plug the R/C leads of the motor driver into the R/C receiver unit, following the driver’s instructions.

Figure D

Mount the motor driver and R/C receiver against the inside wall or near the floor of the garbage can using double-sided foam tape (Figure D). Mount as low as possible, avoiding contact with the compressed air tank, battery, or other components. Mount the receiver antenna along one of the side walls of the can using double sided tape or duct tape. The battery should fit between the mounted motors on the floor of the garbage can; you can use stick-on hook-and-loop fasteners to secure it. Solder a quick-connector to the battery leads.

Plug the R/C relay switch into the receiver. Using low-voltage connection wire, connect one terminal of the R/C switch to the positive lead of the battery (for ease, you may connect to the positive battery lead at the motor driver terminal). Connect the other terminal of the R/C switch to one of the 12V solenoid leads. To complete this circuit, connect the other solenoid lead back to the negative (–) terminal of the battery (or again connect at the motor driver terminal for ease). Now the solenoid will open the air valve when the R/C relay switch is activated (closed).

Double-check all connections. Make sure the transmitter has a fresh battery. Turn on the transmitter, connect the battery quick-connectors, and turn on the inline battery switch. On a two-stick R/C transmitter, the left stick should now control left, right, forward, and backward movement of the prop. You should also be able to hear the R/C relay switch and solenoid respond to their corresponding channel switch or stick movement on the R/C transmitter. When it’s all working, turn everything off and go to the next step.

Install air cylinders and zombie mechanism

Figure E

Create the lid bracket using an 8″×1″ aluminum angle or similar, as shown in Figure E. Drill evenly spaced holes for the bolts. I used ¼” bolts and nuts because I had a few lying around; #10 size or similar would work just as well. The lid bracket hinge was created with 10 gauge wire bent around two of the bolts, and a repurposed 2″ shelf bracket which was drilled and bent; you can copy this or improvise your own hinge.

Figure F

The air cylinder for the lid is attached to the outside rear wall of the trash can using a special “pivot mount” bracket, which can be purchased with the cylinder or created using a flat piece of steel and bent/drilled appropriately. Position the cylinder so the piston rod is fully retracted when the lid is fully closed. Use a utility knife to carefully cut a notch into the garbage can lip to allow clearance for the air cylinder push rod and bracket (Figure F).

Figure G

Create the zombie mounting arm using a length of aluminum or wood about 8″–10″ long depending on zombie size, and a small strap hinge (Figure G). I bent the end of the arm to prevent the zombie from flying off when fastened with zip ties, but this isn’t necessary if you’re using duct tape. The air cylinder pivot on the mounting arm was created using a cylinder bracket with a bolt serving as a hinge pin. The cylinder attaches to this hinge pin using another 2″ shelf bracket bent and drilled appropriately. Attach the zombie cylinder inside the garbage can so that the piston rod is fully retracted when the mounting arm is fully lowered.

Connect the compressed air components

essed air components

Figure H

Remove the short air hose that’s attached to the 5gal tank. Using the Teflon thread seal tape to prevent leaks, install the air regulator with gauge to the compressed air tank and install the female quick-connect coupler to the air regulator (Figure H).

On the solenoid valve’s inlet port, install the male end of the coupler using the ¼” to 1/8″ NPT reducer. On the outlet port, install a push-in connector. If your valve has extra outlet ports, use screw-in plugs. A silencer may be used on the exhaust port of the valve if desired.

On each air cylinder, install an adjustable pressure valve to the port closest to the base. Push a length of the ¼” black pressure tubing into the solenoid outlet port connector. Push two additional lengths of tubing onto each of the adjustable pressure valves, then use the T-connector to connect these 3 tubes together. You’ll have to drill a small hole through the rear of the garbage can wall in order to route the tubing to the cylinder on the back of the can.

Figure I

After filling the compressed air tank using your air compressor, carefully lower it into the garbage can and connect the solenoid valve to the air regulator using the quick-connect coupler (Figure I).

Setup and Testing

Use copious amounts of duct tape to fasten your zombie (or scary object of preference) to the zombie mounting arm. Make sure the transmitter joysticks and switches are off or in neutral. Turn the transmitter power on and then turn the 12V battery switch on (it’s good practice to turn on the transmitter before the receiver in most R/C applications).

Fully close the valves to both air cylinders and then open a half-turn initially (you’ll adjust these in a bit). Carefully open the main valve on the air tank fully. If you hear air leaks, turn the air tank valve off and slightly tighten the compressed air fittings at the tank, regulator, and solenoid valve. If the quick-connect couplers seem to be the problem, Vaseline or light grease around these couplers will usually stop the leak. If no leaks, then you’re good to go to the next step. Adjust the air regulator to about 40psi.

Stand back to test left/right/back/forward movement of the can. Refer to your specific R/C unit instructions to adjust neutral position, direction of movement, and sensitivity of the controls as needed. Be careful with fast starts, as the can may tip backward easily, especially when the 12V battery holds a fresh charge.

Flip the appropriate switch or stick on your transmitter to open the solenoid air valve. Adjust the two air cylinder valves as needed for desired opening speed. For smooth operation, the valves should be set so that the lid begins to open just a bit before the zombie is pushed upward. Once adjusted, use the lock collar on the valves to lock them in position, or simply tape them in place.

Finishing Touches

For an added audio effect, use zip ties or double sided foam tape to secure an inexpensive small motion-activated spooky sound box inside the upper inner wall of the garbage can. The sudden opening of the lid should effectively trigger this sound box.
If you have access to a Cricut machine or a laser cutter, make a decal for the side of your garbage can to match your real garbage cans. In a pinch, a paper logo affixed with double sided tape will be good enough in the relative dark of a Halloween night.
For added realism, consider hanging a banana peel, candy wrapper, or other bits of trash over the edge of the garbage can.

On Halloween Night

Two batteries should last one busy Halloween night. Fully charge both before the festivities begin, and you can make one quick battery change in the middle of the night using the cutout and flap at the bottom of the trash can. You’ll also have to refill the air tank once or twice, so have your compressor and hose ready.

Designate someone else to hand out candy at the front door while you walk around discreetly outside with the R/C transmitter. This way you can roll your prop up and down the sidewalk or street to meet your unsuspecting victims where they won’t expect a scare.

CAUTION: Tips for safe scaring

  • There’s a potential pinch point between the rear garbage can handle and the pneumatic cylinder piston rod when it deploys, so never activate the zombie when anyone is holding this handle. Also, the zombie and lid can deploy quickly depending on air pressure and valve settings so avoid popping the prop when faces or hands are nearby.
  • Avoid scaring very young kids (kids shorter than the garbage can should usually be off limits) or the very old. Your prop should only be used for good. My favorite targets are teenagers trying to look brave with their friends, or big “tough looking” guys holding a beverage or two.
  • Your prop will look like a real garbage can, so be careful of those wanting to use it as such. However, these people also make some of the best victims … Just pop the zombie before they toss the candy wrapper in the can and all is good.
  • Avoid handing your R/C controller over to others during your haunt. You will likely not get it back!

Conclusion

Until Next Time

Before storing the prop, make sure all batteries are disconnected and removed, and all pressure is released from the compressed air tank. Store the garbage can so that it doesn’t rest on the wheels, which could cause the axles to angle upward during long storage.

Have a safe, happy, and noisy Halloween!