Need to burn Arduino bootloaders onto lots of Arduinos or AVR chips? Avrdude is the perfect tool to configure and burn those things REALLY fast! Plus it’s terminal-based and easily scriptable. I’ll show you how to bend Avrdude to your will!

Project Steps

First we have to install Avrdude. This method will vary based on your operating system, as we’ll see below:

For Windows, an executable can be found here.

For Mac OSX, I recommend following the instructions here.

For Linux, your distro may have it in its repository. If you’re an Arch Linux user, it can be found in the AUR as avrdude-arduino.

As I am an Arch Linux user, my initial screenshots will be Arch-based. I’ll expand to Windows and perhaps OSX later.

Now we’re going to show you how to get to Avrdude, which also varies by operating system.

For Windows, type “cmd” in the Run dialog. Type “avrdude” into the terminal. If it installed sucessfully, it should show you a list of options.

For OSX, open Terminal and type “avrdude”. A list of options should appear

And with Linux, just open a terminal and type “avrdude” and a list will appear. Like magic.

Now we’re going to connect our AVR ISP programmer to the computer. The steps vary somewhat based on the programmer, but I will show you how to use Evil Mad Scientist’s ISP Shield 2.0 on top of an Arduino Duemilanove.

Currently, this method may not work with Arduino UNOs without some modifications. This is because of the bootloader used on the UNO.

If you feel like trying, according to this site it may work with a 10uF capacitor connected between reset and ground. Or it may work unedited, I haven’t tested it yet

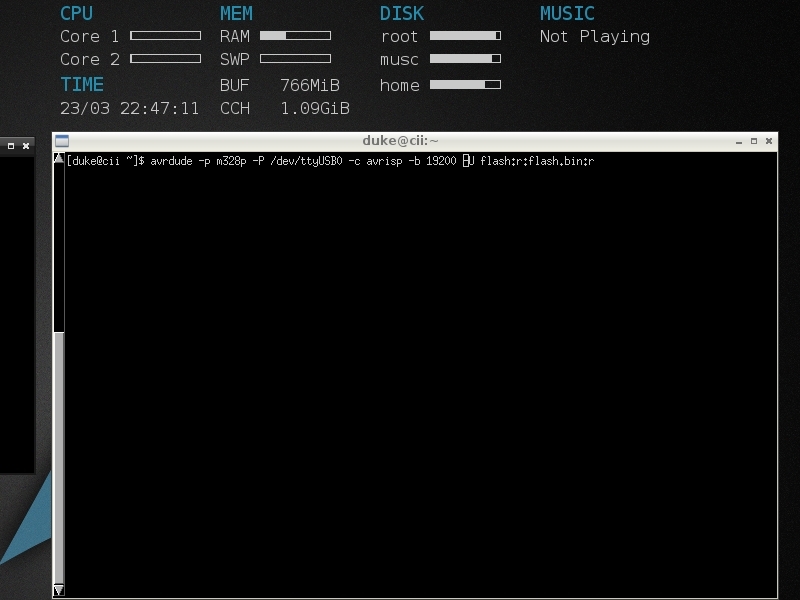
Now we’re going to invoke the Avrdude command to do something; in this case copy the flash contents of an ATmega328p chip to a file named “flash.bin” in the current directory.

In the screenshot we see the command being invoked. avrdude runs the command, while -p m328p tells Avrdude we’re programming an ATmega328p chip.

-P tells Avrdude where to look for the USB programmer. On my Linux computer, it’s at /dev/ttyUSB0.

On Windows, the command used is based on the programmer being used. If it’s USB-based, than you can put usb after -P, if it’s on a parallel port it’s probably LPT1, or if it’s serial, COM1. If you can’t find it, you can always look in Device Manager to find out.

OSX users have it tough. If you have the Arduino IDE installed, look under the serial ports option and see where your Arduino is…..

The stuff after -c is the programmer you’re using. For the ISP Shield 2.0, use avrisp. Look at the documentation on yours to find out.

Penultimately, the number after -b is the new baud rate. I could only get the ISP Shield 2.0 on a Duemilanove to work with a rate of 19200. Common baud rates also include 9600. Leave this option off and see if it works. If it doesn’t work, and you have the right programmer location, try the two above. Otherwise, Google is your friend.

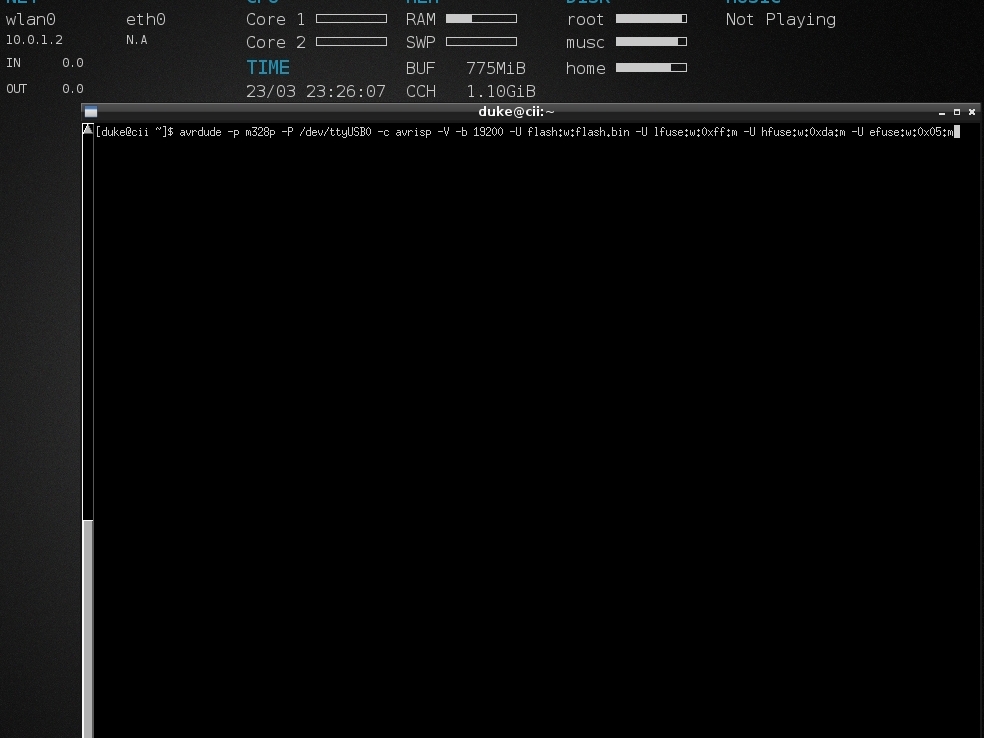
And finally -U flash:r:flash.bin:r is the command for reading the flash memory and saving it in raw format to “flash.bin”. Replacing flash:r:flash.bin:r with flash:w:flash.bin will write the contents of “flash.bin” to the chip

The last thing to worry about, once Avrdude has run succesfully, is the fuse values. These should only be trifled with if your Arduino or chip is not working. I had to change them on some blank 328p chips. The best thing to do is plug it in and test it with the Blink sketch. If it doesn’t work, then you might have to change the fuses. Proceed to the next step:

The fuses are kind of like the config values for the chip itself. They control the speed, voltage, and type of clock used in the chip. Changing these is not difficult, but it is not for the foolhardy. I burned one 328p chip with the Blink sketch, and used Avrdude to check the fuses.

Command for viewing fuses on my computer: avrdude -p m328p -P /dev/ttyUSB0 -c avrisp -b 19200 -v

In the screenshot, you can see the results of two different chips. To show the date, just replace the -U option and everything after it with -v. That will only show you info about the chip, not change it

On the top is the results from a chip that successfully runs Blink. The bottom one does not.

To change the fuses we only need to go to a calculator, like this one. Choose your chip, and enter the values of lfuse, efuse, and hfuse shown in the screenshot into the bottom of the page under “Current settings”.

It will generate new -U values which can be added to the end of your command after the -U flash:w:flash.bin. An unlimited number of -U commands can be chained. You can run Avrdude with the -v command again to verify the fuse values.

Finally, here’s the full command for copying the contents of the chip AND changing the fuse values to the correct ones:

avrdude -p m328p -P /dev/ttyUSB0 -c avrisp -V -b 19200 -U flash:w:flash.bin -U lfuse:w:0xff:m -U hfuse:w:0xda:m -U efuse:w:0x05:m

This copies the contents of “flash.bin” to the chip, and overwrites the fuses. The eagle-eyed among you will notice the addition of -V, which tells Avrdude not to verify the process, and cuts the time from 30 seconds to a shocking 2.24 seconds per chip. Use at your own risk, of course.

Finally, if you’d like additional information, or are still somewhat confused, these links may aid you: http://arduino.cc/en/Tutorial/ArduinoISP http://www.ladyada.net/learn/avr/avrdude… http://www.evilmadscientist.com/article…. http://www.ladyada.net/learn/avr/fuses.h…

Note though, that Avrdude is only really worth it if you have large numbers of chips (or boards) to burn. The Arduino software can easily do all this stuff, albeit slower and not as scriptable. But a lot easier.

Conclusion

I hope this has helped you understand the use of Avrdude for mass burning of chips. Again, this is only worthwhile if you have a large quantity, or want a scriptable method of Arduino management. Using the Arduino software is far easier for small numbers of jobs. If anything is unclear, don't hesitate to comment, and I'll see what I can do.