Getting Started with 5 Basic Hand Tools

First off, I’m going to focus on what I consider to be the five basic hand tools for working with wood. These are the fundamentals that will allow you to build most anything. Keep in mind that no one tool is right for everyone. The hammer that I love might be the one that makes your wrist sore, or my favorite saw might feel backwards. Don’t be afraid to try different tools and techniques until you find the ones that feel right and make the most sense to you.

The Hammer

Nothing says blunt force like a hunk of metal on the end of a stick. Probably the oldest tool in the book. When I first started woodworking, I remember seeing a picture of a guy with his hammer collection, it was a whole room filled with hundreds of different hammers. At the time, I couldn’t imagine needing more than one, but I feel much differently now. Within eyeshot as I type this, I can see nine hammers. Each is different and each sees (fairly) regular use. The one pictured above is easily my favorite. It’s a 375g Japanese carpenters hammer. One face is flat, for driving nails, the other is slightly convex for driving the nail below the surface. I use it for everything from driving chisels and adjusting planes to knocking joints together and closing cans. It’s my go-to hammer. The weight is right and I like its balance. If your work will require a lot of nailing, a claw hammer might be a better choice. For me, I would probably stick with this one and add a small pry bar to my collection. A tip for the claw hammer users: when doing lighter chopping, try using the side of the hammer head to drive the chisel instead of the face. It gives you more control and a larger striking area.

Chisels

Next in line is the chisel. It can be used for anything from heavy chopping to light paring or fine carving. While also known to open paint cans, turn screws, and act as a pry bar, these are not recommended uses. Seriously, use a screwdriver. A screwdriver will appreciate the attention. While there are hundreds of chisel sizes and styles, most people can get by with four. I would recommend 1/4, 1/2, 3/4, and 1″ standard bench chisels. Select ones that feel good in your hand and learn how to sharpen them. There are virtually no chisels that are ready to use right off the shelf, they all need some sharpening to get them to sing. Once you experience a truly sharp chisel, you will understand the difference, not only by what you’re able to achieve, but the ease with which you can do it. Above is a heavy patterned chisel called atsu-nomi (thick chisel) that’s used for cutting joints in large timbers. It’s part of a set made for me by master blacksmith Iyoroi and it’s one of my favorites.

Hand Planes

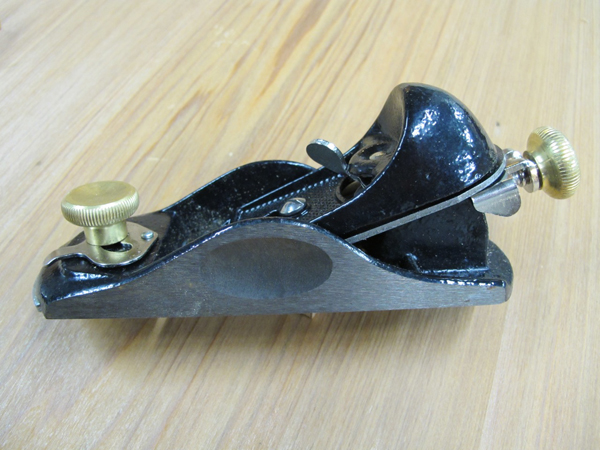
Historically, hand planes were used mostly (but not exclusively) for smoothing and adjusting the thickness of rough board (called “thicknessing”). While some still prefer to work this way, when it comes to dimensioning stock, most of the heavy work is done by machines. This doesn’t mean the hand plane is obsolete. It remains an incredibly useful tool that no woodworker should be without. A well-tuned plane can do in minutes what can take a sander an hour, and produce an arguably better surface in the process. It also allows you to work while standing in a pile of shavings instead of a cloud of dust. If I had to choose only one, it would be a low-angle block plane like the one here. Aside from being fairly easy to set up and sharpen, it can be used for everything from trimming and shaping stock to finish planing surfaces. And like chisels, they’re rarely ready to use out of the box. They should be looked at more as a kit that you have to finish before it’s ready to use. (Basic chisel and plane set up and sharpening will be covered in an upcoming post.)

Hand Saw

As with the hand plane, much of the work a saw preforms has been picked up by the powered version. Even so, the handsaw remains a useful and necessary part of a woodworker’s collection. When it comes to saws for cutting wood, there are two basic types: rip saws and crosscut saws. Rip saws are meant to cut in the direction of the grain and typically have fewer, bigger teeth. Crosscut saws are, as the name implies, for cutting across the grain. They typically have more and finer teeth in order to shear the grain and leave a cleaner cut. While combination and general purpose saws exist, they tend to be a little too aggressive for careful work. My choice of hand saw is a Japanese ryoba nokogiri (double blade saw). It has rip teeth on one side, crosscut teeth on the other, and unlike western saws, it cuts on the pull stroke. While they used to be difficult to find, you can now usually get them at home stores.

Clamps

Last on the list is the clamp. Without clamps, nearly every operation with the tools above becomes more difficult. Not only are they good for holding together the final assembly, their ability to keep things where you want them while you work is invaluable. There is little that is more frustrating than trying to work a piece of wood that keeps sliding around. A couple of clamps are essential and most woodworkers, at least once in their life, have repeated the mantra “you can never have enough clamps.” Usually while wishing they had one or two more. Two 24″ bar clamps are good. Four are better. Eight are better still…

Project Steps

Woodworking Project Layout Tools

Accurate layout work is the critical first step to a successful project. Without precise, repeatable marks, it is very difficult to get everything to come together at the end. So for this piece, I will go over some of the basic tools for measuring, marking, and transferring lines. My big three (actually four) tools for almost all of the work I do are the tape measure, a high quality 12″ combination square, and a .005 drafting pen. I also use a 4″ combination square for smaller work.

MEASURING

The three most common measuring devices you’re likely to find in a wood shop are the tape measure, folding rule, and steel rule. All three have their good and bad points. But as with all tools, find the one(s) that fit your style and make the most sense to you and the way you work.

The tape measure with its spring-steel blade rolled up into a small box is fast and can measure distances that would require a massive folding rule. On the down side, the little hook at the end of the tape can introduce inaccuracy. When new, the hook slides on rivets just enough to adjust for the thickness of the hooks metal. When measuring to the inside of something, the hook is pressed in; when on the outside, the hook is pulled out keeping the measurements accurate. This works great for a while, but over time, the holes and rivets can wear and get bigger, or worse. Far more common, the hook can be bent when the tape measure is dropped. To remedy this, most woodworkers “burn an inch.” This is where you ignore the hook and start all of your measurements from the one inch mark. This works well and gives accurate results, as long as you remember to subtract one inch from your result. Trust me, no one who uses this method hasn’t had a moment of dread after discovering something (or worse, multiple things) didn’t fit to the tune of one extra inch. So stay awake out there. When choosing a tape measure, consider the type of work you are doing. If you primarily work with material shorter than twelve feet, don’t buy a twenty five foot tape. Those last thirteen feet will never see daylight and the extra mass is heavy and cumbersome.


The folding rule overcomes the hook problem by having a fixed metal cap at the end of its wooden rule. This makes for worry free use, especially when measuring against something. It also has a nifty little sliding rule built into the end to measure depths and interior distances. On the downside, the thickness of the wooden blade means it must be laid on its edge to get accurate results and the way it folds creates a stair step shape that can make it awkward to use over distances.

The steel rule is a nice balance between the folders consistency and the tape measure’s small size, but its limitations are obvious. They are great for smaller work but once you get beyond the six inch mark, one of the above will have to take over.

Honorable mention goes to the story pole or story stick. This is usually a long piece of wood that one puts their own marks on for transferring measurements. This can be more reliable because it gets rid of all of those pesky numbers, and every distance is as marked. Story poles are especially useful when measuring larger projects with multiple components (like a kitchen or library) or when needing to transfer the same dimension over many parts. It helps eliminate measuring mistakes.

SQUARES

For layout work, a square’s primary function is to draw lines 90º perpendicular to a side. As always, there are a few types available but what sets them apart is what else they do. For me, a combination square is the most useful. Not only does it give me 90º and the occasional 45º, it also transfers measurements from one piece to another, finds the true center of a board, and checks depths and helps set up tools. It’s hard to imagine woodworking without it. Definitely spend up when buying one. Get the best one you can afford. A loose, out of square or hard to move blade creates more frustration than it’s worth.

The speed square is handy as well but is more suited to carpentry. I find the deeply stamped numbers to make for jaggy lines so I use it mostly for rough layout and marking. The sashigane is the standard square for Japanese joinery. It looks like a western framing square but has a much thinner, flexible blade. And also like the framing square, it is covered in mysterious, oddly spaced numbers and strange markings that when in the right hands can be used to figure and lay out some pretty complicated joints. Since I have yet to decipher one, those hands are not mine.

MARKING

When it comes to making lines, thin, sharp, and readable are key. If a line is too thick or fuzzy (carpenters pencil) it’s easy to get lost as to where to cut or measure. Over the years, I’ve worked through a series of marking implements from #2 pencils (sharpen too much) to mechanical pencils (lead breaks too much) to knives (sharpening/lines can be hard to see) and even tried working with a bamboo pen for a while (never got the hang of it), but my favorite remains the .005 drafting pen. It leaves dark clear and very thin lines. I still use the others on occasion, pencil for rough layout and for places I might need to erase. Knives for when I need to cut to a super exact line. But for most situations the pen is king. Whatever you use, remember to mark a line only once. Multiple strokes not only darken it but make it wider and fuzzier and less accurate.

From the front: traditional ink line, modern ink line, chalk line

SNAP LINES:

If you need to mark a straight line over a long distance, a snap line is the tool. A snap line is basically a reel of string that’s pulled through pigment and then, wait for it… snapped on a surface to make a line. The standard carpenters version has a string with a small hook that is pulled through a reservoir of (usually) blue chalk. To use it, you hook the string at one end of a board, pull the box to the other, stretch it taught and give it a snap. This leaves a reasonably good line for rough cutting. The downside is that this line tends to be wide, fuzzy, and that can be wiped or blown away, often by the tool that is trying to follow it. The Japanese ink line follows the same principal but a couple of differences. Instead of chalk, it uses ink for pigment, and it has a much thinner line with a pin instead of a hook. This allows for a very fine, dark, and accurate line that can’t be blown or brushed away. It also leaves that same ink on your fingers and everything else the string touches, so proceed with caution. Both kinds take a little practice to get the tension right and to keep the line from bouncing or snapping curved lines. They also have several different colors and permanence of chalk/ink available.

MARKING GAUGE

Last up is the marking gauge. Functionally, it’s like a combination of the adjustable square and a marking knife. While the shapes and styles available are endless, they are basically a bar with a blade or a pin in the end, attached to an adjustable fence. These are especially handy when transferring the same layout lines to multiple pieces and marking lines parallel to curved edges. They are quick and, if you keep them sharp, accurate and leave clean precise lines.

Getting Started with Power Tools

Next, we move into the land of electricity, with impressive tools that exchange drudgery for speed, relative silence for roar, and charming shavings for clouds of dust. Power tools can ease some of the burden of woodwork but make no mistake, they still require finesse and a little practice to get the most out of them. They’re still hand tools, just far much more aggressive ones.

DRILL

What can you say about a drill? It makes holes and drives screws. Whether cordless or corded, they all preform in the same basic way. Since everyone should at least be passingly familiar with what a drill does, I’ll focus instead on different styles of bits.

From left to right: twist drill, brad point, auger bit.

First up is the standard twist drill. This is the most common style of bit for general purpose drilling. They work okay in wood but because of the shape of the tip, can leave a slightly ragged hole. If you’re drilling pilot holes for screws and the like, this is fine, but if you want smooth sided, clean holes for dowels or plugs, then you will want to step up to brad point bits.

The brad point, or spur bit, is designed specifically for drilling wood. It has a sharp point at its center which helps with accuracy and also keeps the bit from wandering when starting the hole. The spurs to either side act to slice the wood grain before pulling it out, keeping the hole much smoother and cleaner.

Auger bits are similar to spur bits but with smoother sides and center screw tip. This screw makes the bit pull itself into the wood which helps with the deep straight holes they are designed to drill. They are available in really long sizes so if you need to drill a five foot deep hole, an auger bit is for you. Try to ease in on the power when starting one because they can really get get away from you if you aren’t ready for it.

From left to right: paddle bit, forstner bit, hole saw.

For drilling holes over 1/2″, most people turn to paddle bits and Forstner bits. Paddle or spade bits are the berserkers of the drill bit world. Their flat shape makes them flail wildly into the wood leaving raged destruction in their wake. If you need big holes fast in places you won’t see, these are the bits for you. And while all drill bits have issues with blow out on the exit side of the hole, these are exceptionally bad. To help remedy that, clamp a scrap piece of wood to the exit side. And if you need to enlarge an existing hole using one, first drill through a scrap with the larger bit, then clamp it over the existing hole and let it act as a guide.

Forstner bits look completely different from the rest and come in diameters from 1/4″ to 4″. They cut clean sided, flat bottomed holes. Because of their design, they can also drill overlapping holes which makes them great for wasting mortises or situations where you have to bore out a larger area. While the smaller sizes perform pretty well in a hand drill, the larger ones require a lot of power to turn so should be used in a drill press. Trust that you do not want to try to drive a 4″ bit by hand. If a hand drill is the only option and you need a large diameter hole, switch to a hole saw.

Hole saws are great when it comes to making large diameter holes. Since they only cut the outer edge of the hole instead of cutting all of the waste away, they require less power but because they leave the center intact, they are best for through holes.

Power saws for woodwork break into three basic varieties: circular, reciprocating, and band (I’ll leave chainsaws to someone else). Since bandsaws for woodworking are primarily stationary tools, I’ll cover them later. This time, I’ll focus on the other two.


Circular saws have a round blade that spins inside a housing and are mostly used for straight line cutting. They can be used freehand for rough cutting but for important cuts that need to be straight, it’s best to run it against a straight edge. A piece of straight lumber will work but I prefer the factory edge of a piece of plywood. There are also purpose built aluminum tracks available that do the same thing.


Jigsaws have a reciprocating blade that travels up and down through the wood. Because the body of the blade is narrow, they can be used for cutting curves and shapes. The narrow blade also means that cutting straight lines can be a challenge. This is especially true in thick wood where it’s common for the blade to deflect and wander below the surface leaving the cut with angled faces. The key to getting a jigsaw to behave is to use fresh blades, take your time and let the tool do the cutting. Don’t force it.

Trim router, plunge router.

ROUTER

It’s hard to imagine a tool as versatile as the router. With its endless selection of bit shapes and styles and its equally vast set of jigs, there is little that can’t be done with one. There are bits for cutting joints, making edge profiles, following patterns, and incising designs. Basically, a high speed (8000 – 28000rpm) motor with a chuck for mounting bits and a sole to control the depth of cut, the router is a fairly simple device. But because of that simplicity, it is easy to manipulate and trick into doing your bidding. Of the three I own, the one that sees the most use is the trim router. Its small size makes it easy to set up and maneuver but it has plenty of power to do what I need.

Biscuit jointer with three common size biscuits.

BISCUIT JOINER

Biscuit or plate joining is a type of loose tenon joinery. Where a standard mortise and tenon joint is composed of two pieces, one with the mortise (female side) and one with the tenon (male side), a loose tenon joint has two mortises and a floating or loose tenon that they share. The biscuit joiner uses a small saw blade to cut a semicircular slot that fits one half of a football shaped piece of compressed wood called, you guessed it, a biscuit. When glue is applied to the biscuit it swells slightly, helping lock everything together. This makes for a clean, fastener free, and surprisingly strong joint. Because of this swelling action, you have to work fast. If you move too slow the biscuit can swell so much that the joint will no longer close. Breaking complex pieces into sub assemblies can help. Also be sure to dry fit everything together before gluing. You don’t want to discover the one misaligned biscuit when your racing the glue.

Random orbit sander, half sheet finishing sander.

SANDERS

Nothing says drudgery to me like sanding. Hand sanding in particular. Hours of arm stress and mind numbing repetition. Power sanders help a lot. Broken into three groups, circular (and random orbit), orbital (vibrating) and belt. Each has its strong and weak points.

Belt sanders are nice in that they can remove a lot of stock quickly and in experienced hands can be used for finish sanding. On the other hand, because the belt travels in one direction, it should only be used in the direction of the grain. This makes sanding assemblies difficult. It’s also important to keep them moving to avoid sanding a ditch into the surface.

Orbital sanders move the sandpaper in tiny circles. So tiny that it feels like it’s just vibrating. This makes stock removal much slower but also leaves a finer surface. They can be used in any direction if moved slowly, but still perform best when moved with the grain. Available in quarter sheet (palm) and half sheet sizes they are great for final smoothing, but still leave tiny little circular scratches in the surface.

Random orbit sanders add the same orbital action to a spinning disc. This acts to get rid of the little circles and allows for sanding in any direction. It can be used for quick stock removal and finish sanding making it the sander to go for if you can only have one.