Is your remote control collection getting out of control? With a television, cable box, Blu-ray player, and stereo, not only does each remote take up space, but making them work to turn on the right devices and set the right inputs can be very frustrating! You might consider buying a fancy programmable remote control, but they can be expensive and sometimes don’t offer the control or interface you want. This smart remote control project will show you how to build a device that can send and receive remote control codes from a web page. You can program exactly the functionality that you need from any smart phone or computer!
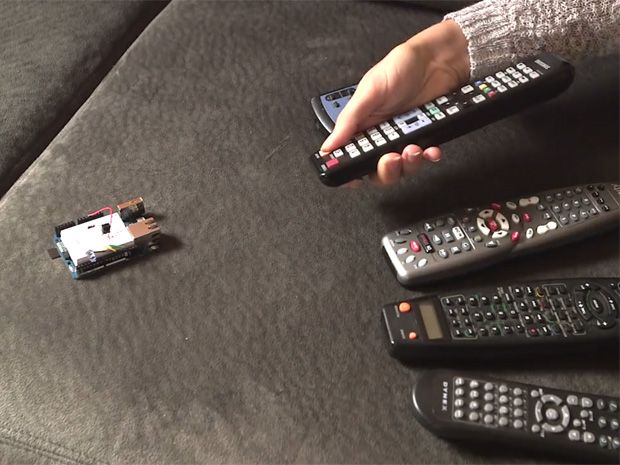
This project uses the Arduino Yún, which is a special Arduino that’s perfect for network-connected devices. The Yún has two processors, one of which runs the Linux operating system and can connect to wired or wireless networks. The second processor is the same as the one used in the Arduino Leonardo. It therefore has great compatibility with Arduino libraries and hardware.
To send and receive remote control signals, this project uses an infrared LED and receiver. Infrared light is invisible to the human eye but easy for electronic sensors to detect. To make the transmission of signals more reliable, devices typically modulate (flash or flicker) infrared light very quickly, so there’s less chance for stray infrared light (like from sunlight) to interfere. An infrared receiver is a small device that can pick up infrared signals modulated at a particular frequency, commonly 38kHz (38,000 times per second). Using an infrared receiver, an Arduino can detect the bits being sent by a remote control. And to play back a remote control signal, the Arduino can flash an infrared LED at 38kHz!
Taking command of your entertainment center is accomplished through a simple web interface which is run locally on the Yún and accessible to most web browsers. The website facilitates basic infrared device control and even allows for multiple commands to be strung together. For example, a ‘Watch Movie’ button might send the control codes to turn on your TV, Blu-ray player, and set the TV to the Blu-ray player input.
This is a moderately difficult project which will require some experience running Arduino sketches and using command line tools. The electronic components for this project are simple and can be easily assembled on a solderless breadboard.
Im going to built have some questions Im new to python
i added a to the activities.xml and i can display it in the HTML page
by doing a {{ activity.img }} ok happy with that so I thought i should be able to go.
and that would display the image and yes the image is in the same folder as the index.html what manual should i be reading LOL
Worked it out had to create a folder call static put them there and them use the url_for() function
hello , thanks for your job. i have tried , following all steps, but , when the ir codes are in RAW , the read works fine but the transmission do not works. any idea? thanks a lot. steve
Hay steve What i would do first look at the ir with the smart phone camera you should see the ir light that should point you down the right track. I have ordered the hardware waiting for it.
hello StePhan,
i would to say only that in raw not works, the codes received in RAW not work when are sended , as you can try with the serial monitor, take a RAW code in input and than paste the same code (with the string RAW: included) and you find that not works. thanks
did u read this http://www.righto.com/2009/08/multi-protocol-infrared-remote-library.html
Hello StePhan,
i had read the site you link, but i do not have found any solution. like showed in this site through the project steps, seems that , resend the raw code that you can receive, is the only thing to do to obtain the infra red signal to command all the devices even those that the protocol is unknown (raw). but do not works. i have tried to consider only the code received and pasting into a buffer in the code , to pass to the sendRaw() function , calculating the number of elements and the buffer (38) , but once again it not works. has anyone tryed to use trasmission with raw data? did it work? can you post me some example code? thanks in advance . steve
ya..Intelligent remote control for human comfort is built by humans and is easilyپارتیشن – تست جوش – کرکره برقی
I’m stoked! I’m a novice Maker, but I actually successfully built this project to control my LEGO Power Functions motor for a LEGO train. It appears I can only interface with the Yun if it’s on the same WiFi network as the Web Interface. Does anyone know how to configure the Yun to run on a different WiFi network than the web interface? My goal is to control my LEGO train remotely when I’m away from the house. Any help would be great! Thanks!
I haven’t tried arduino Yun. But the idea of controlling your outside your Wifi is by using additional online server that your Mobile phone access. then setup Yun to periodically fetch status from your online server and act based on the status.
that’s my two cents as a web developer.
I know some ir conditioner remote controlls send more than one code for each key, is possible to use this project with that type of remotes?
I’m getting this error and I’m not having luck fixing it.
Traceback (most recent call last): File “mnt/sda1/arduino/www/SmartRemoteControl/servery.py”, line 4, in from flask import *
ImportError: No module named flask
you got to install again the python files
Hi makers! This is a really cool project. All my media equipment is placed in a large cabinet where the Smart Remote also is placed. But I would like to control my TV set with the remote as well. Is it possible on the the Yún to have more that one ir transmitter so I could place one transmitter outside of the cabinet and based on the activity in the XML send the signal on different pins?
Hello Makers: Can I use a Iduino Yun Shield for this project instead of the Arduino yun.
Hi, really cool project. I made it with success!
I would like to know if there are a place with some more details regarding what is going on under the hood. Would like to know if it would be possible to record new buttons by the website – instead of having to use a PC and upload the .ino once more..
I have a really stupid telly (Panasonic TV) that requires a really long press on the power button to power on… How do I simulate a long press. I tried to repeat the code a couple of times but no luck.
i have found that on my devices a long press will the code for the single press then “NEC: 0 FFFFFFFF” repeatedly until i let go i would imagine this is what you would need to put after the desired function instead of repeating the same thing
Hey Makers :)
Can anybody please help me?!?
I got everything working except…
I don’t know where to find the file refered to as “file /etc/rc.local” to edit it in order to make the server start automatically on boot
Hey guys I have tried it. But am stuck in the part where I login in browser using my arduino yun ip address and press movies or any other activity.
Also when I start my server in Putty, I get restarting with stat, Is that anything to to with it??
* Running on http://0.0.0.0:5000/ (Press CTRL+C to quit)
* Restarting with stat
If I rememember correctly i did not receive that exact message but it did not give me an error so i continued on to the next steps and it ended up working properly. if your still having trouble give us a better description of the problem otherwise try emailing the author of the project directly he was a big help when i was first building the project
Hi
I have been struggling to Decode the Signal out of a Samsung Air Conditioner Remote.
The IRremote library doesn’t seem to recognize the protocol.
So I wrote a simple code using pulseIn() function of arduino to note down the time (in microseconds) for the HIGH and LOW states of the TSOP1738 data output pin.
The code is as follows:
//Basic Code to read TSOP1738 input
const int input_pin = 15;
int i = 0;
void setup() {
pinMode(input_pin, INPUT);
Serial.begin(9600);
}
void loop() {
int remote_val = read_remote();
if(remote_val>0)
{
Serial.println(remote_val);
}
}
int read_remote()
{
int time = pulseIn(input_pin, LOW); /* Changing the LOW to HIGH will show timings for the other state */
return time;
}
using pulseIn(input_pin, LOW) that shows time for HIGH states (mark) as TSOP inverts the data
The data I obtained is:
576
2948
489
494
493
491
500
446
446
468
491
486
489
488
488
489
489
488
487
487
462
482
487
497
495
496
478
433
2945
489
489
488
484
440
496
489
478
434
495
494
500
512
505
533
495
441
440
505
488
494
449
495
481
503
449
519
509
484
443
512
502
510
using instead pulseIn(input_pin, HIGH) will give the time for the LOW states (spaces):
The data I obtained is:
17689
8854
500
1479
502
525
494
548
538
539
517
1470
490
468
1468
463
462
1467
1519
490
468
494
501
460
465
1517
8796
1453
499
492
1495
524
1471
465
531
500
500
505
509
485
496
8834
1466
532
491
490
1480
1501
1462
496
1523
500
492
1476
519
470
1471
I understand that 560us mark followed by 560us space is a digital LOW (0)
and 560us mark followed by a 1690us space is a digital HIGH (1)
But I am unable to understand what does 17689, 8854 in pulseIn(…,HIGH) output and 2948 in pulseIn(…, LOW) output mean.
I am not able to figure out the protocol Samsung is using to send the data.
Also I tried to send this data as it is using an IR led but the Air Conditioner didn’t recognize it.
I would be thankful for any help
kenapa tidak menggunakan bluetooth hc06/05? jika menggunakan wifi akan tergantung jaringan internet,…
All of the code works fine except I am not getting any output on my IR LED transmitter. Receiver works fine, web server / page works fine — I click the button and try to see the IR LED transmitter from my cellphone camera and I see nothing light up. The LED transmitter is connected to pin 13 as shown in the tutorial.
Also, when I click send, the onboard L13 LED lights up but nothing on my actual LED transmitter.
Thoughts on what could be wrong?
I’ve seen this pretty arduino test board schematics/wiring directions many times, but don’t know which sw is used to create them? Also this black matrix paper for background. Where do you get it?
I have been having issues when I am receiving the IR data, the issues are when I press the button it does receive the data but the data is presented as raw data like this:
Decoded remote code:
RAW: 2260 122A 190 8FC 190 11F8 190 92E 190 11C6 190 92E 190 8FC 190 92E 190 8FC 190 92E 190 92E 190 8FC 190 92E 190 8FC 190 11F8 190 11F8 190 8FC 190
——————–
Decoded remote code:
RAW: 2292 122A 15E 92E 190 11F8 15E 92E 190 11F8 190 92E 15E 92E 190 92E 15E 92E 190 92E 190 8FC 190 92E 190 92E 15E 92E 15E 122A 15E 11F8 190 92E 190
——————–
Obviously this is not the same as above but I was wondering what would be going on and how I could use this data to create my smart remote.
I have raspberry pi 3. Can we make this project using raspberry pi 3. If yes then how to do ? Can you explain me ?
ConfigureACCEPT
Privacy Overview
Necessary cookies are absolutely essential for the website to function properly. This category only includes cookies that ensures basic functionalities and security features of the website. These cookies do not store any personal information.
Any cookies that may not be particularly necessary for the website to function and is used specifically to collect user personal data via analytics, ads, other embedded contents are termed as non-necessary cookies. It is mandatory to procure user consent prior to running these cookies on your website.