

The French are good at many things. French vintage wines are the standard to which the rest of the world’s vintners aspire. French breads are merveilleux. So are French perfumes, designer clothing, and cheeses. And, I’d like to add one more thing to the list for admiring Francophiles: wooden games.
On a recent trip to Paris, I saw all sorts of Frenchfolk, young and old, playing in the spring sunshine with a variety of wooden toys and games. Many of them, like the now-popular cornhole game and giant Jenga, I had seen before. A few, like the Nok Hockey carrom board and wooden skittles, brought back memories from a long-ago past. But I saw one that seemed, at least to me, brand new and a lot of fun. The French call it Jeu Gruyère (or Jeu du Gruyère), which translates, more or less, to the “Swiss Cheese Game.” (Below )

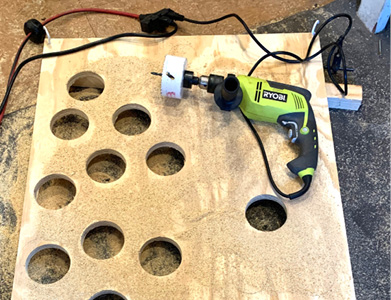
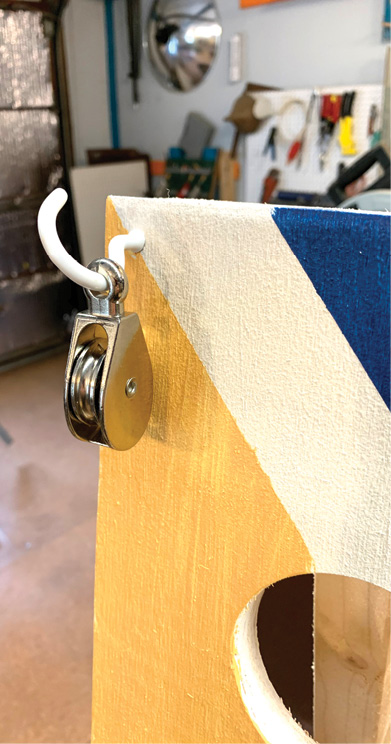
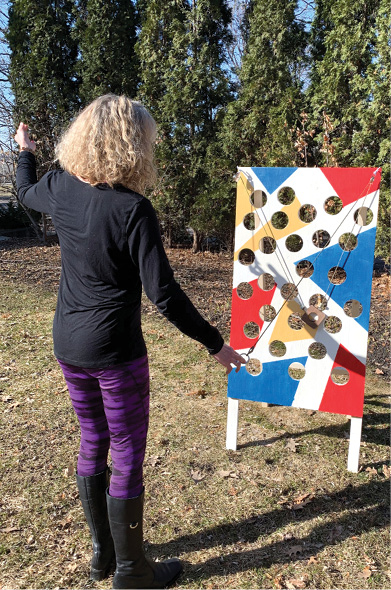
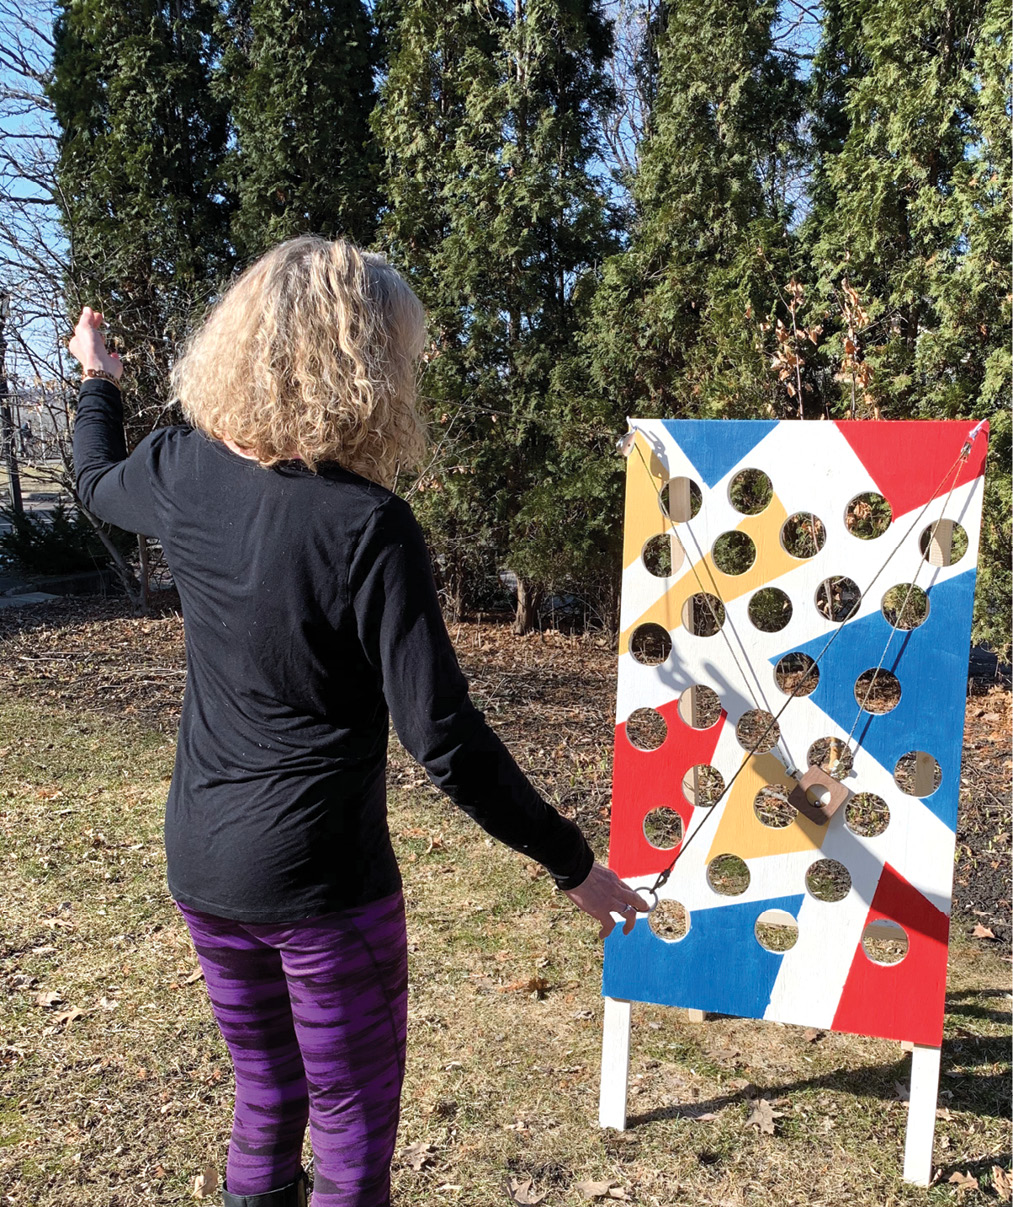
Jeu Gruyère is like an enhanced, three-dimensional version of Chutes and Ladders mixed with Milton Bradley’s Operation game. But it’s more than that: when you add the ability to control the ball carrier using a pulley system, you get a game that’s a challenge to both mind and body. The game consists of an inclined wooden board with holes placed at intervals and a wooden ball carrier that the facile Gruyèrist glides over the board via a system of ropes and pulleys that works just like a two-axis X-Y plotter. If the player is good, he or she can guide the ball to the top of the board without the ball falling through any of the Swiss cheese holes. If the player is not so good, well, then expect a fair amount of time watching the ball fall to the ground.

The game builder chooses the size and spacing of the holes in the board. Lots of holes, closely spaced, and a small-diameter ball create a tough challenge: mastering a Jeu Gruyère board like that takes a cool head and a keen eye and some practice. But for those a bit less dexterous and steady-handed, a board with wider paths and smaller holes makes for a perhaps more satisfying experience. In addition, you can vary the experience by using different shaped ball carriers, different sized balls, and longer or shorter rope handles.
Once you’ve got the hang of Jeu Gruyère, there are all sorts of variants to try:

• SCORING — Mark off the board in four sections from bottom (easy) to top (hard) and assign 1–4 points, respectively. Assign extra points for holes that are hardest to reach. For skilled players, dropping in zone 1 means you lose, you’re out (above)!
• MAKE BIGGER, ODD-SHAPED HOLES — with narrower, more challenging paths between them
• DRAW COURSES ON THE BOARD — easy or difficult, see who can follow them fastest
• TWO-PLAYER TEAMS — each take one handle, and work together to guide the ball

• LOOP THE HANDLES AROUND YOUR KNEES — for a more challenging game called Piège à Genoux (Knee Trap) (above)

• DOUBLE-SIDED GRUYÈRE BOARD — Both sides can be played solo at the same time, or players can race each other. A fabric stretcher catches dropped balls (above).

• BALL RETURN — Build a shallow box behind the board to capture the ball and return it to the bottom (above). If you’re really ambitious, you can partition the box to deliver the ball to individual ball returns, assigning each a different score (below).

DRILLING REALLY BIG HOLES

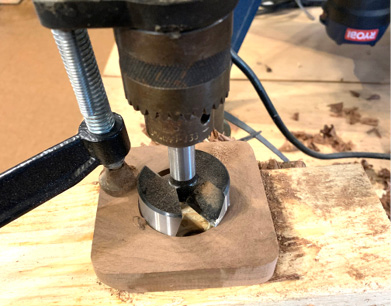
You have great latitude in making the Gruyère board’s holes. While I chose to make all the holes on my board the same diameter, there’s no reason you can’t vary the diameters by using different sized hole saws. Be aware that bigger holes are harder to cut, and you’ll need a fairly powerful electric drill in order to make them. I eschewed my 18V cordless in favor of a larger, more powerful corded drill. While it is possible to drill large-diameter holes using a cordless drill in ¾" plywood, it is neither easy nor fun to do so. More power makes the job go better.
Further, the choice of the hole saw itself is an important one. A hole saw is basically a ring of sharp teeth surrounding a pilot drill bit in the center. The pilot drill bit keeps the hole saw from wandering around at the start of the cut. Since you’re cutting through ¾" plywood, the hole saw’s “cup” needs to be at least that deep. There are other methods of cutting holes in materials, such as circle cutters, which have the advantage of being adjustable, but I doubt the average circle cutter could handle the job of cutting so many large holes in plywood this thick.

The right tool for this job is a bi-metal hole saw. Hardware store shelves are covered with a variety of sizes of hole saws. You’ll probably see two kinds of hole saws: carbon steel hole saws and the more expensive bi-metal hole saws. In the long run, you’ll probably be a lot happier with the bi-metals. Bi-metal saws have teeth that are fabricated from two different types of steel. The outside surface of the teeth is made from hardened alloy that cuts easily through the plywood. But the inner surface of the blade is made from springy, more ductile steel that allows smoother, easier cutting and a much longer lasting blade. A quality bi-metal hole saw will bore easily through materials such as plastic and wood and can handle metals as well.

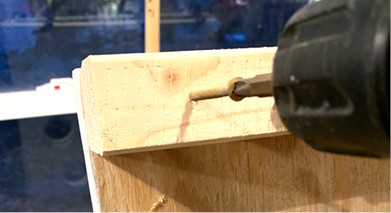
The other thing to know about drilling holes is that good hole saws use an arbor, sometimes called a mandrel (Figure ), to attach the saw to the drill. Inexpensive hole saws have a rod extending from the back of the saw that goes directly into your drill’s chuck. That might be fine for small-diameter holes or even a larger one if you’re only drilling one or two. But if you’re drilling many large-diameter holes, it’s hard-to-impossible to apply enough torque to keep the drill from slipping in the chuck. So, hole saw manufacturers use a mandrel to connect the hole saw to the drill. The mandrel goes in between the saw and the drill. The mandrel attaches to the drill via its shaft. The hole saw itself attaches to the mandrel via a screw collar, but the turning torque is transmitted by two heavy duty drive pins.
CAUTION: Take great care when drilling large-diameter holes. When the teeth of the hole saw contact the plywood surface, the saw applies a great amount of torque. This can result in the board itself spinning if it’s not properly secured. Apply only slow, gentle downward force, making sure the drill is held perpendicular to the surface of the wood. Not doing so will cause the drill to wrench in your hands and that could cause injury. Go slow, wear safety equipment including glasses and gloves, and be mindful while drilling each and every hole!

WILLIAM GURSTELLE’s book series Remaking History, based on his Make: column of the same name, is available in the Maker Shed.