horn2

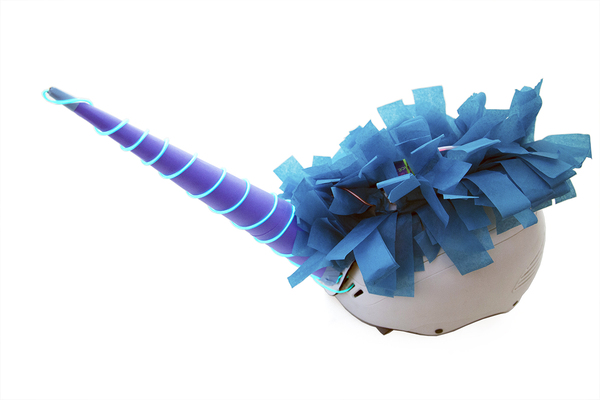
This project was made for stylish individuals who want to stay safe. Make your own by combining littleBits with craft material. Then, wear the mystical bike helmet to light your way when you ride at night.

littleBits is an open source library of electronic modules that snap together for prototyping, learning, and fun. Each bit has a specific function (light, sound, sensors, buttons, thresholds, pulse, motors, etc.), and the modules snap to make larger circuits. littleBits are sold in kits, which are available in the Maker Shed.

Project Steps

Assemble your littleBits circuit.

Take a power Bit and connect the battery cable and 9V battery to it. Make sure that the on/off switch on the power module is switched to “on.” Next, assemble the circuit: power + pulse + wire + light wire.

Make the horn.

Construct the horn. Roll a colorful piece of paper into a cone shape. Glue or tape it so that it stays in place. Cut around the base of the horn to make a flat surface. We also placed a triangular cardboard insert inside the horn to give it some structure.

Illuminate the horn.

Feed the top of the light wire up through the bottom of the horn and out through the top. Be sure that the Bit part remains at the bottom of the horn.

From the top, wrap the light wire down the horn in a spiral pattern. You should make sure that you have some extra light wire at the bottom.

Create the horn foundation.

Cut out a piece of cardboard that will be the base for the horn and the unicorn’s hair. This is also the part that connects to the bike helmet. It should span from the front of the helmet to the back and should be about 3″ wide.

Tape or glue the bottom of the horn to the front of the cardboard base. The wire and the rest of the circuit will stick out from the base of the horn.

With tape, stick the rest of the circuit to the back half of the cardboard base.

Add some unicorn hair.

Now it’s time to make some rockin’ hair. Take a large sheet of tissue paper and cut it into strips. Gather the strips together and cut a fringe on one side. Glue or tape the tissue paper around the circuit on the back half of the cardboard base.

Take a look at your bike helmet and see where the air vents are. Depending on their location, cut a couple of holes in the cardboard base to feed string through (we used a velcro strip).

Put everything together and ride into the night.

Attach the cardboard to the top of the helmet. Use the light wire to secure the front end. When you weave it through the vents, the light wire will act as a fastener.

Near the back (where you cut holes), feed a string (or velcro strip) through the cardboard and down through the back vents, securing the cardboard to the helmet.

Now you are ready to roam. Hop on that bike and be the brightest unihorn unicorn in town.