m47_Rocket-1
Photo: Hep Svadja
This project and many more can be found in our book Make: Rockets, Down to Earth Rocket Science.

Water rockets have been around a long time, but really got popular when soda manufacturers started packaging soda in 2-liter bottles back in the mid-’70s. Since they were considerate enough to give away free rocket bodies with every soft drink purchase, many of us started building rocket launchers to fly these new rockets.

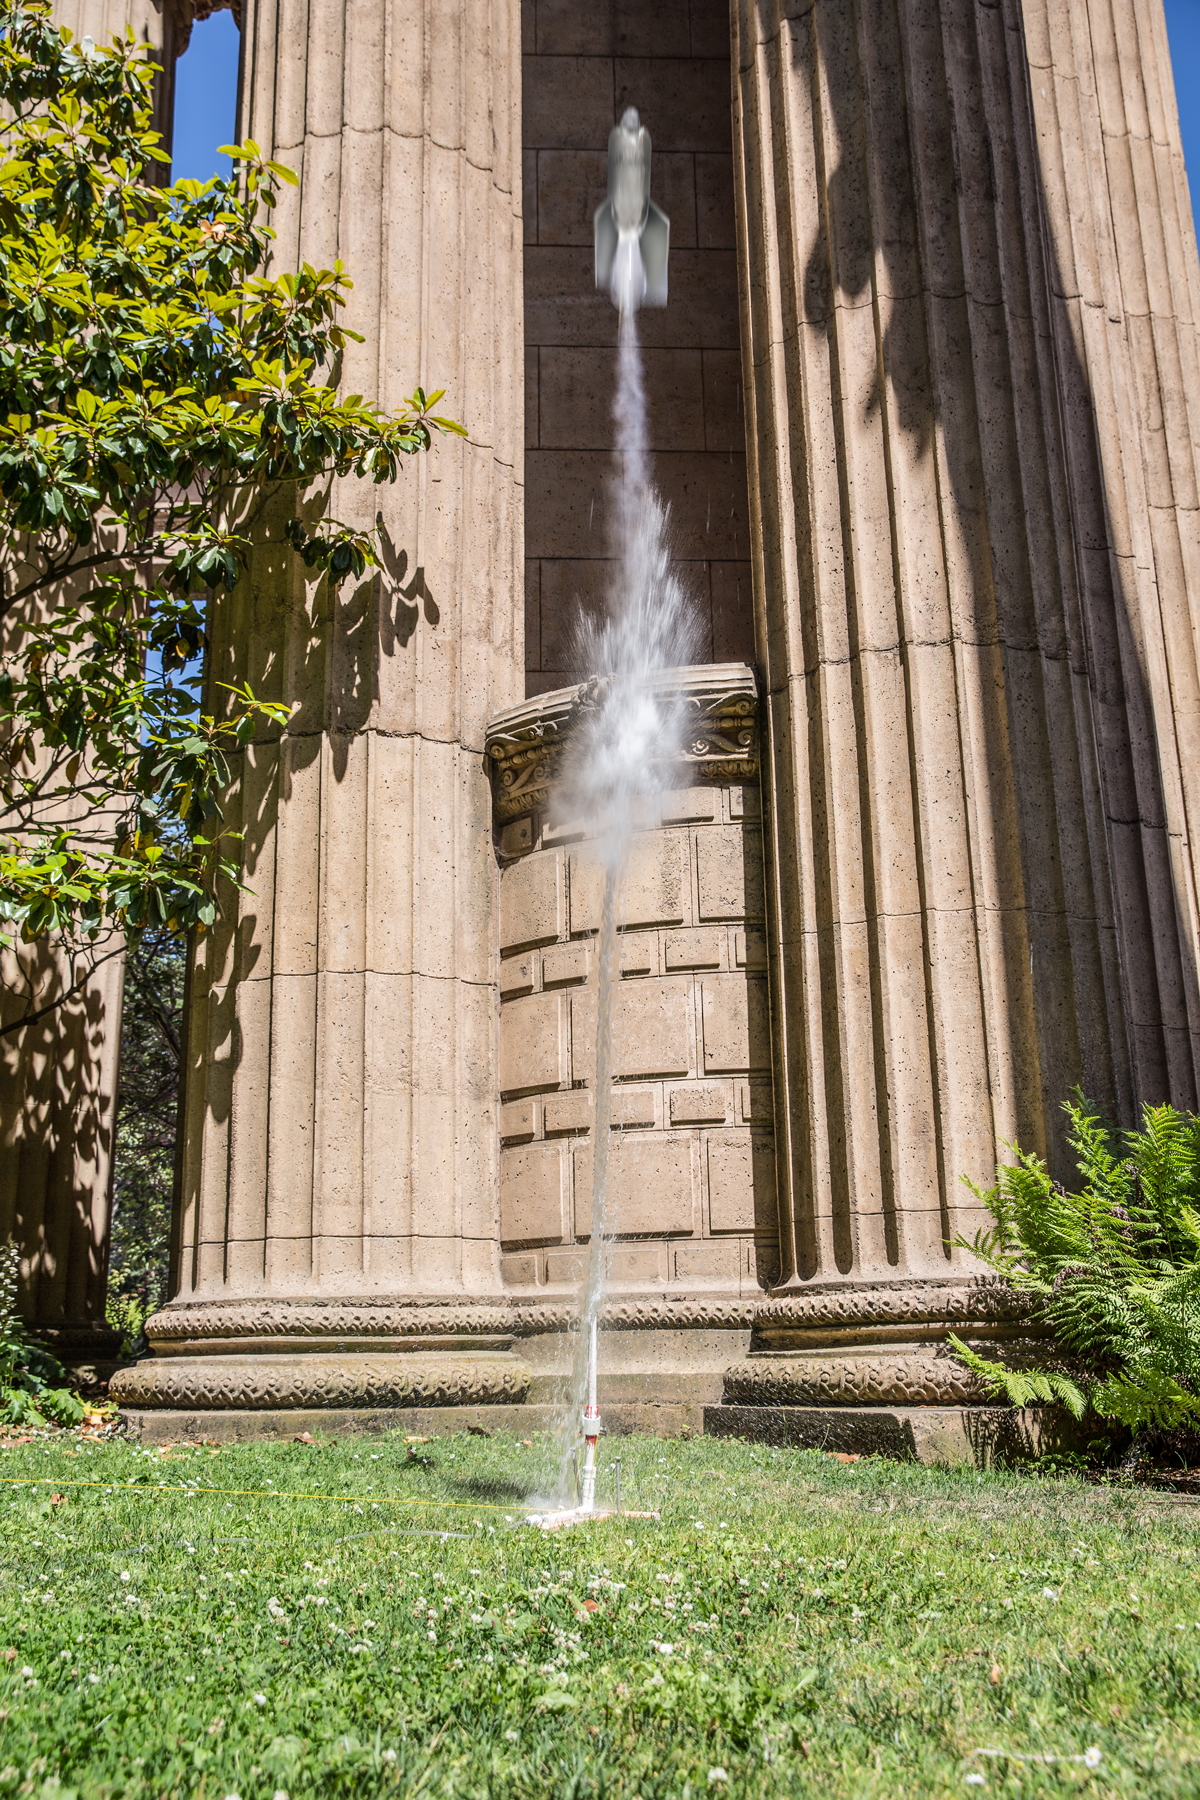
Water rocket launchers are fun and easy to build if you have a few household tools, but there are some tricks that are not obvious at first. You’re going to hold a rocket on a pad while it is under as much as 75 psi of pressure. That’s not easy to do. This one uses high pressure O-rings and a zip-tie mechanism to securely hold the rocket in place until launch time.

Fig-7-24
Photos: Mike & Patty Westerfield

Most people think water rockets are safe, simply because they don’t use flammable materials. They can be—but only if you pay attention to some safety issues. Briefly, it isn’t safe to be close to PVC pipe under pressure from air. It’s also not safe to be near the rocket itself. There have been at least two cases where people broke their hand with a water rocket when it launched unexpectedly and smashed into their hand. Thank goodness they weren’t leaning over the rocket with their head or body at the time! This launcher has a mechanism for releasing the pressure remotely, so you never, ever have to approach the pressurized rocket.

This article shows you how to build the launcher from scratch using parts you buy at your local hardware store. There is also a kit, available from Maker Shed, that has all of the parts needed to build the launcher. You can skip the initial steps of cutting and drilling parts if you get the kit, since all of the parts are precut and drilled.

Water rockets can be dangerous. Never approach a pressurized rocket. The rocket is heavy when it lifts off, carrying over 1 pound of water, and it hits bone-breaking speeds of around 100mph in a fraction of a second. You can find the National Association of Rocketry’s Water Rocket safety guidelines at waterrocketmanual. com/safety_code.htm or see Step 22 for more safety guidelines.

Fig-7-23

You can find out more about rocketry in general, and water rockets in particular, in Make: Rockets, Down to Earth Rocket Science. This launcher design first appeared there.

Project Steps

Cut the launch tube

The launch tube sticks up into the soda bottle, giving you a way to pressurize the bottle and guiding the rocket for the first few inches of flight. It’s also a snorkel that prevents the water from draining down into the launcher while still providing a way to pump air into the bottle.

The launch tube is 10½” long for a typical 2-liter soda bottle, but you can use different bottle sizes. To get one the perfect length, shove a ½” Schedule 40 PVC pipe into the bottle until it is a couple of inches from the end. Mark the pipe about ½” from the bottom of the bottle and cut the pipe.

NOTE: Most 2-liter bottles fit perfectly on a ½” PVC pipe, but a few are too tight, so you will need to experiment a bit.

Round the end of the launch tube

One end of the PVC pipe will slide in and out of the bottle. Sand this end so it is rounded a bit.

Cut the launch tube where the O-ring will sit

The O-ring that holds the water and air in the water rocket until launch time sits in the launch tube about halfway into the neck of the soda bottle. This is about 1″ from the end of the launch tube for a 2-liter soda bottle.

Dry fit a ½” PVC adapter. Find a spot on the bottle’s neck about halfway down, where it is not changing diameter, and cut the tube at this spot, usually about 1″ from the end of the launch tube.

This cut will serve as the seat for an O-ring, and that O-ring is the critical component in the entire launcher for holding pressure until the launch. Make sure this cut is absolutely straight. Sand the surfaces flat if necessary.

Cut the remaining PVC parts

Cut the remaining ½” PVC parts. You will need 3 more pieces cut 1″, 4″, and 9″ long.

Cut and drill the slip collar

The slip collar is a 1½” PVC pipe cut 1½” long. It has 2 holes drilled in the side where the launch string will eventually be tied.

You don’t need much of the 1½” PVC, which is usually sold in 10-foot lengths. Ask at your local hardware store; I found a 2-foot length of scrap that worked just fine.

After cutting the pipe 1½” long, drill two 3/16″ holes on opposite sides of one end; we will tie the launch string through these holes.

The photo shows some orange duct tape inside the pipe. You can add or remove the duct tape as needed to match the specific size of your soda bottle neck and the zip ties you use to make the launch mechanism.

Cut the base boards

Cut two 12″-long boards for the base of the launcher. The photos show 1×3 lumber, but the exact size is not critical.

The photo shows the pieces predrilled for the T-plate, screw eyes and tube straps, as the pieces come in the kit. If you’re making your own launcher from scratch, drill these holes as you mount the various pieces. Be sure and drill the holes before inserting the screws, though. Most wood will split if you try to insert the screws without predrilling a hole.

Create the O-ring seat

Use a 1″ section of tube that fits snugly inside the ½” PVC launch tube as the seat for the O-ring. The kit comes with a 1″ long piece of brass pipe that is 9/32″ in diameter and 0.014″ thick, but any tube that fits will do.

Use epoxy glue to fasten these parts, since the glue needs to bond well to both PVC and brass. Rough up the ends of the brass tube so the glue will bond, but don’t rough up the middle, where the O-ring will sit. Glue the pieces together so the gap between the PVC parts is exactly the width of the O-ring. It won’t hurt anything if a little epoxy oozes into the gap; just wipe it out with a cotton swab soaked in rubbing alcohol.

Once the glue dries, slide the O-ring into place.

Assemble the launch tube

Assemble the remainder of the launch tube from a slip coupling, the 4″ length of pipe, and the male slip coupling.

From left to right in the photo, the parts are the launch tube you just assembled, followed by a slip coupling. The slip coupling slides onto the PVC pipe on both ends. Next is the 4″ piece of PVC, followed by the mail slip coupling. The male slip coupling is the one that slips over a PVC pipe on one end, and has threads on the outside of the other end.

Glue these parts using PVC cement. If you happen to have epoxy glue handy, but no PVC cement, the epoxy glue will work, too.

Mount the hose barb in the end cap

You will pressurize the launcher using a 1/4″ hose barb mounted in an end cap. The kit comes with a predrilled end cap. If you are building your launcher from scratch, drill a ½” hole in the center of the PVC end cap.

Thread a brass hose barb into the hole in the end cap. Be sure the hose barb is perfectly straight as you thread it into the hole.

Remove the hose barb and inspect the end cap carefully for cracks. If it’s cracked, throw the part away and try again with a new part.

Once you are satisfied with the piece, use teflon tape and screw the hose barb into place one last time. You can use epoxy glue to seal the part in place if you do not have teflon tape.

Assemble the lower pressure tube

From upper left to lower right, the lower pressure tube starts with a female slip joint. This one has threads on the inside of one end, and slips over the PVC pipe on the other. The 1″ section of PVC pipe slips inside this piece and the 90° slip joint that forms the corner. A 9″ length of PVC forms the base, slipping into the 90° slip joint on one end and the end cap with the hose barb on the other.

Glue these parts in place using PVC cement or epoxy.

Build the launcher base

Screw the 2 wood parts of the base together using a T-plate. Mount the lower pressure tube to the base using 2 tube straps. The tube straps need to be tight enough that the tube is tough to twist, but allowing it to twist when you really push on it is fine. That lets you tilt the rocket a little away from vertical, which is handy if there is a light wind.

Add the 2 screw eyes, which will guide the launch string.

The kit comes with predrilled holes in the proper spots. If you are building your launcher from scratch, be sure and drill pilot holes before inserting the screws. If you don’t the wood may crack.

Attaching the zip ties

Place a rubber band around the top of the slip adapter and slide the bottle town until it rests on the top of the adapter. Shove zip ties under the rubber band as shown in the photo. Leave a little space between adjacent zip ties.

Tape the zip ties in place

Once the zip ties are in place, secure them with a strip of duct tape and remove the rubber band.

It’s still pretty easy to pull the bottle off of the launch tube. The zip ties pop open, allowing it to slide off. Once the bottle is under pressure, the zip ties are held in place until launch time by the collar from Step 5; it slips up over the heads of the zip ties. Pulling this collar down releases the zip ties, launching the rocket.

The size of the neck on 2-liter bottles varies a bit. Add duct tape inside the collar until the tube stays in place when it is slipped over the ring of zip ties.

Secure the zip ties

Use a 1½” hose clamp to securely fasten the zip ties near the bottom of the PVC adapter. Position the hose clamp so it keeps the PVC collar from sliding all the way down the launch tube, but gives plenty of clearance for the collar to slide down far enough to expose the heads of the zip ties to release the rocket.

Trim the Schrader valve

You need a way to pressurize the water rocket, and you need to be able to do that from a distance to stay safe. You will use a Schrader valve. You can find these at auto supply stores and some hardware stores.

The automotive Schrader valve comes with a large, bulbous rubber coating to make it easy to seat in a tire. Carve that away carefully with a hobby knife until you expose the inner brass lining.

Remove the valve mechanism

You also want to be able to release the pressure if something goes wrong and you need to approach the rocket. We’ll remove the valve in the middle to allow air to escape when the pump is disconnected.

The pin in the middle is threaded in the brass tube. You can also remove the pin by grabbing it with a normal pair of needle nose pliers and unscrewing it. If the pin is really stubborn, you can also drill it out from the bottom using a 3/32″ drill bit.

Connect the hose and valve

Connect the Schrader valve to the hose barb using 20 feet of 5/16″ clear vinyl tubing. Heat the tubing by holding it under hot running water to soften the tubing, then slide the tube over the hose barb and Schrader valve. Attach the tubing to the hose barb and Schrader valve using hose clamps.

Add the launch string

You’ll launch the rocket by pulling on a long launch string that pulls the PVC launch collar down, allowing the zip ties to spring apart. Braided mason line, available at hardware stores, is a great choice.

Screw the launch tube into the lower pressure tube. Form a loop of string that ties to one of the holes in the PVC collar, threads through one screw eye, loops back through the second screw eye, and finally ties off on the other hole in the PVC collar. Tie another piece of string to the center of the loop. Cut the string so it is a bit longer than the vinyl tubing used to pressurize the rocket.

Build a water rocket

Now that you have a launcher, you need a rocket! Here’s how to build one. (For a parachute-recovered version, see makezine.com/go/soda-bottle-rocket.)

The body of the rocket is made from a 2-liter soda bottle, although you can also use smaller bottles. Be sure to use soda bottles, though, not water bottles. Plastic bottles used to hold water will not stand up to too much pressure; they don’t have to, since the water they hold is not carbonated.

After peeling off the label, soak a paper towel in WD-40 and lay it on the remaining label and glue. After about ½ hour, the glue wipes right off. Remove any WD-40 from the bottle using rubbing alcohol before you apply glue for the fins.

Cut the fins

Foam core, corrugated plastic, or any other stiff, waterproof material works well for fins. Cut 3 fins of pretty much any shape you like. Each fin should be about 10 square inches — say, 3″×3½” or so. Be sure the inside edge of the fin fits snugly against the base of the bottle. You can find a template here for the fins shown.

Attach the 3 fins with polyurethane glue, such as Titebond or Gorilla Glue. Beware of hot glue guns for attaching parts on a water rocket. The heat can change the molecular structure of the bottle, weakening it slightly. CA glues can do the same.

Add a glue fillet along the joints between the fins and bottle to add strength.

Assemble the rocket

This water rocket is pretty light compared to its size, so it’s not going to do any damage when it lands. It’s more likely that the ground will damage the rocket, especially if it is concrete or some other hard material. Keep the rocket intact by putting some padding on top. The photo of the finished rocket shows a short piece cut from foam pipe insulation. Another great source of foam is a short piece from a swim noodle.

Flying your water rocket

Water rockets are particularly dangerous, but they do deserve some respect. For example, at least two people have broken their hands because they violated a simple and obvious safety rule by working near the water rocket when it was under pressure. The water rocket is heavy when it lifts off, carrying over a pound of water, and it hits speeds of around 100 mph pretty quickly. You do not want to be in the way when it launches!

About the NAR Water Rocket Safety Code
The National Association of Rocketry (NAR) knows more about model rocket safety than any organization, but they do concentrate on solid propellant rockets. They have created two safety codes for water rockets in the past. The one shown here is one of those safety codes. It’s considered obsolete, but it’s still the best safety code available for water rockets.

NAR is currently revising the water rocket safety code. I’ve gotten a chance to work with a member of the NAR safety committee as he drafted the new standard. It’s not clear yet whether this new safety code will be fully adopted by NAR.

The launcher, water rockets, and launch procedures in this book were developed to satisfy both this old standard and the draft I have seen of the new standard. Be sure to watch the NAR web site for the new water rocket safety code.

NAR Water Rocket Safety Code

  1. Definitions. For the purposes of this safety code, a “Water Rocket” is defined as any rocket whose thrust is generated by expansion of a compressed, non-combustible gas. An inert fluid such as water may be used for thrust augmentation.
  2. Scope. This code applies to water rockets having a pressure chamber volume greater than 1200ml or a launch pressure exceeding 35 psi.
  3. Materials. The pressure chamber of the rocket shall be constructed of thin, ductile plastic. Only lightweight, non-metal parts shall be used for the nose, body, and fins.
  4. Compressed Gas Safety. A safe distance shall be maintained at all times between persons and pressurized water rockets or launchers. The recommended safe distance is as follows:
    Launch Pressure With Eye Protection Without Eye Protection
    Up to 60 psi 10’ 20’
    Above 60 psi 20’ 40’

    Note: The new draft standard specifies 15′ for pressures up to 80 psi, and 30 feet for pressures above 80 psi. There is no difference with or without eye protection. I recommended 20 feet of tubing to satisfy the more restrictive standard for up to 60 psi. It’s your choice, of course, but when I let my grandkids fly water rockets, I keep them at least 20 feet away from any pressurized rocket.

  5. Pressurization System. Compressed air tanks and gas cylinders shall be stored and transported in accordance with all applicable safety codes. Line fittings near the operator shall be rated by the manufacturer for use with compressed gas at the intended pressure.
  6. Launcher. The launcher shall hold the rocket to within 30 degrees of vertical to ensure that it flies nearly straight up. It shall provide a stable support against wind and any triggering forces, and allow the rocket to be pressurized and depressurized from a safe distance. Launchers shall be constructed from materials rated for at least 3 times the intended launch pressure.
  7. Launch Safety. I will use a countdown prior to launch to ensure that spectators are paying attention and are a safe distance away. If my rocket does not launch when triggered, I will not allow anyone to approach it until it has been depressurized.
  8. Size. A water rocket whose mass (excluding water) exceeds 453 grams (1lb) shall be considered a “Large Model Rocket” for the purpose of compliance with Federal Aviation Administration regulations.
  9. Flight Safety. Water rockets shall not be directed at targets, into clouds, or near airplanes. Flammable or explosive payloads shall not be carried.
  10. Launch Site. Water rockets shall be launched outdoors, in an open area at least 100 feet on a side (for rockets using a launch pressure of 60 psi or less), or 500 feet on a side (for rockets using higher pressure).
  11. Recovery System. A recovery system such as a streamer, parachute, or tumble recovery shall be used, with the intent to return it safely to earth without damage.
  12. Recovery Safety. Recovery shall not be attempted from power lines, tall trees, or other dangerous places.

Launch it!

Drive the 2 stakes into the ground and wedge the launcher’s cross bars against them. This allows you to pull on the string without dragging or tipping the launcher.

Fill the bottle about one-third full of water.

The launcher is small enough to turn it over. Insert the launcher into the rocket, and then flip them over for launch.

Push the rocket down far enough on the launch tube that the zip ties are over the ring on the neck of the bottle. Slide the launch collar up over the edge of the zip ties.

Move all spectators back behind the pump and start pressurizing the rocket using a portable tire pump like a bicycle pump. Pressurize the system to between 60 psi and 75 psi.

In the unlikely event that something goes wrong after pressurizing the rocket, be sure to release the pressure before approaching the launcher. Assuming you built the launcher as directed, all you have to do is disconnect the air pump.

Once you are sure everything is ready, give a countdown from five and tug on the launch cord to release the rocket. It will launch very quickly, reaching speeds of around 100mph in a fraction of a second. Be ready to get wet. The spray from the water will frequently give you a quick shower if the wind is blowing toward you!