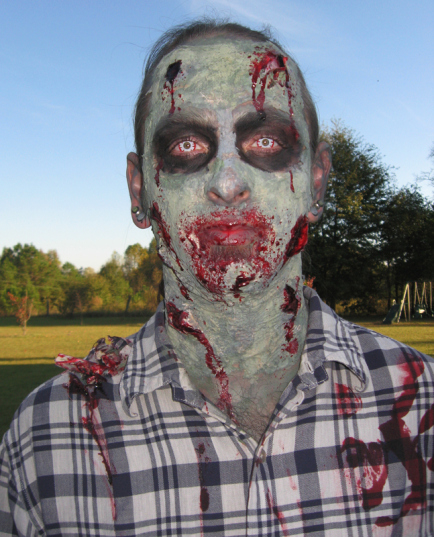
Zombies have to be one of the most iconic halloween costumes out there and with the popularity of AMC’s “The Walking Dead”, they are only getting better. However rather than going to the store andmake_halloweenbadgeV2 (1)
buying one of the many pre made outfits, with some liquid latex, torn up toilet tissue, a bit of cheap makeup, and a health dose of blood you can easily turn yourself into the walking dead.

Zombie Halloween 2010 - Face
Zombie Halloween 2010 – Face

See all of our Halloween projects here.

Project Steps

Getting Started...

Before you begin make sure you have the basic things you’ll need handy. It’s not fun trying to find more cuetips with wet latex and toilet paper hanging off your face.

The next part, is the toilet paper. Be sure to tear the toilet paper, in a way that the edges end up tattered and frayed. In the end, it helps add to the realism of your rotting flesh.

Applying the the layers of Latex and TP

The first thing to do is make sure you get a good bottom coat of latex all over the surfaces you plan to Zombify (I cover from my upper chest/back up to my hairline).

When applying the toilet paper, you should work in small sections and after you have an area covered, apply another coat of latex to that area. The idea is to build up thick layers. Think of it as building a mask, of yourself, on your own face and remember to make it look worn.

This step will repeat until you have covered the areas you are zombifying with several layers of latex/tissue. I normally end up with 8 to 10, just to make sure the “skin” is thick enough.

The MakeUp

Once you have your face on, now you can begin applying the make up. The dried latex/tissue combo gives your skin a cream color, which is actually a great base. Sorry these are only examples.

First I start by blacking out my eyes. From there I work out, adding a layer of grey, then an olivey green in sections.

To cut down on shiny makeup/skin, apply a very light dusting of baby powder. I normally blow it into the air and walk into it.

The Tearing of the Flesh

This is where it gets fun and you can go as scary or as tame as you want. Sorry again there are no actual photo’s of this step. However, I hope you can get a few ideas from the examples.

Take a small sharp object (kids get your parents help) i.e. a toothpick or small scissors and cut a small hole in your new skin, where you plan on having wounds.

Once you’ve marked the spots, with either your fingers or small scissors, slowly tear holes into the skin. Peal the flaps back so they hang and apply a small amount of black cream makeup inside the wound. Be creative…after the makeup process they can end up pretty gory, plus you can stick your fingers in them for added effect.

And finally...the BLOOD!!!

The last step in making any zombie costume realistic is the blood…and I mean lots of it.

On the wounds, I apply a decent amount of fake blood into the holes via cue tip and let it drip/run out, then I add more…

On my mouth I use an open cell sponge to dab it around on my lips, cheeks, chin etc. Again, use enough to run down your face and onto your clothes.

Pulling off your face...

Remember, at the end of the night, you have to take this off. The best way I have found is to just peel it off and then pick off the extra bits. Be mindful of your hairline and any facial hair in this process. You will have a few pulled hairs, but I’ve always found it to be worth it for the general reactions I get.

As a sidenote, this may be the grossest part of the entire costume and always gets an interesting reaction from those that happen to be around when it comes off.

Zombie Extras...Skull and Bones!

Over the years I’ve made a few extras to make my zombie more interesting.

To show a little skull: I cut a section from a cheap white plastic bowl and heated it so I could mold it to my forehead. Prior to the first round of latex I glue it in place with Spirit gum and then cut the section over it once the makeup is complete to reveal the skull piece.

Protruding Bones: Take any 1/4-1/2 dowel and “hack off” a 3-4″ piece. Cut one side so it can lay flat on your arm with a slight raise in elevation. The other end just mangle (it is a compound fracture remember). Once you have it painted and your zombie skin applied simply cut a small hole as you did on your facial marks and tear it open enough to insert the flattened end of the “bone”. Glue it down with a bit of Spirit Gum and add some black cream paint, plus loads of blood.

Zombie Extras...The Missing Eye!

To create a missing eye, simply cut a small piece of black felt (or other flat black material that will absorb blood) and lay it over your eye and glue it in place with a bit of spirit gum prior to applying the latex and TP.

From there follow the standard makeup routine.

Be sure to build a slightly enlarged eye socket with TP and latex when applying, to add to the effect. Then add blood…