


Meet Alex and Bumblebee
Alex is a 16 year old boy who loves cars, making music, and the Transformers movies. Alex has global hypotonia which makes it hard to control his muscles and requires the use of a wheelchair. Bumblebee is an epic costume for Alex’s chair that is interactive, with multiple types of inputs for Alex, and a big sound system and lots of LEDs. This is the story of how we turned this chair into a transformer!

A Little Background
In June 2018, while at the Nation of Makers conference (NOMCON) in Santa Fe, NM, we met an organization called Magic Wheelchair. Magic Wheelchair has one of the simplest and most awesome mission statements…“Magic Wheelchair is a nonprofit organization that builds epic costumes for kiddos in wheelchairs — at no cost to families. “Once we learned of this mission, we asked to have our makerspace, MakerFX, added to their list of builders willing to take on the job of building an epic costume. We also met Bill Binko of ATMakers at NOMCON 2018. ATMaker’s goal is to “bridge the gap between the amazing abilities of those in the Maker movement and STEM/Robotics organizations and the constant need of those in the Assistive Technology space.” We learned that ATMakers is located in Tarpon Springs, just a few hours away from our home base in Orlando, and agreed that we should collaborate together in the future. Fast forward to early 2019 (or three sleepless weeks ago!) – Bill reaches out to us and there is a possibility of being matched with a kiddo in Central Florida by Magic Wheelchair, and that he’d like us to be involved. There is a big reveal planned for the Assistive Tech Industry Association conference (ATIA) and it is a great opportunity to get involved. Oh, and we have THREE WEEKS.
“To achieve great things, two things are needed: a plan and not quite enough time.” Leonard Bernstein
Getting Started
We started forming a team and a few of the team members setup a meeting with Alex and his parents Kim & Jeff, at the FAAST center at UCF where Alex works with communication specialists. We learned that Alex had recently seen the new Bumblebee movie, and loved it. Our team immediately liked the concept that Bumblebee’s character needed to use technology (radio) as his voice, as Alex also uses Assistive Technology devices to communicate. With no time to spare, tacos were consumed, and many napkin sketches were created. Stefan & Erin from Makers Hollow envisioned a partially transformed Bumblebee, with the icon VW Bug front fenders, bumpers & headlights along with the Bumblebee’s head – all surrounding Alex. We also focused on Alex’s love of his keyboard, and wanted to add interactivity to the costume.
Worried about how to fabricate the parts fast enough, we focused on repurposing existing items – a Bumblebee costume helmet and kids ride-on vehicles.
Stefan & Erin from Makers Hollow envisioned a partially transformed Bumblebee, with the icon VW Bug front fenders, bumpers & headlights along with the Bumblebee’s head – all surrounding Alex. We also focused on Alex’s love of his keyboard, and wanted to add interactivity to the costume.
Worried about how to fabricate the parts fast enough, we focused on repurposing existing items – a Bumblebee costume helmet and kids ride-on vehicles.
 A number of our team members participate in the Power Racing Series at Maker Faire Orlando, so we had several car bodies in storage. In addition we purchased a newer VW Beetle and the seller gave us a motorcycle once he heard about the project. We then turned Makers Hollow and MakerFX into a plastic chop shop to find almost all the needed pieces.

A Solid Foundation
As we started reading the Magic Wheelchair builder’s guide, we learned that a mock-up chair is critical to a successful build. We’d hoped to get a loaner wheelchair of the same model, but were unable to get a response from the manufacturer, and local dealers do not stock these wheelchairs due to the high cost. We created a diagram of the chair and Kim provided all the critical measurements.

Frame & Body
We knew that Alex’s parents would need to be able to transport Bumblebee, and quickly landed on a modular design consisting of three sided rolling frame with a front and two removable sides. We would build a head & shoulders assembly that would attach to the top of Alex’s chair. During the first build weekend, Andrea & Mike from MakeMIA and the Witch Doctor Battlebots team drove up from Miami to work on the frame at Makers Hollow.


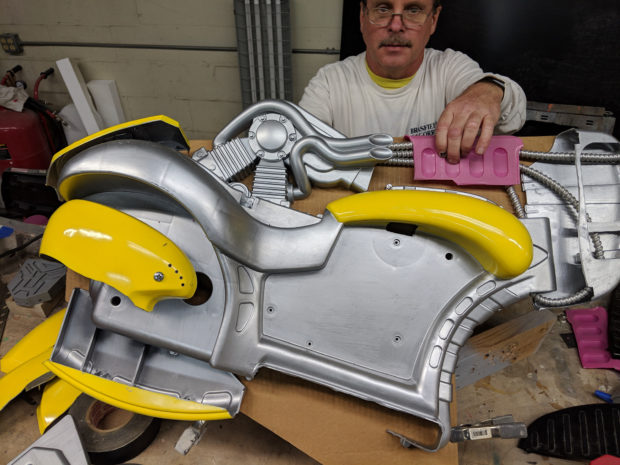 The iconic VW “towel bar” bumpers were recreated using a bicycle fender, some copper tubing, 1/2″ PVC sheet, and a LOT of hand fabrication from Stefan and Andrew.


 While we were working on the frame & body, Jean Paul started working on the rear bumper in parallel…


Head & Shoulders
We had the plan for Bumblebee’s head & shoulders assembly from the beginning, but didn’t start the assembly until the Thursday before the reveal as we’d been so busy with the frame, body, rear bumper and interactive elements. Here’s a mockup of the head & shoulders – they have been painted, and we have one 3D-printed (but not painted) hubcap, but this is before the steel fabrication started.

Will it fit?
With our crazy fabrication schedule we didn’t attempt a test fit until Thursday night before the reveal (yikes!) – we were very anxious, and all our planning, Kim’s measurements, and the mock-up chair work paid off. It all fit!!
Interactive Elements
At our first meeting, we decided that this epic Bumblebee costume would not only look amazing, but that it would be interactive for Alex. Our Assistive Technology pro, Bill from ATMakers, was instrumental in helping us select interactions that would be usable by Alex, and also that could be worked into his physical therapy in the future.Dashboard
As we gutted one of the VW ride on toys, we were left with this dashboard. While it wasn’t part of our original plan, we knew Alex would love it and Bumblebee needs a dashboard!
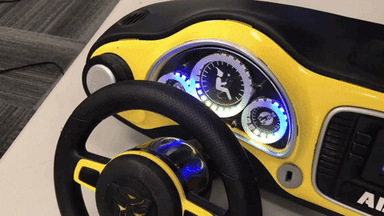 Powered by a Teensy 3.6, this dashboard has a capacitive touch horn button 3D printed with conductive filament from Proto-pasta! The Adafruit 12-Key Capacitive Touch Sensor Breakout was used to interface to the Teensy and to control the sensitivity of the button. It also contains two Assistive Technology buttons, a 320×240 LCD video screen, and three addressable LED rings.


MIDI Keyboard
The keyboard was configured to send the keybed notes on channel 1, and to send the pad notes on channel 2. With the dashboard Teensy set to send its MIDI notes (from the horn button and two side buttons) on channel 3, we could have incoming notes from three sources and react differently to them as needed. The main controller Teensy software is setup so that the keybed keys play notes as you would expect, and the 8 keyboard pads are used to change the current instrument, the animation mode, the primary LED color scheme, turn the main headlights on / off, and to play the horn sounds, transformer sounds, and Bumblebee voice sounds. These actions can easily be reconfigured through a mapping of input keys / pads / buttons to actions, or by reconfiguring the output of the MIDI keyboard using its utility.Remote Control
We expected that Alex’s parents may want to help control Bumblebee, so we integrated a presentation remote. Initially this was viewed as a “nice-to-have” but turned into a critical function for testing the system as well as controlling Bumblebee for demonstrations. (I’ll be keeping one of these handy for all my Teensy USB host projects, as it was amazingly handy for testing without having to integrate additional buttons)
Main Controller
Processing all these notes and keypresses is a Teensy 3.6 with USB host cable, a 7 port powered USB hub, a Teensy audio adapter board, a custom level-shifter board, and a custom 5-channel transistor driver board. The Teensy sketch handles the audio setup, including audio in from a music device, audio out to a 12v amplifier, FFT audio analysis, peak audio analysis, and mapping incoming key presses and MIDI notes to actions. These actions include playing Bumblebee sound files, VW bug horn sounds, and changing the color and mode of the animations. I was new to Teensy, and was amazed by the USB host capabilities and the Audio capabilities. If you haven’t used this system before, be sure to check out the audio workshop video and documentation, it shows the capabilities of this system and makes it very easy to get started with the audio design tool. The code for the system is hosted on the MakerFX GitHub. Please be gentle with your feedback, I am just learning Teensy and I did all the coding on the controller in < 7 days from powering up my first Teensy. We have a number of known bugs, and will bring Bumblebee back to MakerFX for some upgrades in the coming weeks.LEDs
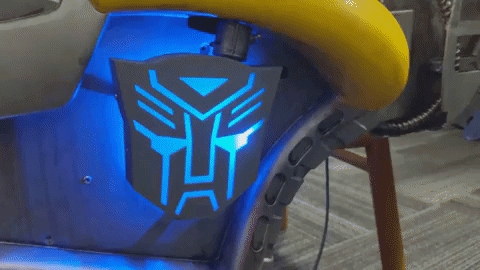
Connected to the Teensy are 4 sets of WS2812 addressable LEDs. These drive the eyes (two 16 LED rings running on the same data pin), the tray LEDs (60+ LEDs that wrap around Alex’s tray, the headlight rings (two 24 LED rings running on the same data pin), and the Autobot logos on the side of Bumblebee (10 strip LEDs per side, also sharing a data pin). In addition, several sections of 12v RGB strip LEDs are used as ground effect and side panel lighting and these are driven by 3 channels of the custom driver board. The remaining two channels on the driver board control the left and right headlight spot which also run at 12v. One interesting learning – as we were sourcing parts, we mixed brands of LED rings. There are large variations in the rings, from the type of connection to the direction of the LEDs (clockwise / counter-clockwise). We are using the FastLED library, and non-blocking WS2812Serial library for the Teensy. A custom level shifter board that uses the 74HCT245 to provide 5v data lines for the addressable LEDs so that we can run them at the full 5v.
Animation Modes
There are 7 animation modes currently: two FFT audio spectum analysis modes, two peak audio level modes, and three chase animations. In the audio-reactive modes, the white LED headlights come on at peak audio levels. The audio analysis and LED reactions include Bumblebee’s sound effect, any notes played by Alex, and any music or sounds on the aux input jack. Alex’s mom found an old iPod that is now a dedicated music source for Bumblebee! You can see more of the LED animations in the timelapse video from the last two (late!) nights of wiring, painting and testing! (We fire up the system about 2 minutes into the video… which was about 2AM the night before the reveal!)
THANK YOU!
Thank you to the more than 25 people that contributed to the project in just 3 short weeks, and to the Magic Wheelchair team for making this all possible!
ADVERTISEMENT


