How-To: Book scanner on the cheap

How-To: Book scanner on the cheap

diybookscanner.jpg

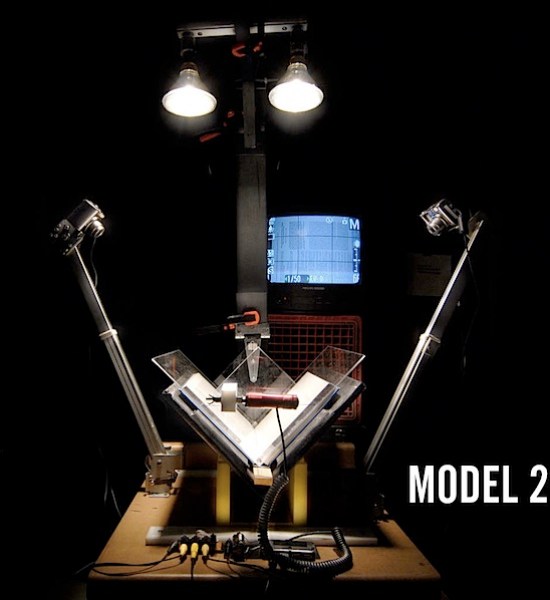
Noah Bicknell and Daniel Reetz made this book scanner using cheap digital cameras and scavenged building materials. From the Insructable:

I love books. There is some truly fantastic knowledge and information hidden out there in hard to find, rare, and not commercially viable books. I find that I want my books with me everywhere. But that’s where the problems begin. Buying, moving, storing, and preserving books means environmental costs… and when I loan a book to a friend, I no longer have access to it. Digital books change the landscape . After suffering through scanning many of my old, rare, and government issue books, I decided to create a book scanner that anybody could make, for around $300. And that’s what this instructable is all about. A greener future with more books rather than fewer books. More access to information, rather than less access to information. And maybe, years from now, a reformed publishing/distribution model (but I’m not holding my breath…).

12 thoughts on “How-To: Book scanner on the cheap

  1. ubiq_01 says:

    That’s great. Thank you for posting this info!

  2. Anonymous says:

    Wouldn’t it be cheaper and easier to just have a single camera that takes pictures of both, left and right pages? Instead of having a holding device, you can also just hold it down with your hand. It’d be much quicker too. Snap, flip page, snap, flip page. No plastic to pick up or put down.

    1. Anonymous says:

      I think there are several problems with having a single camera. For one, I think you’d have a tough time fitting both pages in the frame nicely with each shot. Second, You’d have to adjust the height of the camera depending on the size of the book, which would compromise image quality.

      Most importantly, if you’re shooting overhead the pages are going to be angled away from the camera as the book bends. So you’d get a bunch of distorted PDFs that you have to cut in half to make two pages.

      Also, holding it down with your hand will get your fingers in the shot! (Your hand isn’t a very reliable device.) The setup provided will give you reproducible quality images.

  3. Anonymous says:

    I have some old books (one is over 250 years old) that I would love to have digital copies of. They are so fragile that I seldom use them. This method of copying would cause minimal wear and tear to the dear old things. Good job! Archivists and antiquarians may be interested in this.

  4. Dave Andersen says:

    Good stuff, except for some misinformation in the lighting section – the author comments that fluorescent lighting flickers and has poor color rendition, but that’s easily fixable with proper bulb selection unless you want art-quality color rendition. Modern CFLs and electronic ballast fluorescents flicker at 10-20kHz, not 60Hz, so you’ll never notice the flicker with normal shutter speeds. If you want to use a CFL for this project, do make sure to shop around for one with a very high CRI. You can compensate for the white balance either on the camera or in software, but you do want the CRI. There’s a nice discussion of this issue in the dpreview.com forums. CFLs are the easiest, but if you don’t mind purchasing a T8 or T12 fixture and mounting them yourself, you can get a 98 CRI bulb that’s absolutely great. (Tungsten provides a 100 CRI; most poor quality fluorescents are in the 80 range.)

    1. daniel reetz says:

      Hi Dave,

      I didn’t mean to be misleading about CFL bulbs. My experience is generally with the big tubes and dimmable ballasts at work (I work in a neuroscience lab studying human vision). Our dimmable ballasts flicker visibly. I’ll take your advice into account.

      Even taking into account what you’ve said, I feel the halogens are a better choice because they have such incredibly high output (meaning nice low ISO settings) and a nice even dispersion pattern. Not to mention high CRI.

      I hope some other people make scanners — perhaps someone could make one with CFLs and prove me wrong.

      Re: single camera operation — the software that attempts to do that is Snapter, but I found that it rarely, if ever, worked well and it was a real disappointment, even outside all the concerns raised above.

      Thank you, Make, for posting this and thanks everyone for taking the time to check it out. If you have an Instructables account I would love to hear from you there or perhaps even get your vote.

Comments are closed.

Discuss this article with the rest of the community on our Discord server!
Tagged

Becky Stern is a Content Creator at Autodesk/Instructables, and part time faculty at New York’s School of Visual Arts Products of Design grad program. Making and sharing are her two biggest passions, and she's created hundreds of free online DIY tutorials and videos, mostly about technology and its intersection with crafts. Find her @bekathwia on YouTube/Twitter/Instagram.

View more articles by Becky Stern

ADVERTISEMENT

Maker Faire Bay Area 2023 - Mare Island, CA

Escape to an island of imagination + innovation as Maker Faire Bay Area returns for its 15th iteration!

Buy Tickets today! SAVE 15% and lock-in your preferred date(s).

FEEDBACK