Converting a Mountain Bike into a Single Speed “Road Warrior”

Bikes Workshop
Converting a Mountain Bike into a Single Speed “Road Warrior”
ss1
Converted with new pedals, chain, and tensioner (old tires)

Modern mountain bikes really are incredible contraptions. So are road bikes. If, however, you want a simple, low-maintenance ride to exercise or commute on varied terrain with, a single speed bike will do the job quite nicely.

Deservedly or not, I have a hard time trusting bikes with skinny tires to hold my 6’4″, 250 lb frame, especially when I enjoy the occasional bunny-hop or curb roll. My solution was to convert a mountain bike into a single-speed for mostly road use.

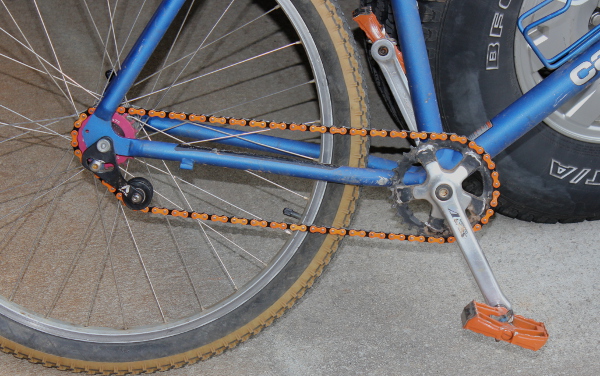
This conversion transformed an older Cannondale bike into a single speed ride, stripping off any excess weight, and generally cleaning everything. I obtained a single-speed chain tensioner to keep the chain taught, and a single-speed rear cog second-hand from a friend. I also took off the extra two front chain rings, leaving only the middle ring intact. I considered leaving the outer one as a “bash guard,” but that’s not really the kind of riding I planned on doing with this.

ss3
Conversion with non-reduced chain ring, original tensioner, pedals, and tires

In addition, I added a dedicated single-speed chain, clipless pedals that could be used with normal shoes when needed, and put on road(ish) tires. As tested here, this makes a big difference on paved roads. From personal experience, one really needs to be cautious on fire roads when used to “knobbies.” I managed to wipe out pretty bad on some loose gravel using this bike, but possibly that loss of traction could have happened with either type of tire.

The first video below shows a time-lapse of my basic conversion, and the second shows my tests of the new Michelin Country Rock tires. The engineer in me just couldn’t stand to wonder if they were actually any better performance-wise.

YouTube player
YouTube player

If there’s one thing that frustrates me about this bike, it’s that there’s not a good way to add disk brakes. The front would be possible with a new fork (possibly more than doubling what I’ve spent on the bike), but putting them on the back would be very difficult.

If you’re wondering about the wooden bar grips seen in the second picture, they were put on temporarily, and information on them can be found here.

3 thoughts on “Converting a Mountain Bike into a Single Speed “Road Warrior”

  1. illintechnology says:

    As a professional bike mechanic of over 12 years (in rainy Portland OR) I would counsel against kludging some disk brakes on this bike. Even for bikes that are designed for disk brakes the performance gains that are promised by disk brake enthusiasts don’t seem to pan out.

    If a disk brake caliper is nice, has great adjustability, has great pads, mated to a perfectly flat rotor and is completely dialed in, yes, the performance is good, but, when that rotor gets slightly bent because it was bumped into while locked up, or a bit of road grime/grease/oil/schmutz gets on the rotor and contaminates the pad or the pads start to wear funny, there goes your performance.

    Most cheaper disk brake calipers/rotors, even when brand new never work that well even with a lot of time dialing in adjustments. They are often noisy and unstable when you do finally think you have them dialed in, and then after only a few rides the brake performance is already fading.

    There are people that swear by disk brakes, but then when I talk to them and share my experience in the shop with run of the mill disk brakes, they always say “oh, well you need nice hydraulic ones, mechanical disk brakes aren’t worth installing”. But even with expensive hydraulic disk brakes much of the same adjustment/noise/long term performance issues are common.

    Decent (read under $40 each) cantilever brakes with decent pads (read, under $15), when mated to decent (read under $40 a set) levers work great, when dialed in. In my experience, dialing in decent cantilever brakes is much easier, and much more stable than dialing in disk brakes that cost three times as much and the long term performance is is much higher.

  2. tony z says:

    What’s the benefit to keeping the tensioner? Is it not possible to get an appropriate tightness by removing some chainlinks?

    1. Jonathan Gennick says:

      Tony, just happened to spot this post. The reason for the tensioner is that it’s difficult to make the chain length work out precisely. One might be able to make a half-link chain work without a tensioner, but then over time the chain would wear and become elongated and further adjustments might be needed. For those reasons it’s common on bicycles with derailleur dropouts to add a tensioner to compensate for the inability to slide the wheel back and forth like in a more traditional singlespeed design.

Comments are closed.

Discuss this article with the rest of the community on our Discord server!
Tagged

Jeremy is an engineer with 10 years experience at his full-time profession, and has a BSME from Clemson University. Outside of work he’s an avid maker and experimenter, building anything that comes into his mind!

View more articles by Jeremy S Cook

ADVERTISEMENT

Maker Faire Bay Area 2023 - Mare Island, CA

Escape to an island of imagination + innovation as Maker Faire Bay Area returns for its 15th iteration!

Buy Tickets today! SAVE 15% and lock-in your preferred date(s).

FEEDBACK