

CO2 Monitors vs. Covid — DIY Kits and Parts Lists
As described in Volume 78 of Make: Magazine, there are many possible options for building a CO2 monitoring device. In the article “Fresh Air” (pages 22-35) we outlined four basic approaches; on this page we provide the parts lists for building those. In addition, we now have a basic OCTOPUS CO2 Traffic Light Kit from Maker Shed.
New! OCTOPUS CO2 Traffic Light Kit from Maker Shed
This kit, available through Maker Shed, provides the basic components for building a CO2 monitoring device that works as a CO2 Traffic Light. By reading CO2 levels and displaying the reading as easy-to-understand colors (green/yellow/red), this device can be used to measure proper ventilation indoors and reduce the risk of the spread of Covid-19.

The OCTOPUS board with SCD30 Feather sensor.
The custom OCTOPUS board, based on the ESP8266 chip, was designed by Fab-Lab.eu in Germany. The IoT Octopus board offers a lot of flexibility in selecting components such as different displays, sensors, power or networking options. This basic kit includes the Sensirion SCD30 CO2 sensor mounted on a Feather-compatible wing PCB, and the Octopus with a Bosch Sensortec BME680 on-board sensor (to measure VOC gases, IAQ, temperature, humidity, and barometric pressure) and two NeoPixel LEDs for displaying a “traffic light” — green when levels are OK, yellow for a warning, red when unhealthy. This kit is compatible with the Arduino IDE, and can be programmed using ArduBlocks. No soldering required.
CO2 Traffic Light Kit includes:
- IoT OCTOPUS board with ESP8266 microcontroller, BME680 gas/environmental sensor, two Grove connectors for analog and I2C and USB
- Sensirion SCD30 CO2 sensor and Feather wing with pre-soldered headers
- Two RGBW NeoPixel LEDs on board
Buy on MakerShed.
Option A: IoT Octopus Board
This option is based on Grove components. The OCTOPUS Board has RGB LEDs, the ESP8266 chip, and the BME680 environment sensor on board as well. A separate display is not required because you can use the onboard LEDs as “traffic lights.” If you do want to add a display, consider the Grove 16×2, White on Blue. Use a Grove cable to connect the SCD-30 sensor — or a Grove branch (Y) cable to connect the sensor and optional display — to the Octopus board.
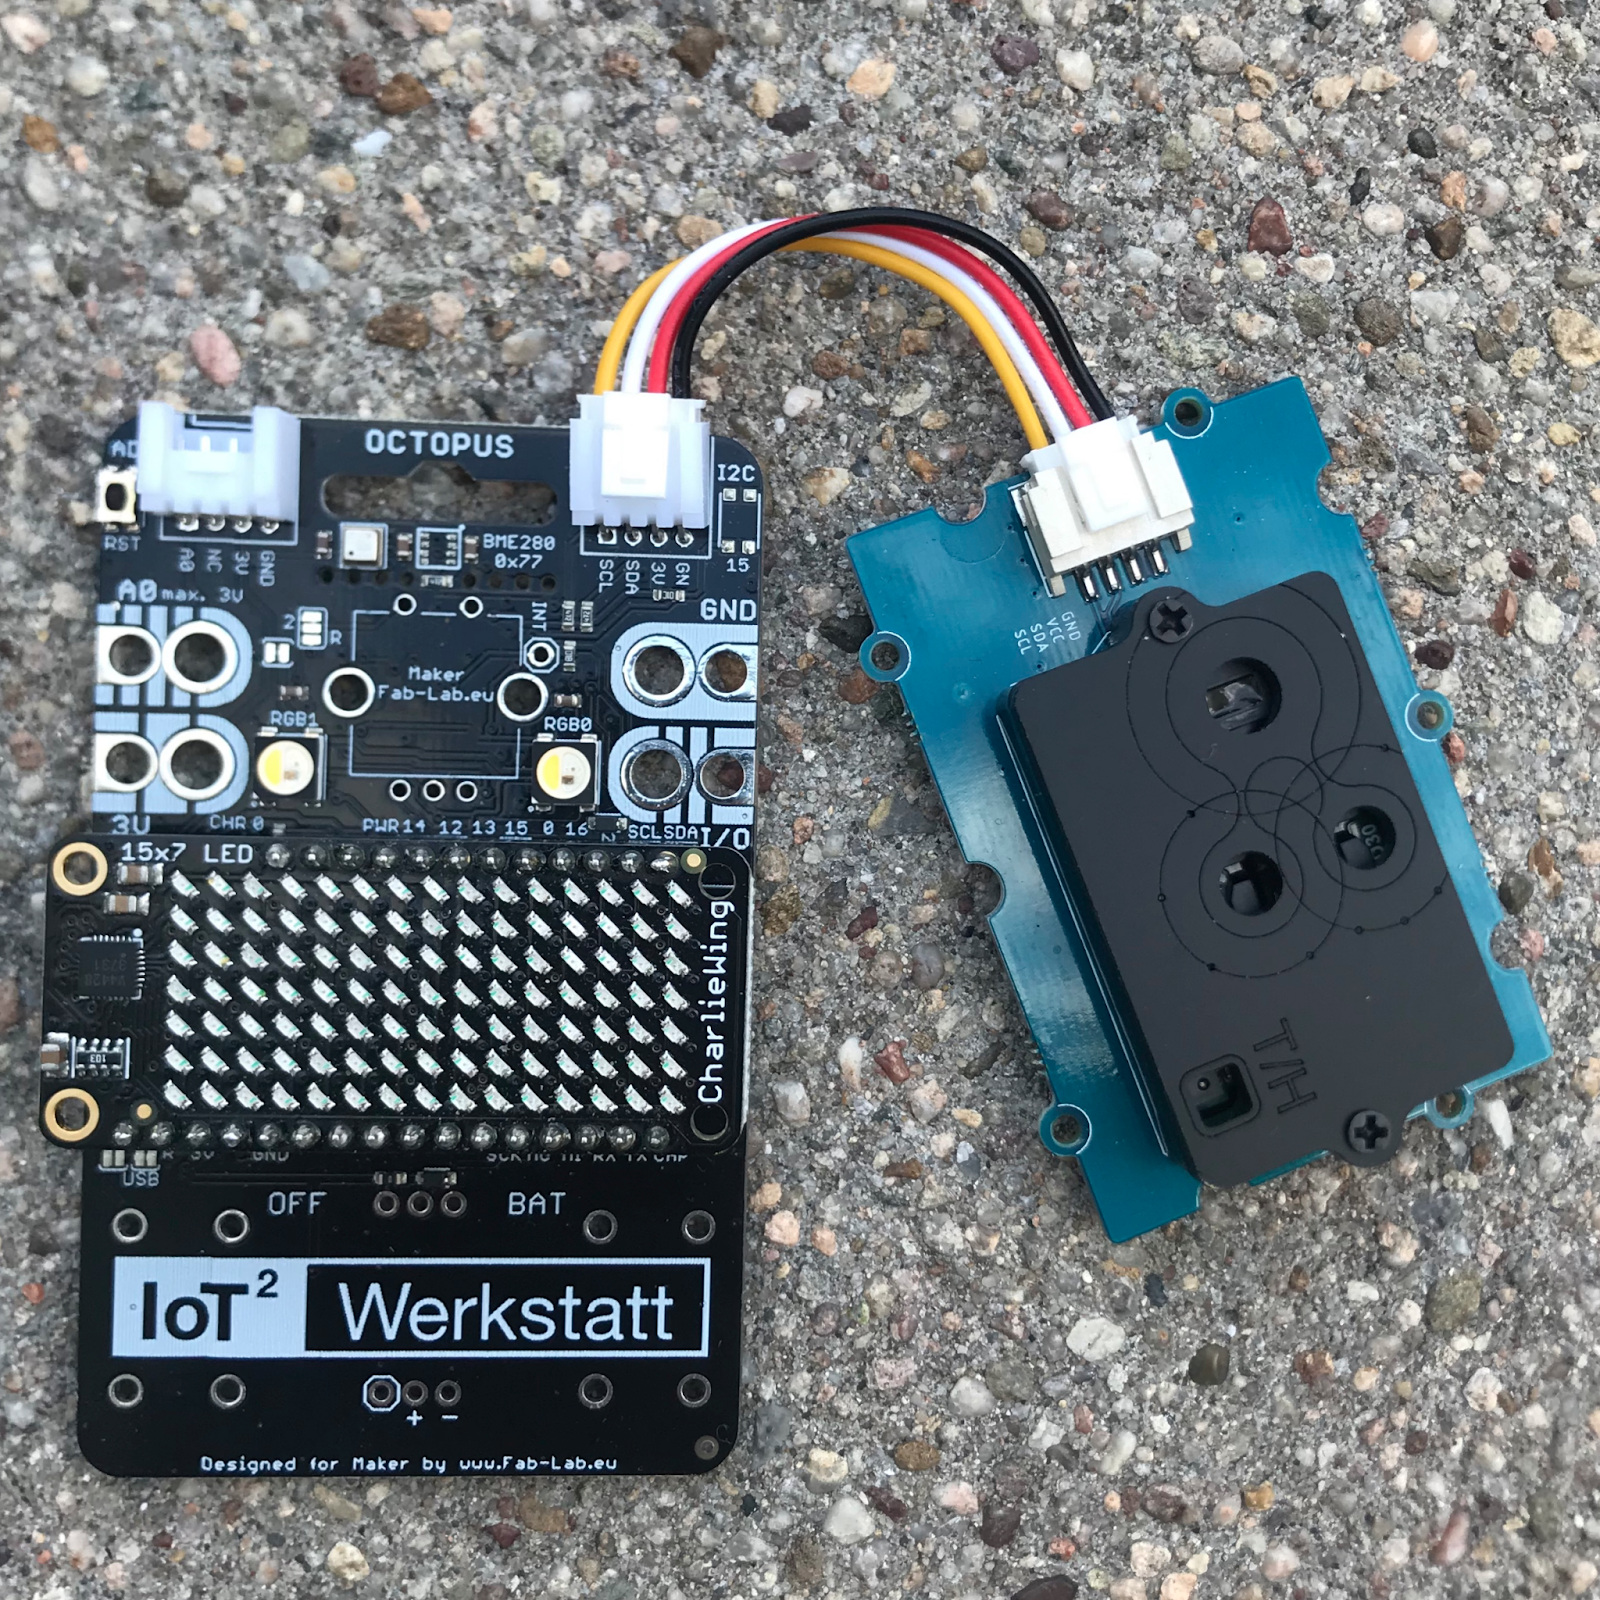
The Octopus board with SCD30 Grove sensor.
| Controller | IoT Octopus | $45 |
| CO2 sensor | Grove SCD30 | $66 |
| Display | Grove 16×2 LCD | $7 |
| Cable | Grove Y cables | $5 |
| Power | USB |
Option B: DIY Bare Board Kit
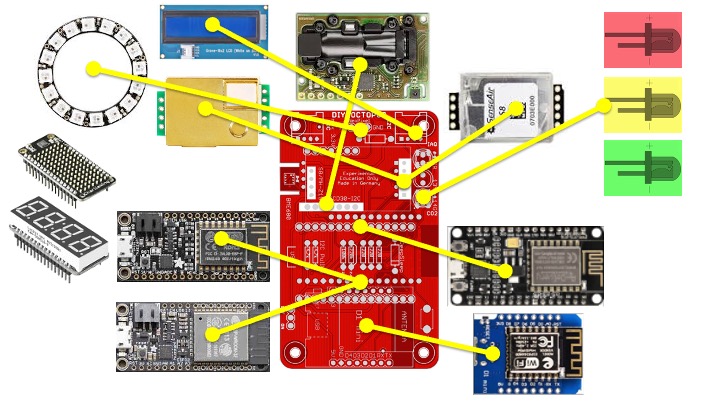
This version is same form-factor as the IoT Octopus and comes as a kit that requires assembly. The red PCB is compatible with different options for compute module (microcontroller), CO2 sensor, and display (Figure 8). As a kit, it comes with a Node MCU, Grove connectors, resistors, and other components and requires through-hole soldering. After assembly, this handheld device has the SCD30 conveniently stacked on the board.

The red DIY Octopus bare board has locations for adding different CO2 sensors (1)(2), microcontrollers (3)(4), and displays (4)(5)(6), plus VOC sensor (7), discrete LEDs (8), and NeoPixel LEDs (9).
| Kit | DIY IoT Octopus including SCD30 and ESP8288 module (NodeMCU v2, Wemos D1, Feather ESP8266) | $85 |
| Power | USB |
Option C: Compact and Small CO2 Devices
A compact CO2 monitor based on an Adafruit Feather microcontroller stacks the sensor mounted on a FeatherWing board. Guido has his own FeatherWing on Tindie that can be purchased with either the two-channel SCD30 or the one-channel MHZ-19 CO2 sensors. You can also, as in Option D, buy equivalent components from Adafruit, Seeed Studios, or SparkFun.
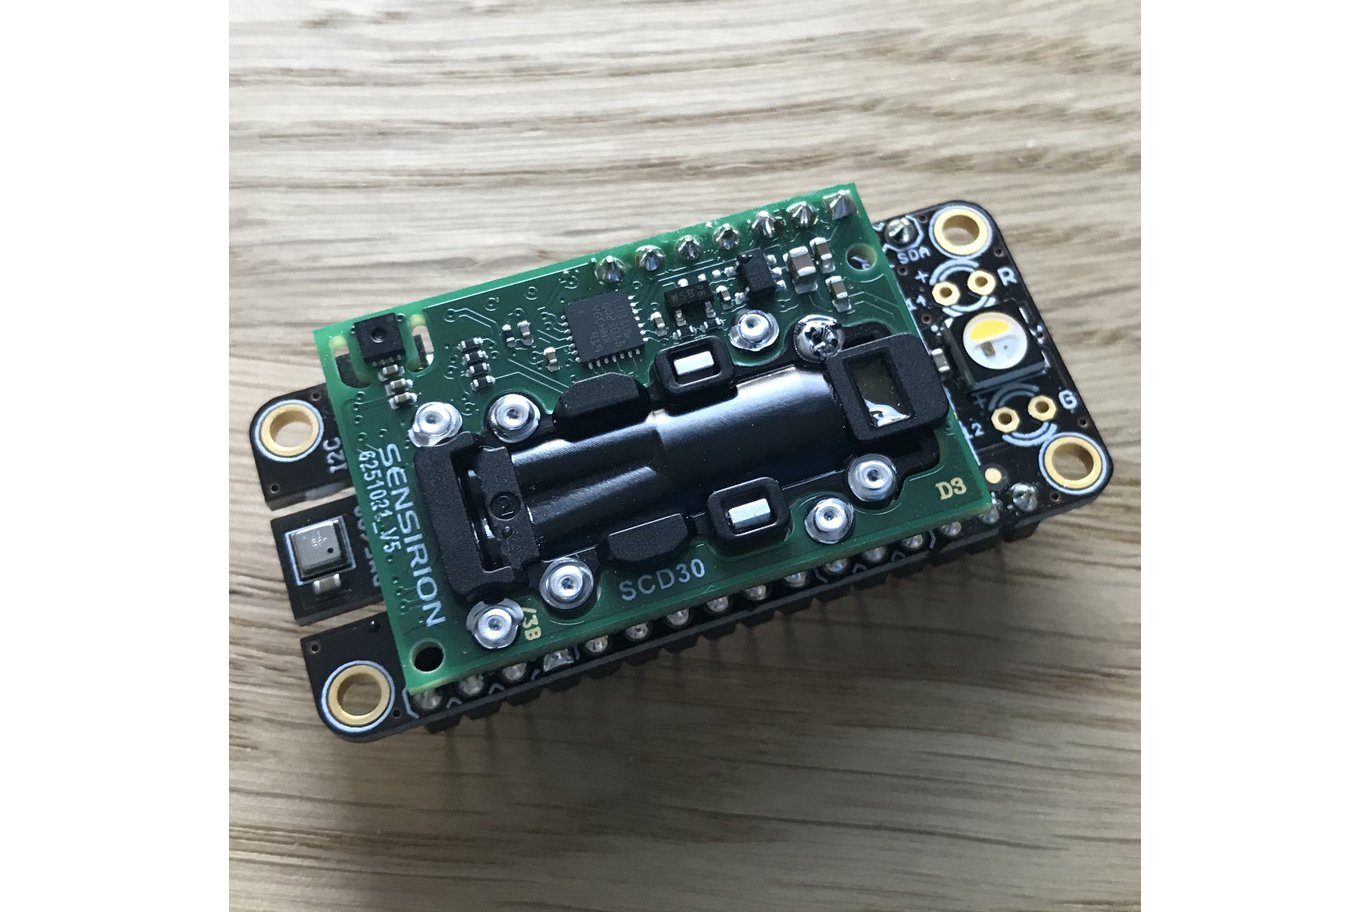
SCD30 sensor mounted on FeatherWing, for stacking on a Feather microcontroller.
| Controller | Adafruit Feather | $17–$40 |
| CO2 Sensor | FeatherWing SCD30 or MH-Z19 | $28 + $50 (SCD30)or $35 (MH-Z19) |
| Display | Various | |
| Power | USB |
The even smaller SCD40 sensor can also be mounted on a FeatherWing, or piggybacked onto Adafruit’s QT Py RP2040 ($10) or QT Py SAMD21 ($8) or the Seeed Studio XIAO (SAMD21). A Stemma/Qwiic display or others can be used. You need to do a little soldering of 2×8 rows but it’s simple to build the world’s smallest CO2 device. Note that the RP2040 board cannot be programmed using ArduBlocks.

SCD40 and Adafruit QT Py connected to an Adafruit FeatherWing 128×60 OLED display.
Here is a list of possible display options:
- LED matrix in different colors (Adafruit Feather CharliePlex 15×7) —universal output: text, measured values, and trend graph
- 7-segment display in different colors (Adafruit 7-Segment FeatherWings), easy-to-read LED digits for measured value output
- NeoPixel matrix (Adafruit NeopixelWing 4×8), widely visible signal lights (green, yellow, red)
- NeoPixel ring (Adafruit Neopixel 24) and Grove cable (male-jumper to Grove), measurement value display (gauge) and traffic light simultaneously. You could also use fewer pixels — just increase the parameter delta in the code if necessary (e.g. 200 ppm/pixel) and adjust size (e.g. 16 pixels).
Option D: Stephan Schulz’s CO2 Monitor
Stephan Schulz built this CO2 device entirely from Adafruit parts, as a portable battery-powered monitor and data logger that his daughter could take to school. It’s based on a Feather M4 microcontroller, with a FeatherWing OLED display and FeatherWing data logger; he shared his code and bill of materials at github.com/stephanschulz/co2-monitor.

Stephan Schulz’s CO2 monitor based on Adafruit FeatherWings. All part numbers from Adafruit.
Adafruit SCD30 NDIR CO2 sensor, part #4867
Feather M4 Express microcontroller, #3857
Battery, 3.7v 2000mAh, #2011
FeatherWing 128×32 OLED display, #2900
Qwiic JST SH 4-pin cable, #4399
Adalogger FeatherWing with RTC and SD slot, #2922
8GB SD card, #1294
CR1220 3V coin cell battery, #380
Quad 2×2 FeatherWing Kit, #4253

Mix-and-Match CO2 Monitors with Adafruit Parts
We loved Carter Nelson’s great big RGB Matrix Portal Room CO2 Monitor (shown above) so we asked him to imagine all the different ways you might build a CO2 device using different Adafruit parts. Here are Carter’s tips for mixing your own CO2 monitors and other air quality monitors.
These air quality projects are all generally doing the same thing: read a sensor value in a loop and display it somehow. So the main items are the sensor, the display, and the microcontroller board that ties them together and runs the actual sensor-reading-and-displaying code. There are numerous options for all of these, providing lots of variety in picking a system to meet differing needs in terms of sensor quality, display readability, and overall cost.
Sensors
There are various options for gas sensors that can detect a variety of gas types and provide a resulting air quality indication.
» If you want to focus on a specific contaminant, then find a sensor that matches. On the low end are these various “hot-plate” based sensor options:
https://www.adafruit.com/product/3709
https://www.adafruit.com/product/4829
https://www.adafruit.com/product/3566
In addition to measuring various gas components they can also provide an estimated value for air quality.
» For particulate air quality measurements, something like the PMSA003I is needed:
https://www.adafruit.com/product/4632
which is optically based and measures the scattered light from an internal laser.
» If you want to measure actual CO2 levels instead of estimated CO2 levels, then you would need to use a sensor like the SCD30 (not to be confused with the SGP30):
https://www.adafruit.com/product/4867
Displays
For a simple option, how about a single RGB LED? NeoPixels provide a good choice here, since they only require a single data pin for control. This 8mm diffused option could provide a simple color based indicator that could be seen from some distance (like across the room):
https://www.adafruit.com/product/1734
NeoPixels are also chainable and come in numerous other form factors. So plenty of other configurations could be conceived.
https://www.adafruit.com/category/275
There is even a FeatherWing option for use on a Feather main board:
https://www.adafruit.com/product/2945
If you wanted to actually be able to display sensor values, but still keep things simple, then consider segmented LEDs:
https://www.adafruit.com/product/878
https://www.adafruit.com/product/1911
The 7-segment displays can generally only show numbers (and a few letters) while the alphanumeric displays can show both numbers and letters. Both are limited to 4 characters, but they can be chained to provide more if needed. These are also available in FeatherWing format for use with Feather main boards:
https://www.adafruit.com/product/3108
https://www.adafruit.com/product/3127
Graphical TFTs provide a much more powerful option. These tend to be fairly high resolution, on the order of 240×320 or 320×480 pixels. They come in general purpose breakout formats:
https://www.adafruit.com/product/2478
https://www.adafruit.com/product/1743
https://www.adafruit.com/product/2050
as well as FeatherWing formats for use with Feather main boards:
https://www.adafruit.com/product/3315
https://www.adafruit.com/product/3651
But to be able to drive a graphical TFT, you’ll need an correspondingly powerful microcontroller main board. So these options will generally be your more expensive ones.
RGB LED matrices are not super high resolution, generally only 32×32 to 64×64 pixels, but are physically large and bright. This makes them good options for readability from a far distance. And they have enough resolution to allow for some creativity in providing both text and graphics.
https://www.adafruit.com/category/327
There are lots of pins associated with driving RGB LED matrices and wiring them all up correctly can be challenging. By using something like the RGB Matrix FeatherWing:
https://www.adafruit.com/product/3036
these connections are taken care of a standard ribbon cable connector makes connecting a RGB LED matrix easy.
Microcontrollers
Since the code is fairly simple, you could potentially use a minimal microcontroller. The main driver for using more powerful microcontrollers will most likely be driven by the display choice. For example, driving a single RGB LED (NeoPixel) does not require much power. However, driving a graphical TFT or RGB matrix will require a micrcontroller with more memory. So on the low end, you could use something as diminutive as an Adafruit QT Py:
https://www.adafruit.com/product/4600
On the other end, for options driving graphical displays, a more powerful choice like the Adafruit Feather M4 Express would work well:
https://www.adafruit.com/product/3857
or the new Raspberry Pi RP2040 based Feather:
https://www.adafruit.com/product/4884
Another choice for graphical TFTs are options that combine both the display and the microcontroller, like the Adafruit CLUE:
https://www.adafruit.com/product/4500
Adafruit PyBadge:
https://www.adafruit.com/product/4200
or the Adafruit PyPortal line:
https://www.adafruit.com/product/4465
https://www.adafruit.com/product/4116
https://www.adafruit.com/product/4444
For use with RGB LED matrices, the Adafruit Matrix Portal provides a plug and play option with an onboard M4 based microcontroller:
https://www.adafruit.com/product/4745
Or, by using the aforementioned RGB Matrix FeatherWing, one could also use a Feather main board.
Example Builds
So, obviously, the number of available permutations is quite large. To provide some ideas, here are a few example builds, ranging from super simple to nice and large.
Super Simple: QT Py + SGP30 + NeoPixel = Read the indicated air quality from the SGP30 and turn that into a color sent to the NeoPixel. For example green for good, yellow for caution, red for bad.
Basic Graphical: CLUE + SGP30 = Read the indicated air quality and display on the TFT. With 240×240 pixels to play with, can get creative and show text, graphics, plots, etc.
IOT Connected: Feather M4 Express + AirLift FeatherWing + PM2.5 = Read the air quality and send it to Adafruit IO and view results on phone or other smart device.
https://learn.adafruit.com/diy-air-quality-monitor
Nice and Large RGB LED: Matrix Portal + LED RGB Matrix + SCD30 = Read the CO2 value and display along with smiley face icons and brief word description.
https://learn.adafruit.com/matrix-portal-room-co2-monitor
1,000 — The Magic Number?
Now that we can measure CO2 levels, how much is too much?
Many European governments recognize 1,000–1,500ppm CO2 as the threshold for “low” indoor air quality.
In the United States, the EPA hasn’t set a CO2 standard but its Reference Guide for IAQ in Schools leans on a decades-old ventilation standard of 1,000ppm from the American Society of Heating, Refrigerating, and Air-Conditioning Engineers. ASHRAE has long since backtracked on that number, but did recently find “700ppm above the outdoor concentration as the upper limit for occupied classrooms (usually around 1,000ppm)” — the point where the room smells offensive from body odor. Sounds like 1,000 is still a pretty good threshold for “open a window, it’s getting stuffy in here.”
OSHA limits exposure to 5000ppm as an occupational hazard (too dangerous to work in), but interestingly, does require that air supplied to commercial divers “shall not contain a level of carbon dioxide greater than” — you guessed it — 1,000ppm.
—Keith Hammond
Resources
- Guido Burger’s English Language page on CO2 Devices
- Video featuring Guido Burger discussing CO2 devices and showing how to build one using these components:
