In our consumer society, most materials are discarded once they become old or obsolete. Many of these rejects have a hidden beauty that can be brought back to life in a new form; discarded or never-used printed circuit boards (PCBs) fall into this category.

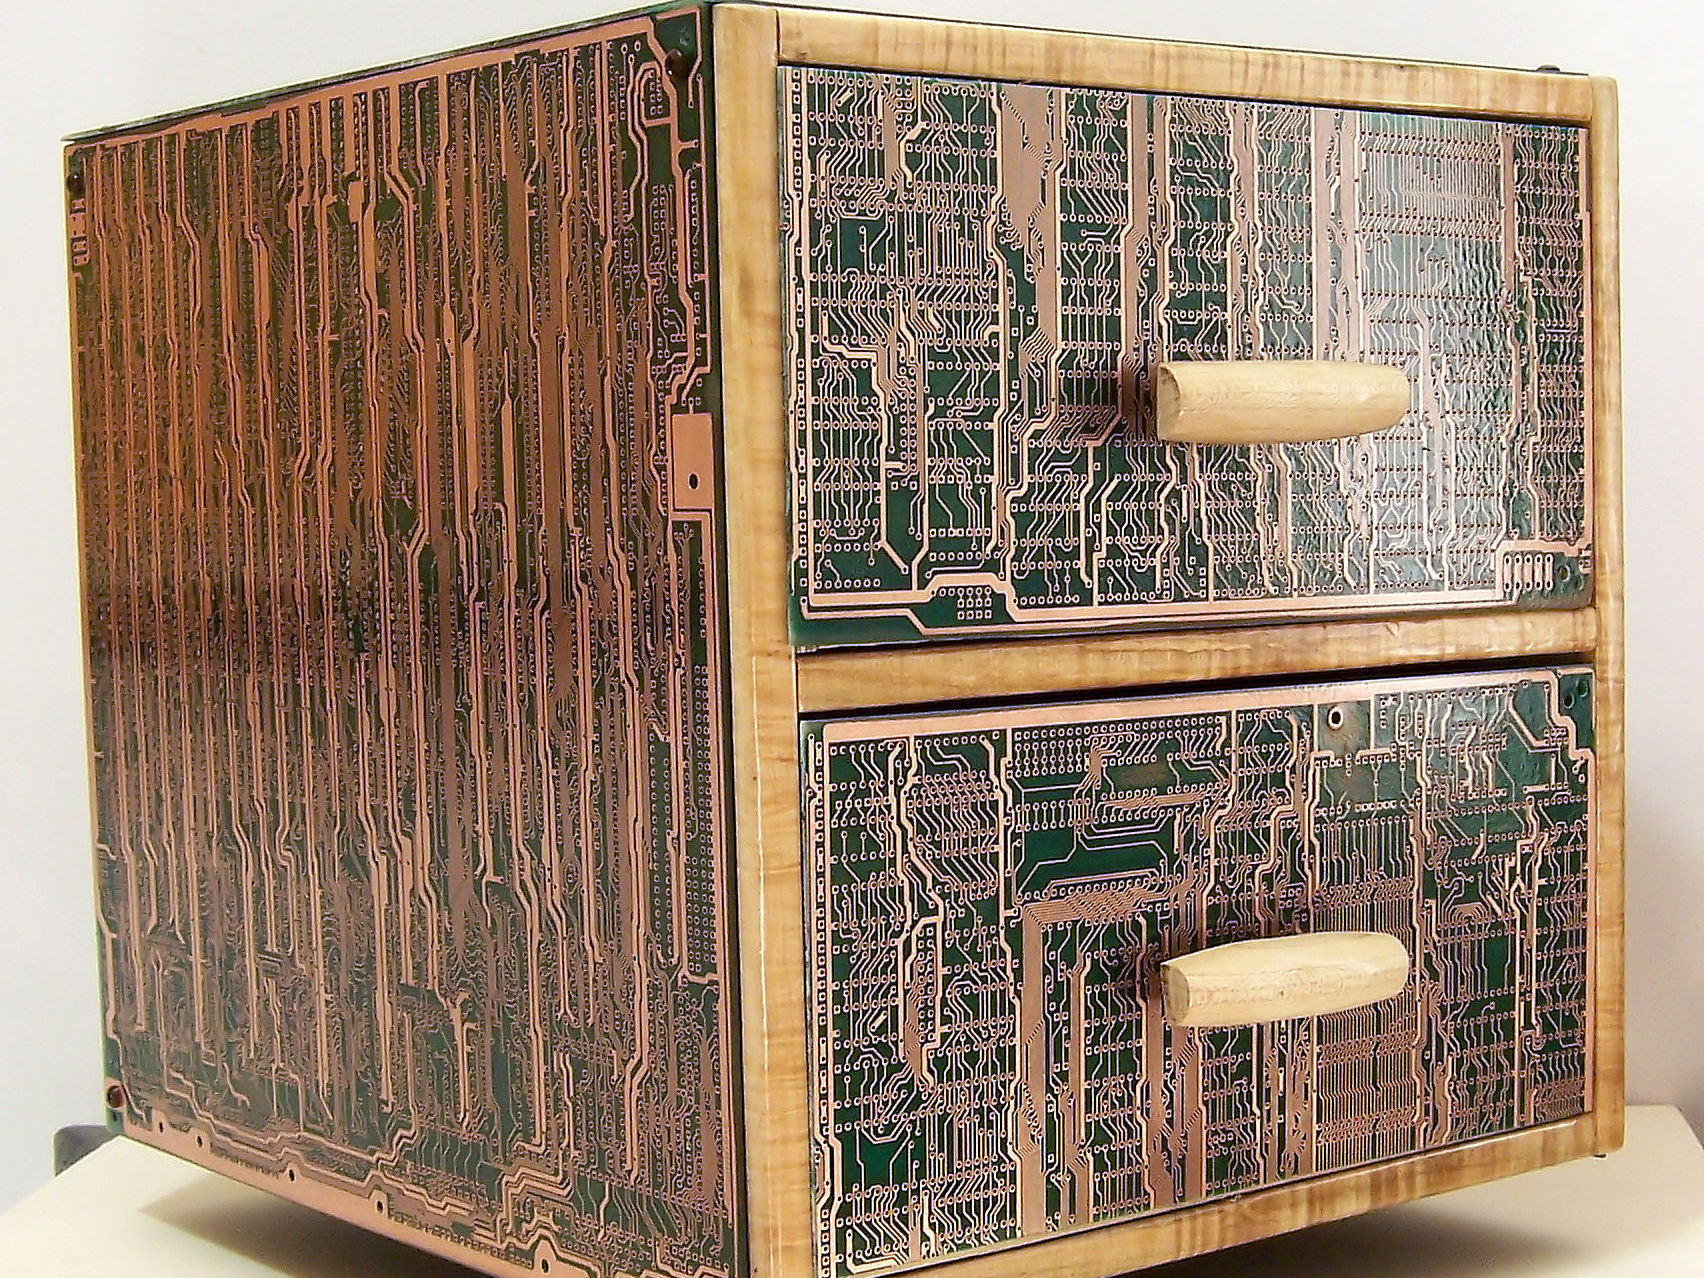
A consequence of the high-tech bubble bust of a few years ago is that millions of PCBs were never used and are now resting in warehouses, waiting for a new lease on life. This project shows how to make a 2-drawer case and “veneer” it with recycled PCBs. The PCBs’ coppery traces look like metallic petroglyphs, and the case looks great in any modern living room or office. Depending on the size, the case can hold precious papers, jewelry, stationery, pens and pencils, or CDs.

Project Steps

Plan and design your case.

Choose your circuit boards. At first glance all the boards look alike, but the trick is to imagine them without their green coating (the solder mask). The best-looking boards will be ones that have the most copper showing. In order to get an idea of what a stripped board will look like, lightly sand off the green protective layer and look at all the boards. The board chosen for this project is shown at left.

NOTE : Boards that do not have parts embedded in them are easier to work with and can be cut on a regular table saw. The larger boards are easier to use and require less preparation.

The size of the boards will determine the size of the cabinet. Measure the board to get the dimensions; in this example, the chosen size is 11″×123″.

Decide on the number of drawers for your cabinet, depending on your needs and taste. In this example, the sizes of the boards are a good fit for a case with 2 drawers.

Choose the material that you’ll use to build your cabinet. It can be made of just about any type of wood, from solid wood to MDF (medium density fiberboard). The example shown is made of Baltic birch plywood; this is solid and easy-to-use plywood where the layers are thin and have no voids (meaning it is easy to mill and has a nice flat surface). Plywood is a great material to use because it will also make the case heavy and thus more sturdy and durable.

Build the case.

With your saw, cut your wood into 6 pieces — 2 side walls, top, bottom, back, and a separator piece to divide it into 2 slots for drawers. Again, the size of the pieces should be the same size as your chosen PCBs.

Join the pieces together in a consistent and sturdy manner. I recommend using lap joints which allow for a larger gluing area and also provide support for the boards at the joints. If the pieces are only pinned and glued together (a butt joint), the structure will be weak, and the joints will have a tendency to separate over time as humidity rises and falls.The case will be veneered with PCB material; therefore the joints do not have to be decorative, just strong. To make a lap joint, place a bit in the router and adjust the height of the bit so that it clears the wood

Sand and stain the case.

PCBs are full of holes and irregular shapes, so it’s important that the eye not be drawn to the faults in the boards. To avoid this, stain the outside of the case in black. Any black stain will do, but the suggested stain is black Chinese or Japanese calligraphy ink. This ink is made primarily with carbon and will not fade over time. It can be purchased as ink or in convenient sticks that are ground into fine slurry; both will work.

TIP: To make stain “blacker than black,” finely pound calligraphy sticks into pea-size pieces and sit them in water for 6 months in an airtight glass container. The mixture becomes a gel you can dilute to form any level of black. The ink is water-based and won’t sink into wood with any glue in it. For a consistent finish, lightly sand the wood, then apply the stain. Remember: Stain permanently discolors anything it touches.

Build the drawers.

Cut 5 pieces of your wood for each drawer — 2 sides, a bottom, back, and front.

The drawers have to be made to fit in the slots, but not too tightly or loosely. If the fit is too tight, the drawers will stick when the wood expands because of humidity. If it is too loose, the drawers will wobble and bind. To have a perfect fit, cut them as described in the attached images.

The exact size of the front of the drawer would be 101″×44″, so a good size for this is 101″–¼” = 94″. This leaves 1″ on each side of the drawer. The height depends on the purpose of the drawer, but should be at least 2″ or 3″. So the drawer front is 94″×2½.

The length for the drawer is 123″–8″–1″–fudge factor (length of case–thickness of back–thickness of PCB–fudge factor). The length therefore is 123″–9″ = 125″.

Frame the circuit boards.

The face of the cabinet still has exposed plywood that needs to be covered with contrasting wood in order to frame the printed circuit boards. To increase strength and durability, choose a light but hard wood; maple is a good choice. Cut the wood into strips to fit the exposed plywood, then use wood glue to adhere the strips to the plywood.

Cut the PCB for case top and sides.

Cut your PCBs on a regular table saw just like you would with wood. Make 5 pieces that are sized to cover the top, front, and 3 sides.

Safety first! Take extra care when cutting or sanding printed circuit boards. Wear safety glasses and a mask when cutting PCBs because, unlike wood, PCBs pose several dangerous challenges. Because of the thinness of most boards, they are prone to binding when cut on a table saw, and chunks of the board’s material can be flung at your face. PCBs are also made of potentially hazardous material, while copper dust and fiberglass also pose a hazard. Older boards may contain lead (a poisonous metal).

Sand and polish the PCB.

Remove the boards’ covering, beginning with the coarsest sandpaper (60).

Continue sanding and gradually increase the grit to 150 if you are aiming for a satin or rough finish.

For a mirror finish, continue sanding with ever-increasing grit (400, then 1,000); these should be done by hand.

Apply a clear, protective coating (spray-on polyurethane). It is important that the boards be cleaned of all the dust and grime accumulated on the surface before spraying.

Dry the PCBs in a warm and well-ventilated area.

NOTE: Remember that copper tarnishes quickly — protect the board as soon as you are finished sanding it.

Fit the PCB to sides of the case.

Use screws or glue to attach the PCB boards to the cabinet. If you are using screws, use small wood ones to attach the polished PCBs to the sides of the cabinet. Typically, the boards will have holes of various sizes built into them. Place the screws in these holes to tightly bind the board to the cabinet.

If you decide to glue the boards to the cabinet, apply glue to the boards first. The best type of glue for this project is epoxy-based. Screws can also be used as tiny clamps to hold the boards until the glue has set.

Make knobs for the drawers.

Drawer pulls enhance the beauty and functionality of your cabinet. In this example, the drawer pulls were made of the same maple used for the wood strips.

Cut the maple into sticks, then shape them by sanding them with a stationary sander, and then by hand. Do not try to make the pulls too perfect; the idea is to contrast the glittery, busy precision of the PCBs with the handmade elegance of the drawer pulls. Drill a ¼” hole in the center of each drawer pull, about halfway in.

Fit the drawer faces and the knobs.

Carefully measure the opening of the cabinet where the drawers fit in. Cut 2 faces from the PCBs, and then carefully drill a ¼” hole in the center of each of the PCB faces. Fit a PCB face with clamps to one of the drawer faces and drill a hole; repeat with the other PCB face, then glue the PCB faces to the drawer faces.

Use a ¼” dowel to fit the knob into the drawer. You will need to add a bit of glue on the dowel and in the hole before fitting. Place the drawers in the case.

NOTE: To make the drawer easier to pull out, place the drawer pull slightly lower than the center of the face.

Admire your handiwork.

The devices of modernity are powered by the humble PCB. The beauty and elegance of the PCB, otherwise forgotten and discarded, has been revealed and used in a practical way. Now it’s the time to fill your cabinet with stuff!

Conclusion

This project first appeared in CRAFT Volume 02, page 84.