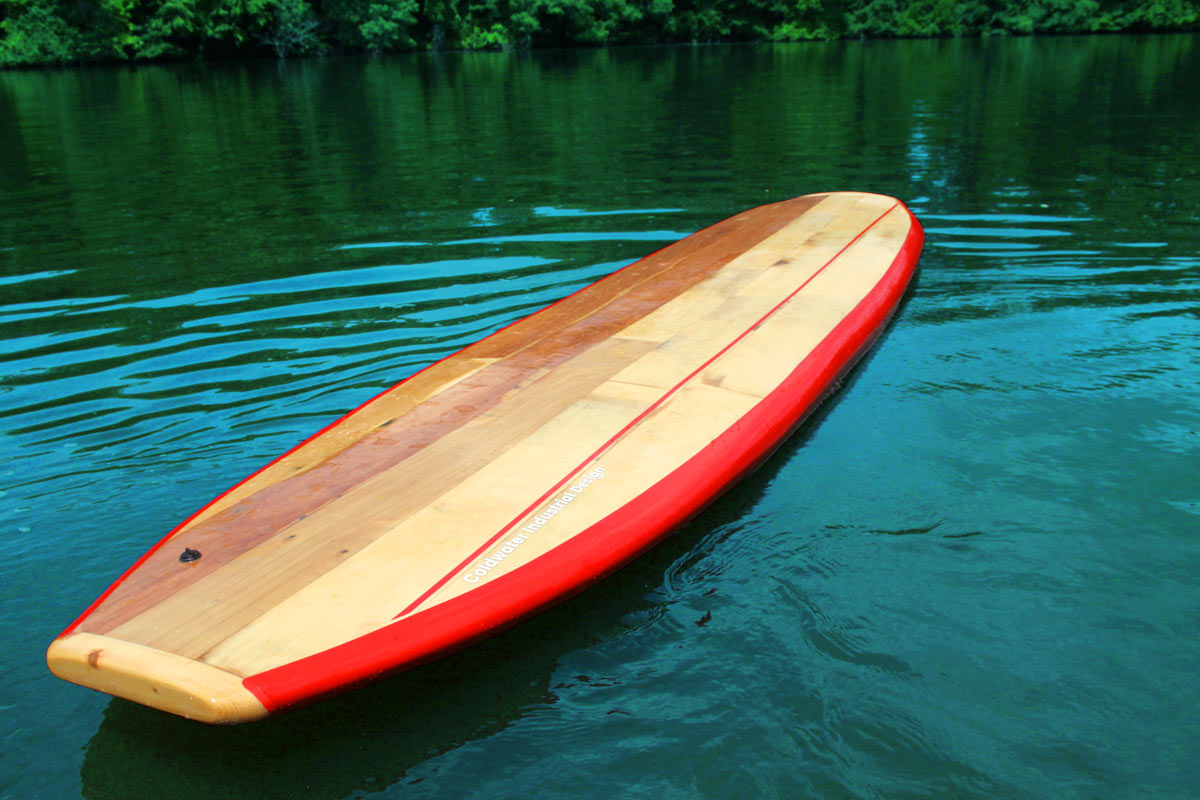
Wha’s SUP, water lovers? A stand-up paddleboard (or SUP) is one of the newest incarnations of the venerable surfboard, and we’re going to build one that has all the wonderful qualities of the old wooden longboards. In fact, this 10’5″ longboard SUP
can do double duty as both a paddle craft and a wave-rider.

I grew up around boats and the beach. The surfboard is a natural for attracting any young beach kid’s interest. After hurling around some awfully heavy solid wood boards in the past, modern materials and techniques drew me back in. As I became interested in building lightweight sailing boats, I started to fuse modern composite technology with old-school wood. This CNC SUP project pulls in the best influences from drastically different worlds.

At the core of this CNC SUP longboard is a “rib and spine” skeleton that makes it hollow yet strong. Using a CNC router and the vector images that I provide, you’ll be able to create this internal frame in a few quick steps. The covering of the board and the final finishing are phases of the project where you can go in any number of directions. I’ll show you one way, and will hint at others. The beauty of making a surfboard is that there are infinite varieties in the final covering.

Anatomy of a Surfboard/Paddleboard

Finally, this SUP has excellent safety. It uses what I call a “NeverSink” system for its rails (the curved edges of the board) which result in a board that can survive a fracture and yet never fully sink!

Creating the CNC board is a twelve-step program:

  1. Obtain the materials, tools and space
  2. Think about time and schedules
  3. Use the SVG files to create G-code
  4. Cut the ribs and spine on your CNC router of choice
  5. Assemble the internal frame
  6. Choose a tactic for covering the deck and bottom
  7. Plank the deck and bottom
  8. Create the nose and tail pieces
  9. Create the NeverSink rails
  10. Cover the rails and body with epoxy and fiberglass
  11. Create the stabilizer fin
  12. Finish work

Software and Data

You’ll need a Scalable Vector Graphic (SVG) viewing or editing program, such as the freely-available Inkscape application. With this editor, you can view the included files and alter them as you see fit. You can print the SVG file with numbered pieces to aid you in building the board’s skeleton.

You’ll also need access to a G-code generator. You can find these online, for free, such as MakerCam. When you upload the SVG file, you will have to select your type of cut (such as a profile) as well as the sequence and bit size. For the purposes of this tutorial, it is assumed that you know how to perform this step. It is also assumed that you know how to import this G-code into your CNC platform and operate the machine safely. To learn more about G-code, see Get to Know Your CNC: How to Read G-Code and Make: Getting Started with CNC.

Materials

The SUP is a hollow wood craft with extruded polystyrene foam rails. The structure is encapsulated in layers of epoxy and fiberglass cloth, making it a true “composite” watercraft. The oldest longboards were entirely wood, with no epoxy sheathing, and many worked well. You can choose to go that route, for sure, but take some time to read through my assembly process and notes and perhaps you might find a new route that’s even better! Then, you will absolutely have to write it up and share it. If you do some digging around on surfboard builders’ forums, you’ll find an amazing variety of tactics and material choices. This is just one of my tested creations.

The Skeleton

The primary material for the board is wood. I suggest plywood. You can go the ultra-reliable route and purchase “marine grade” plywood, which is usually made out of okoume, or you can go less expensive and use the most knot-free plywood you can find and simply know that encapsulating it in epoxy will repel water and add strength. “Marine grade” plywood is the better choice, to be sure, and it is virtually free of any “voids” between the laminated plys. However, there are some very good non-marine grade choices out there. You will make the internal frame out of this plywood. I suggest one sheet (48″×96″) of ¼” plywood.

The Skin, Nose, Tail, and Fin

The covering for the board is another area of great freedom. Many people choose to use cedar strips and plane them down to ¼”. You can use plywood or other woods, but be sure they’re as knot-free as possible. I try to use found wood or recycled flooring or fence wood; of course, for such pieces I have to do a lot of repair with epoxy, but if you’re comfortable with this, by all means try it! For the top and bottom skins, you’ll want enough wood to approximately equal two 48″×96″ sheets of plywood.

The wood that you use for the nose and tail blocks should be thick enough for these ends, or you can simply laminate smaller pieces together to make blocks that are about 24″ wide × 2½” thick × 3½” long.

The fin is usually made out of scrap plywood and laminated with epoxy and fiberglass cloth. It’s usually slightly thicker than ¼”, so you may want to laminate two fin profiles together and simply sand/shape it down.

The Rails

You will need one 48″×96″ sheet of 2″-thick extruded polystyrene (XPS) foam. This is usually called “pink foam” insulation, and can be found in the big box home improvement stores. A blue form of this also works. Please be aware that the dust from cutting, sanding, or burning this type of foam is toxic, as we will talk about later, so be prepared.

Space to Build

You will need at least enough space to fit the board in and flip it over as you work on it. A room 16′ long and 7′ wide is as small as you would dare manage. You can bring the board out through a normal door or even a garden-level window. Be aware that the board is about 125″ long and 32″ wide, and negotiating tight turns or stairs may need to be taken into account. When in doubt, make a mock-up with scrap wood or cardboard and see if the object can make it out. Think about where you will cut materials while the board is progressing. Where will you glue up the skin and where will you keep the internal skeleton when they are not paired?

Stop. Breathe. Think.

Making a surfboard is a whole-body experience, and also a whole-mind experience. It is no wonder many people find ways to attach the metaphysical to the art of surfing, and consequently, to the building of the boards. Why are so many SUP riders doing yoga on their boards? There is something going on here, and you’d be remiss to miss out. Building a board is like making another type of fish for the earth. Stop and think of the form, the water, the people and the shapes. Let’s also pause a bit and think about some important aspects involved in making this new creature.

Timing and the Schedule of Chemicals

So you have your materials and tools. Great. Think about the order in which it is all going together and the manner in which you will bring material in and out of your space. As pieces are being glued up, can you progress with other parts? Look through the steps carefully and determine where you can optimize your build process. Take for example, the fin: you may have time to work on this while the top skin is gluing up to the frame. Not all steps are concretely sequential.

The use of epoxy and fiberglass cloth to create the skin covering necessitates careful thinking. Here, you will need about one day per rail (of which there are two) and one day per skin (again, two). Therefore, you will need at least four days for just putting on the epoxy and fiberglass. Then there is the sanding. Then the painting and/or varnishing. While your epoxy and paint and varnish are drying, you won’t want a lot of dust flying around; what can you do in the meantime? Think of scheduling your tasks so that suspended particulate matter doesn’t interfere with your clean, drying surfaces.

Another piece to consider is the material list. Most of the time, you can get the wood quick enough, but odd items such as the vent leash plug may take a while, if ordered. Make sure your assembly isn’t hung up on some tiny item in transit.

The Look of the Board

Many people like the “bright” look of a clear wooden surfboard. This is easily done with a layer of epoxy and then varnish (since the epoxy is not UV-stable, the varnish protects it). For my purposes, since the rails are made out of foam and the skin is made of found wood, I choose a bright look on the decks and painted rails. You can paint the whole board or only parts. That’s the great thing about surfboards: they are amazing canvases!

How to Plank the Board

Here, again, we have a lot of room to maneuver. Boards are usually planked longitudinally, which is running lengthwise. An alternate way is to lay the planks diagonally, as I have shown here. If you plank diagonally, your planks shouldn’t be more than 3″ wide or they’ll be too hard to bend — they must conform to the curvature of the top, bottom, and spine of the board’s frame.

Whichever way you decide to plank, you’ll likely have to do it in stages. You can lay out the boards and edge-glue them together first, and then place that skin on the frame, or you can glue the planks together in batches on the frame itself. Both ways will be shown here.

Fin Style: External or Internal Box

I’ll show you how to place an external fin on the board. A modern alternative is to use an internal fin box so you can use removable fins. If you choose to go this route, you’ll have to plan out how the box is to be laid into the skin (above) and then how that skin will sit on the frame. You do not want to mount your fin box on the skin and then find out that it’s in the way of the internal spine (or vice-versa).

Vent and Leash Hook Plug

This CNC SUP is a hollow wood board. Since it is encapsulated in epoxy and fiberglass cloth, the composite structure is watertight. Being hollow, however, it has air inside it which will expand and contract with heating and cooling (such as on a car’s roof). To mitigate any cracking of the skin due to expansion, you’ll affix a vent in a block and place it in the top skin near the tail. You can search the Internet for “surfboard vent plug” and find all sorts. The best will have a leash attachment where you can tie on a surfboard leash that attaches to your ankle: very handy to keep your board nearby when you decide to take a spill!

Safety

Before you begin, think about safety. Building a surfboard involves cutting various materials. Eye protection is a must whenever any type of power tool is used. Hearing protection is also important, especially if your power tools are louder than a kitchen blender.

Gloves for your hands are necessary when you work with epoxy. Do not skimp on this. Don’t try to “get one more use” out of a disposable glove. You may go through the entire box, but that’s fine. Get used to putting them on and then disposing of them, one inside the other, each time you change mediums or when the epoxy gets too tacky on them. Don’t go opening doors with epoxy on your gloves. Do not scratch that itch on your face. Epoxy and fiberglass and skin are not great mates, despite all the wonderful new “eco” brands.

Dust masks and respirators are essential any time you’re around wood dust (near the CNC router) or cutting XPS foam. The insulation foam, particularly, is quite noxious, and the dust particles are not meant to be inside your lungs. While a set of disposable masks is great, I recommend a cartridge-type respirator that covers mouth and nose.

Have a first aid kit ready, always. Have an area to clean up. Keep your phone handy not only to take pictures, but also to call a friend if you need help. Don’t try to tough things out. Stop. Breathe. Think.

Build Your CNC’d Wood Stand-Up Paddleboard

1. CNC the Spine and Ribs

There are two SVG files: ColdwaterLongboard2_nolabels.svg and ColdwaterLongboard2_labels.svg. You’ll use the nolabels file to create your G-code. This file has the document set at 4′ high by 8′ long, for a full sheet of plywood oriented in a landscape manner on my Maslow CNC router (see Make: Volume 68, page 42). You can rearrange the parts to fit smaller routers.

Figure A

The labels file contains all the same parts, but they’re labeled (Figure A); print this out as a handy guide for inserting the ribs into the spine. Alternatively, and if you have Z-axis (depth) control, you may decide to actually incorporate the labels into your cut paths; set their plunge depth to only 1/16″ or so.

The SVG files have the ribs outlined in green and the two halves of the spine outlined in red. Short vertical paths indicate the slots, which you may have to adjust when creating your G-code if you’ve chosen a thicker or thinner piece of plywood for your parts. So, if your plywood sheet is only ¼” thick, and your router bit is ¼” thick, then on the slot paths, you’ll want to ensure that the router is performing a follow operation and not an outline operation. If your plywood is thinner than your bit, then you’ll have to cut the slots by hand; no biggie!

You’ll notice that there are ellipses inside the ribs and spine; these are weight-saving holes in the structure, so these cutouts can be discarded.

Figure B

Once you’re good with the SVG files, create your G-code and load it into your CNC platform; it’s time to cut! Load one standard 4’×8′ sheet of plywood into your machine and safely cut the parts out (Figure B). After cutting, and especially if you used tabs, clean up the pieces with a rasp or sandpaper and you’re on your way to assembly.

2. Assemble the Spine

The spine or stringer of the board is made from the two parts outlined in red in the SVG files. You’ll “butt scarf” these two pieces together – glue the angled scarf joint together, and reinforce it with two small butt blocks of scrap wood as you would an ordinary square butt joint, for extra strength. To do this, lay the spine on a flat surface and place the diagonal cuts against each other to check for fit. Next, place an overlapping piece of wood behind it, glue all three pieces, and then glue an overlapping scrap of wood on top, using a weight as a clamp. Use a good, waterproof wood glue such as Titebond III and let the assembly dry for at least 8 hours.

3. Glue the Ribs In

Figure C

Once the spine is assembled and the scarf joint is dry and strong, start gluing the ribs into their respective slots, using waterproof wood glue in each joint (Figure C). You’ll want to do this on a table, in two phases — first the forward (bow or nose) half of the spine and then the rear (stern or tail) half — because the bend (rocker) of the spine makes it difficult to glue all the ribs perpendicular at the same time. To glue them all in one pass, you could make short supports and temporarily hot-glue them diagonally between each rib and spine.

Figure D

Figure D shows all the ribs in place; on top is my “sight batten” — just a long, thin strip of material I use to align the whole board or to help make fair curves.

4. Create Rib Rail Stringers

Figure E
Figure F

Rip 6 long strips of plywood 8′ long by ½” wide. You can find this wood at the top and bottom of the plywood sheet you used to cut out the ribs and spine. These don’t have to look great; they’re placed on the outer edge of the ribs, and help support the foam rails that will come later. You can zip-tie them or wire them to the ribs while the glue is drying (Figure E). Align these rail stringers toward the top third and bottom third of the rib edge, and overlap them so that each rib has at least two rail stringers on its edge (Figure F).

5. Loft the Frame and Meditate (Optional)

Figure G

If you’re able, run some twine through one of the holes in the spine near the bow and another piece of twine through a hole near the stern, and hang these from a rafter or ceiling. Now hoist the skeleton up to about eye level (Figure G). This is a good way to see if the frame is balanced.

Figure H

If you need to tip the board one way or another, tape a small piece of wood near the outer end of a rib that must come down (Figure H); you can move the weight inboard (toward the spine) to fine-tune it. Once you’re happy, glue it to the inside of the rib where it won’t interfere with planking or rails.

Lofting the frame is a momentous occasion: You can see that this is really a creature made for a liquid medium. You can imagine how it will maneuver and feel. Sit back and meditate on how your board will look.

6. Lay Out Your Planking

In most all cases, your planking will be 3″-wide clear pieces of lightweight wood, such as cedar. Decide now whether you’ll do it in straight strips that run from bow to stern (longitudinally), or diagonally. You could also try bending large sheets of wood to the curvature of the board in both directions, but this can be quite tricky.

You’ll plank the bottom first, and then the top. Planking can be done either off the frame or on the frame. Figure I shows a board I made with a plywood bottom skin, and a diagonal cedar top skin, planked on the frame.

Planking off the frame is easier. You’ll want a large, flat surface where you can glue all your planks together for the bottom, and then again for the top.

Regardless of how you choose to do it, make sure you can clamp pieces together tightly enough to get a good bond; this may mean doing only a few boards at a time. Long bar clamps are great for this, as are “come-along” ratcheting straps. Packing tape can even be used if you get it tight enough.

Planking can even be done with strips of plywood, but be aware that when plywood is sanded to match the curvature of the frame, it will create “striping” where the high points are sanded down. Still, the interesting look of sanded plywood high spots may do it for you; I think it looks fine!

7. Figure Out Your Fin

Once your bottom boards are all glued together edge-to-edge, you’ll need to make a decision: fin box or no? A fin box is a plastic box with a slot that accepts a standard removable center fin. The box is placed in the underside of the board via a slot cut from the outside. Since the spine of the board runs down the center, you’ll have to cut into the spine, or get creative and mount the box off-center.

If you don’t want to go through with a fin box, you can make a nice fin out of scrap plywood and simply epoxy it on later.

TIP: Plan to make your fin while you’re covering the board in fiberglass and have a day to spare.

8. Plank the Bottom

If you’ve created the bottom skin off the frame, now’s the time to glue it on. Take a look at the board. Whether you’re planking piece-by-piece on the frame or in one go, you’ll want to make sure that the board is not developing a twist. To knock out twist, prop up the ribs with support blocks on your table while you clamp the ribs to the planks, and place large weights on top as you’re gluing the planking on.

9. Make the Vent Block

A hollow surfboard needs a vent to let air escape and equalize with the outside air, during temperature or altitude changes. The normal vents are small plugs about 1″ wide and 1½” deep. Cut a small block of scrap wood about 3″×3″×1½” deep and drill out a hole the size of your vent plug. You’ll put this block on the inside of your top skin. First lay the skin on the board and measure where the vent box will go — about 24″ forward from the tail and close to the spine — then glue it in place.

10. Plank the Top

Figure J

Figure K

It’s time to put on the top skin. If you’re planking on the frame as you go, keep on going (Figure J) — just remember to put in the vent box when you’re ready. Again, you want to ensure that no twist is developing in the board. Place large weights on the top skin to iron out any warps or wrinkles, and prop the bottom with blocks, to alleviate the dreaded twist (Figure K).

Figure L

When the glue is dry, clean up the skin by carefully cutting it back to the outside edge of the stringers and the first and last ribs (Figure L).

11. Build the Nose Block

The nose block is thick, about 1½” or so after shaping, 24″×3½”×2½” thick to start. If you have a big enough piece of wood to use, that’s wonderful. Otherwise, clamp and glue up smaller scraps (cedar is great). The sensuous curves of the nose and tail pieces look amazing with laminated pieces of wood, so I always go that route.
Glue the nose block to the first rib on the bow end of the board.

12. Lay Out the Rails

Now we’re getting to the heart of my NeverSink method. If the board suffers a terrible crack, these rails will keep it afloat.
We’re using 2″-thick extruded polystyrene (XPS) foam, commonly found as “pink” foam in home improvement stores. Wear a mask when you cut or burn this material. Cutting XPS is not that bad with a sharp hand saw. A hot-wire setup works great, though the fumes are pretty noxious. A table saw is the best way to cut it, however.

Figure M

Rip four 4″ wide strips of XPS, each 8′ long. Then cut a 45° angle on one end of each rail (looking down on the 2″ edge). This is where you’ll scarf the rails together, amidships. Stand the rail pieces up against the rail stringers just for orientation, with their 4″ faces vertical and their 45° cuts at the middle (Figure M). This is your basic layout.

Figure N

You’ll notice the bow portion of each rail has quite a bend to it. To alleviate this and ensure that the foam rails don’t crack when we’re torturing them to this curvature, we’ll use kerf cuts. Using a sharp saw, knife, or hot wire, cut notches about 1″ deep from outboard to inboard, about 2″ apart, from the nose to about 30″ back (Figure N). These kerfs allow the foam to bend without over-stressing and rupturing its skin. You can use this technique on wood as well!

Now you can glue the rails to the rail stringers.

13. Build the Tail Block

Just as you crafted the nose block, now craft the tail block. You can place this on the board before bringing the rails in, or after bending them around the stern-most rail curvature. Glue the block tightly to the last rib; you can run ropes or straps along the long axis of the board to cinch it tight.

14. Shape the Nose, Rails, and Tail

Figure O

Now you can cut down and shape the nose, rails, and tail to the profile of your choice using a fine handsaw, then the Surform rasp, a hand plane (Figure O), and/or varying grits of sandpaper. If you use a hot wire to shape the foam, beware of slicing away too much!

Perhaps the easiest and best rail profile is a D-shaped cross-section that has the same curvature on top and bottom (“50-50” rails). Of course you can try alternate profiles such as a “pinched” rail, but these are for specific performance aspects.

15. Epoxy the Board

I won’t go into all the wonderful traits of epoxy, or exhaust the many ways in which you can lay up your board. Suffice it to say, you need at least one coat of epoxy on the board to seal it. First, patch any gaps in the planking or rails. You can mix some fine sawdust with epoxy to create a patching compound the consistency of peanut butter.

To seal the board, apply the epoxy with a foam roller or carefully with a brush. Beware of drips, as these will cause sanding headaches later!

Optionally, you can put a layer of fiberglass on the top (deck) and/or bottom of the board for extra abrasion resistance, but you’ll have to fully “wet out” the fiberglass cloth and then add at least two or three layers of epoxy to fill up the weave.

16. Fiberglass the Rails

Figure P

The XPS foam rails must be covered with fiberglass for strength. First, you can fair the rails (spackle any gaps) with simple drywall joint compound. After fairing, coat the rails with epoxy and then lay the fiberglass cloth on the wet epoxy. Rails, nose, and tail blocks should all have a layer of 4oz cloth that overlaps the joint between rail and skin; I recommend glassing the entire deck while you’re at it (Figure P). “Wet out” the cloth fully with epoxy, smooth out any bubbles, and clean up any drips.

Figure Q

When this first laminating coat is dry (Figure Q), you’ll want to brush or roller on at least two more coats of epoxy on top of this, to completely fill the weave and create a smooth surface for sanding. Plan on a few days.

17. Make Your Fin

Figure R

The surfboard fin or skeg is a simple creation that you can cut out with a jigsaw or your CNC. Typically, these are about 8″ long for a board this size and there are many shapes; search the internet for “center fin” and you’ll see the dizzying variety. For a good all-around fin, a large “slanted D” style, which looks pretty fish-like, is fine (Figure R). Make this out of two pieces of ¼” plywood laminated together, and sand down the leading edge to a graceful, blunt curve. Sand down the trailing edge to a sharper profile, but don’t make it knife-sharp, as that will actually hinder performance.

Cover the fin in a coat of epoxy, or optionally, fiberglass it too.

18. Lay Out the Tail Fin

Figure S

Epoxy the fin on the bottom of the board, about 8″ forward from the tail (Figure S). For strength, create a fillet from epoxy and sawdust and apply it all around the board-to-fin joint with a gloved finger.

TIP: Come back in an hour or two and dip a gloved finger in denatured alcohol and then smooth the fillet joint; it does wonders and cuts down on sanding later.

19. Paint the Rails

Figure T

You’re getting really close now! Since the rails are that unsightly pink foam and drywall compound, they won’t look all that great. Paint them, and any other areas you wish, with a good all-purpose paint for plastics such as Krylon (Figure T). Go slowly and sand between coats to get it smooth.

20. Finishing

Finish work — you love it or hate it. Here you’ll sand, paint, sand, and sand some more. Make sure you’re not sanding through any fiberglass cloth! Add any extra designs, if you like.

21. Varnish

Figure U

As epoxy is inherently not UV-stable, you’ll want to varnish over it. Pick a good spar varnish, go slowly, and avoid lumps and sags (Figure U). You can varnish over the painted rails as well, though it may impart a slight color change. I sometimes add pinstripes and I varnish over these for extra protection; the coloring actually is quite pleasing.

Surf’s SUP!

You’re done! Sure, there may be odds and ends, and sure, the overall curvature of the board may not be exactly perfect. But it’s close enough, it’s beautiful, and it’s yours. You have come a long way and put your hand into many different techniques from CNC to artistic joinery and composite hull construction. Hooray!

Once your board is dry, you can create a paddle (I like the one at instructables.com/id/Build-a-Stand-Up-Paddeboard-Paddle) or just go out and hit the waves.

I recommend you don’t let your SUP sit in the hot sun or a sealed-up vehicle for long, if you can help it. But the vent really works well and should mitigate any problems.

Keep your board clean and keep grit from grinding into the varnish coat. If it gets a lot of use, varnish it again every couple of years.

As always, think safety. Take a class or get instruction. Wear a life-preserving device and never go too far from a safe landfall. Watch the wind and weather, and have fun!

Project Steps

1. CNC the Spine and Ribs

There are two SVG files: ColdwaterLongboard2_nolabels.svg and ColdwaterLongboard2_labels.svg. You’ll use the nolabels file to create your G-code. This file has the document set at 4′ high by 8′ long, for a full sheet of plywood oriented in a landscape manner on my Maslow CNC router (see Make: Volume 68, page 42). You can rearrange the parts to fit smaller routers.

Figure A

The labels file contains all the same parts, but they’re labeled (Figure A); print this out as a handy guide for inserting the ribs into the spine. Alternatively, and if you have Z-axis (depth) control, you may decide to actually incorporate the labels into your cut paths; set their plunge depth to only 1/16″ or so.

The SVG files have the ribs outlined in green and the two halves of the spine outlined in red. Short vertical paths indicate the slots, which you may have to adjust when creating your G-code if you’ve chosen a thicker or thinner piece of plywood for your parts. So, if your plywood sheet is only ¼” thick, and your router bit is ¼” thick, then on the slot paths, you’ll want to ensure that the router is performing a follow operation and not an outline operation. If your plywood is thinner than your bit, then you’ll have to cut the slots by hand; no biggie!

You’ll notice that there are ellipses inside the ribs and spine; these are weight-saving holes in the structure, so these cutouts can be discarded.

Figure B

Once you’re good with the SVG files, create your G-code and load it into your CNC platform; it’s time to cut! Load one standard 4’×8′ sheet of plywood into your machine and safely cut the parts out (Figure B). After cutting, and especially if you used tabs, clean up the pieces with a rasp or sandpaper and you’re on your way to assembly.

2. Assemble the Spine

The spine or stringer of the board is made from the two parts outlined in red in the SVG files. You’ll “butt scarf” these two pieces together – glue the angled scarf joint together, and reinforce it with two small butt blocks of scrap wood as you would an ordinary square butt joint, for extra strength. To do this, lay the spine on a flat surface and place the diagonal cuts against each other to check for fit. Next, place an overlapping piece of wood behind it, glue all three pieces, and then glue an overlapping scrap of wood on top, using a weight as a clamp. Use a good, waterproof wood glue such as Titebond III and let the assembly dry for at least 8 hours.

3. Glue the Ribs In

Figure C

Once the spine is assembled and the scarf joint is dry and strong, start gluing the ribs into their respective slots, using waterproof wood glue in each joint (Figure C). You’ll want to do this on a table, in two phases — first the forward (bow or nose) half of the spine and then the rear (stern or tail) half — because the bend (rocker) of the spine makes it difficult to glue all the ribs perpendicular at the same time. To glue them all in one pass, you could make short supports and temporarily hot-glue them diagonally between each rib and spine.

Figure D

Figure D shows all the ribs in place; on top is my “sight batten” — just a long, thin strip of material I use to align the whole board or to help make fair curves.

4. Create Rib Rail Stringers

Figure E
Figure F

Rip 6 long strips of plywood 8′ long by ½” wide. You can find this wood at the top and bottom of the plywood sheet you used to cut out the ribs and spine. These don’t have to look great; they’re placed on the outer edge of the ribs, and help support the foam rails that will come later. You can zip-tie them or wire them to the ribs while the glue is drying (Figure E). Align these rail stringers toward the top third and bottom third of the rib edge, and overlap them so that each rib has at least two rail stringers on its edge (Figure F).

5. Loft the Frame and Meditate (Optional)

Figure G

If you’re able, run some twine through one of the holes in the spine near the bow and another piece of twine through a hole near the stern, and hang these from a rafter or ceiling. Now hoist the skeleton up to about eye level (Figure G). This is a good way to see if the frame is balanced.

Figure H

If you need to tip the board one way or another, tape a small piece of wood near the outer end of a rib that must come down (Figure H); you can move the weight inboard (toward the spine) to fine-tune it. Once you’re happy, glue it to the inside of the rib where it won’t interfere with planking or rails.

Lofting the frame is a momentous occasion: You can see that this is really a creature made for a liquid medium. You can imagine how it will maneuver and feel. Sit back and meditate on how your board will look.

6. Lay Out Your Planking

In most all cases, your planking will be 3″-wide clear pieces of lightweight wood, such as cedar. Decide now whether you’ll do it in straight strips that run from bow to stern (longitudinally), or diagonally. You could also try bending large sheets of wood to the curvature of the board in both directions, but this can be quite tricky.

You’ll plank the bottom first, and then the top. Planking can be done either off the frame or on the frame. Figure I shows a board I made with a plywood bottom skin, and a diagonal cedar top skin, planked on the frame.

Planking off the frame is easier. You’ll want a large, flat surface where you can glue all your planks together for the bottom, and then again for the top.

Regardless of how you choose to do it, make sure you can clamp pieces together tightly enough to get a good bond; this may mean doing only a few boards at a time. Long bar clamps are great for this, as are “come-along” ratcheting straps. Packing tape can even be used if you get it tight enough.

Planking can even be done with strips of plywood, but be aware that when plywood is sanded to match the curvature of the frame, it will create “striping” where the high points are sanded down. Still, the interesting look of sanded plywood high spots may do it for you; I think it looks fine!

7. Figure Out Your Fin

Once your bottom boards are all glued together edge-to-edge, you’ll need to make a decision: fin box or no? A fin box is a plastic box with a slot that accepts a standard removable center fin. The box is placed in the underside of the board via a slot cut from the outside. Since the spine of the board runs down the center, you’ll have to cut into the spine, or get creative and mount the box off-center.

If you don’t want to go through with a fin box, you can make a nice fin out of scrap plywood and simply epoxy it on later.

TIP: Plan to make your fin while you’re covering the board in fiberglass and have a day to spare.

8. Plank the Bottom

If you’ve created the bottom skin off the frame, now’s the time to glue it on. Take a look at the board. Whether you’re planking piece-by-piece on the frame or in one go, you’ll want to make sure that the board is not developing a twist. To knock out twist, prop up the ribs with support blocks on your table while you clamp the ribs to the planks, and place large weights on top as you’re gluing the planking on.

9. Make the Vent Block

A hollow surfboard needs a vent to let air escape and equalize with the outside air, during temperature or altitude changes. The normal vents are small plugs about 1″ wide and 1½” deep. Cut a small block of scrap wood about 3″×3″×1½” deep and drill out a hole the size of your vent plug. You’ll put this block on the inside of your top skin. First lay the skin on the board and measure where the vent box will go — about 24″ forward from the tail and close to the spine — then glue it in place.

10. Plank the Top

Figure J

Figure K

It’s time to put on the top skin. If you’re planking on the frame as you go, keep on going (Figure J) — just remember to put in the vent box when you’re ready. Again, you want to ensure that no twist is developing in the board. Place large weights on the top skin to iron out any warps or wrinkles, and prop the bottom with blocks, to alleviate the dreaded twist (Figure K).

Figure L

When the glue is dry, clean up the skin by carefully cutting it back to the outside edge of the stringers and the first and last ribs (Figure L).

11. Build the Nose Block

The nose block is thick, about 1½” or so after shaping, 24″×3½”×2½” thick to start. If you have a big enough piece of wood to use, that’s wonderful. Otherwise, clamp and glue up smaller scraps (cedar is great). The sensuous curves of the nose and tail pieces look amazing with laminated pieces of wood, so I always go that route.
Glue the nose block to the first rib on the bow end of the board.

12. Lay Out the Rails

Now we’re getting to the heart of my NeverSink method. If the board suffers a terrible crack, these rails will keep it afloat.
We’re using 2″-thick extruded polystyrene (XPS) foam, commonly found as “pink” foam in home improvement stores. Wear a mask when you cut or burn this material. Cutting XPS is not that bad with a sharp hand saw. A hot-wire setup works great, though the fumes are pretty noxious. A table saw is the best way to cut it, however.

Figure M

Rip four 4″ wide strips of XPS, each 8′ long. Then cut a 45° angle on one end of each rail (looking down on the 2″ edge). This is where you’ll scarf the rails together, amidships. Stand the rail pieces up against the rail stringers just for orientation, with their 4″ faces vertical and their 45° cuts at the middle (Figure M). This is your basic layout.

Figure N

You’ll notice the bow portion of each rail has quite a bend to it. To alleviate this and ensure that the foam rails don’t crack when we’re torturing them to this curvature, we’ll use kerf cuts. Using a sharp saw, knife, or hot wire, cut notches about 1″ deep from outboard to inboard, about 2″ apart, from the nose to about 30″ back (Figure N). These kerfs allow the foam to bend without over-stressing and rupturing its skin. You can use this technique on wood as well!

Now you can glue the rails to the rail stringers.

13. Build the Tail Block

Just as you crafted the nose block, now craft the tail block. You can place this on the board before bringing the rails in, or after bending them around the stern-most rail curvature. Glue the block tightly to the last rib; you can run ropes or straps along the long axis of the board to cinch it tight.

14. Shape the Nose, Rails, and Tail

Figure O

Now you can cut down and shape the nose, rails, and tail to the profile of your choice using a fine handsaw, then the Surform rasp, a hand plane (Figure O), and/or varying grits of sandpaper. If you use a hot wire to shape the foam, beware of slicing away too much!

Perhaps the easiest and best rail profile is a D-shaped cross-section that has the same curvature on top and bottom (“50-50” rails). Of course you can try alternate profiles such as a “pinched” rail, but these are for specific performance aspects.

15. Epoxy the Board

I won’t go into all the wonderful traits of epoxy, or exhaust the many ways in which you can lay up your board. Suffice it to say, you need at least one coat of epoxy on the board to seal it. First, patch any gaps in the planking or rails. You can mix some fine sawdust with epoxy to create a patching compound the consistency of peanut butter.

To seal the board, apply the epoxy with a foam roller or carefully with a brush. Beware of drips, as these will cause sanding headaches later!

Optionally, you can put a layer of fiberglass on the top (deck) and/or bottom of the board for extra abrasion resistance, but you’ll have to fully “wet out” the fiberglass cloth and then add at least two or three layers of epoxy to fill up the weave.

16. Fiberglass the Rails

Figure P

The XPS foam rails must be covered with fiberglass for strength. First, you can fair the rails (spackle any gaps) with simple drywall joint compound. After fairing, coat the rails with epoxy and then lay the fiberglass cloth on the wet epoxy. Rails, nose, and tail blocks should all have a layer of 4oz cloth that overlaps the joint between rail and skin; I recommend glassing the entire deck while you’re at it (Figure P). “Wet out” the cloth fully with epoxy, smooth out any bubbles, and clean up any drips.

Figure Q

When this first laminating coat is dry (Figure Q), you’ll want to brush or roller on at least two more coats of epoxy on top of this, to completely fill the weave and create a smooth surface for sanding. Plan on a few days.

17. Make Your Fin

Figure R

The surfboard fin or skeg is a simple creation that you can cut out with a jigsaw or your CNC. Typically, these are about 8″ long for a board this size and there are many shapes; search the internet for “center fin” and you’ll see the dizzying variety. For a good all-around fin, a large “slanted D” style, which looks pretty fish-like, is fine (Figure R). Make this out of two pieces of ¼” plywood laminated together, and sand down the leading edge to a graceful, blunt curve. Sand down the trailing edge to a sharper profile, but don’t make it knife-sharp, as that will actually hinder performance.

Cover the fin in a coat of epoxy, or optionally, fiberglass it too.

18. Lay Out the Tail Fin

Figure S

Epoxy the fin on the bottom of the board, about 8″ forward from the tail (Figure S). For strength, create a fillet from epoxy and sawdust and apply it all around the board-to-fin joint with a gloved finger.

TIP: Come back in an hour or two and dip a gloved finger in denatured alcohol and then smooth the fillet joint; it does wonders and cuts down on sanding later.

19. Paint the Rails

Figure T

You’re getting really close now! Since the rails are that unsightly pink foam and drywall compound, they won’t look all that great. Paint them, and any other areas you wish, with a good all-purpose paint for plastics such as Krylon (Figure T). Go slowly and sand between coats to get it smooth.

20. Finishing

Finish work — you love it or hate it. Here you’ll sand, paint, sand, and sand some more. Make sure you’re not sanding through any fiberglass cloth! Add any extra designs, if you like.

21. Varnish

Figure U

As epoxy is inherently not UV-stable, you’ll want to varnish over it. Pick a good spar varnish, go slowly, and avoid lumps and sags (Figure U). You can varnish over the painted rails as well, though it may impart a slight color change. I sometimes add pinstripes and I varnish over these for extra protection; the coloring actually is quite pleasing.

Surf’s SUP!

You’re done! Sure, there may be odds and ends, and sure, the overall curvature of the board may not be exactly perfect. But it’s close enough, it’s beautiful, and it’s yours. You have come a long way and put your hand into many different techniques from CNC to artistic joinery and composite hull construction. Hooray!

Once your board is dry, you can create a paddle (I like this one) or just go out and hit the waves.

I recommend you don’t let your SUP sit in the hot sun or a sealed-up vehicle for long, if you can help it. But the vent really works well and should mitigate any problems.

Keep your board clean and keep grit from grinding into the varnish coat. If it gets a lot of use, varnish it again every couple of years.

As always, think safety. Take a class or get instruction. Wear a life-preserving device and never go too far from a safe landfall. Watch the wind and weather, and have fun!