This article appeared in Make: Vol. 65. Want more great how-tos delivered to your mailbox? Subscribe now!

Home coffee roasting has become so popular that Googling the subject yields millions of hits, and rightfully so: the results can be amazing. There’s just no other way to a fresher cup of coffee. And unroasted (green) beans are readily available from hundreds of sources online, and occasionally locally.

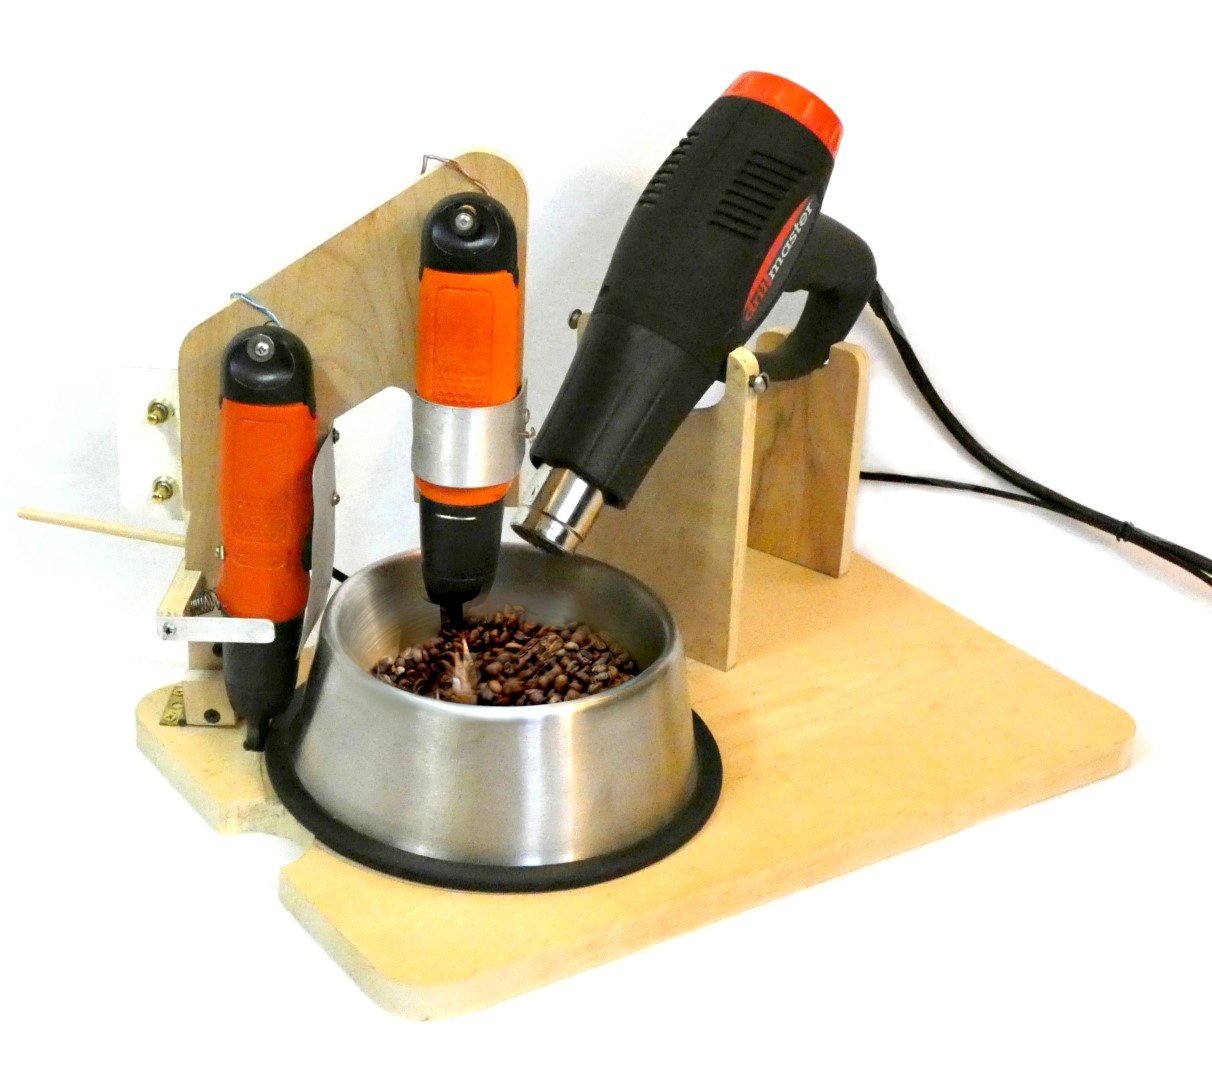
Here’s a cheap, quick, and reliable machine that roasts a decent amount of coffee beautifully with only 5 main parts: two $9 Black & Decker screwdrivers, a $15 heat gun, a cheap power supply and, oh yeah, a (new) dog bowl.

Various incarnations of the heat gun/dog bowl technique are well documented online. This one takes the concept to the next level. It’s easy to build in a day or two, quick to roast, and, best of all, the roasting process is automated, reliably exposing the entire surface of every bean to the same heat.

Cost for the main parts is under $50. Most other materials can be found in a reasonably well-equipped shop. The screwdrivers and power supply are available from Amazon, the heat gun from Harbor Freight, and the wonderful dog bowl from Walmart. (It’s wonderful because it has a rubber anti-skid ring and rounded corners.)

If you live close to a coffee roasting business, ask if they’ll sell you some green beans. If not, Amazon will be happy to have some on your doorstep by the time you finish reading this article. OK, maybe not quite, but go ahead and order 5 pounds of unroasted Kenya AA and start building!

This image identifies most of the parts that will keep the beans constantly moving. This assembly will be mounted to a wood base, which is made first. If you want to paint or clear-coat the wood parts, do so before any construction.

Project Steps

MAKE THE WOODEN PARTS

1. Make the base from a flat 18″ piece of 1×12 pine (¾” ×11¼”) or ¾” plywood. Drill holes A–G as accurately as you can, following the x-y dimensions provided.

Do not drill the hole that’s marked with asterisks (*) until Step 24.

2. In the bottom of the base, countersink holes C, D, E, and F to fit flat-head #8×1½” wood screws. Countersink hole G so the 5/16″ bolt’s flat head will be barely sub-flush with the bottom of the base. Thread the bolt into that hole. Put the skate bearing or fidget spinner bearing over the end of the bolt. If you can’t find the specified bearing, use a stack of four 5/16″×¾”×1/16″ flat washers. The bolt must not protrude above the bearing (or washers). If it does, unscrew the bolt a bit, keeping its head sub-flush, and/or grind its end.

If your base is not perfectly flat, attach two or three 2×2 stringers, 11¼” long, perpendicular to the base’s long axis. Just don’t cover any holes.

3. Make three more wood parts in this step and Steps 4 and 5 from ½” project plywood. Use a jigsaw or band saw to cut out the screwdriver holder and hinge mounts. Holes are dimensioned to fit #8×1″ and #8×1½” wood screws. Don’t mount any wood parts to the base yet.

4. Make the rear heat gun holder. Keep the cutout centered, and no deeper than 11/16″.

5. Make the front heat gun holder. Its cutout must also clear the housing. Ensure the two threaded holes line up with the mounting bosses on the heat gun. Sand all wood parts with 120- and 320-grit paper. Go ahead and install the two ¼”-20 × ¾” machine screws; these will lock the heat gun in place later.

BUILD THE ROASTING BOWL


6. Make the bearing surround from ¼” project plywood. On one side, slightly countersink the two 1/16″ holes to clear the flat-head screw heads when they poke out of the bottom of the bowl.

The 7/8″ hole fits the specified bearing. If you use washers instead, drill a ¾” hole. In either case, a spade bit is best for this task.

7. On the bottom surface of the bowl, place the surround with its small countersinks toward the bowl, and its big hole concentric with the machined circles in the bowl. This must be accurate so that the bowl won’t wobble excessively side-to-side. (Up to 1/16″ wobble is OK.) Tape it in place.

8. Using a new 1/16″ bit and cutting oil, slowly drill through the surround’s two 1/16″ holes into and through the bowl bottom.

9. From the top of the bowl, gradually countersink the two holes just enough so that the heads of two #4×¼” flat-head screws will not pass through, but will be virtually flush. Attach the surround. If you countersink a hole too much, just drill and countersink another pair of holes; a couple extra holes won’t affect the roasting process. Those screw heads need to be flush so the bean stirrer doesn’t hit them.

10. File, sand, or grind flush the points of the mounting screws if they protrude from the bottom of the surround.

11. Place the bowl/surround assembly over the skate/fidget spinner bearing (or washers). It won’t be easy to locate the first time, so draw a circle on your base around the bowl to speed the process later.

12. Give the bowl a 360° spin. If it wobbles side-to-side more than 1/16″, re-mount the surround more accurately to the bowl. The bowl’s anti-skid ring will be driven by a screwdriver chuck (that normally holds a driver bit). A bit of vertical wobble is OK.

MAKE THE BEAN STIRRER

13. Make the stirrer from 12-gauge solid copper wire. I bought a few feet of 3-conductor cable and stripped about 18″ of insulation from one of the conductors with an X-Acto knife and No. 11 blade.

Bend one wire end twice to yield three ½” segments that will fit into the stirrer screwdriver’s chuck.

Roll up a rough elliptical coil, which can bulge slightly at first, then flatten it and try to keep it symmetrical. This will probably need to be adjusted after you assemble the machine, so just set it aside.

MODIFY THE SCREWDRIVERS

14. Since the roaster is powered by a 6VDC power supply instead of batteries, the screwdriver battery compartments must be modified. But first test each screwdriver: install four AA batteries, ensure the spindle-lock collar is unlocked, then press each button for forward and reverse directions. Remove the batteries.

15. In each compartment, at the end and to one side of its centerline, drill a 1/8″ hole to allow two 22-gauge wires to pass. Run the wires through the hole and solder them to the terminals that connect to the screwdriver. Plug the battery compartments back in.

MOUNT THE SCREWDRIVER HOLDER

16. Add the two hinge mounts (cut out in Step 3) to the sides of the screwdriver holder using #8×1″ and #8×1½” wood screws.

17. To easily place and remove the bowl, the screwdriver holder swings out of the way on a 1½”-wide × 1″ hinge. Mount the hinge with #6×½” wood screws so it lines up with the bottom of the screwdriver holder assembly. Attach that assembly with #6×¾” flat-head wood screws using holes A and B you drilled into the base.

MOUNT THE SCREWDRIVERS

18. Hang the screwdrivers on their holder with two 3/8″ dia. × 15/8″ dowels. Drill the dowel ends to take 4 small screws; add 4 washers to trap the screwdrivers. Run wires over the top of the screwdriver holder. The outermost screwdriver turns the bowl and the inner one stirs the beans.

19. Make three 1/16″-thick aluminum strips (A, B, and C). Strips A and B work with the bowl-turning screwdriver; C does double duty retaining the stirring screwdriver and holding one of its buttons in. All three pieces can be cut from standard 1/16″-thick aluminum extrusions. Bend strip C around a scrap piece of PVC pipe, or even one of the screwdrivers. A vise and rubber hammer can help.

20. Make a small wood block to hold a compression spring and aluminum strip B. The spring must keep the bowl-turning screwdriver’s chuck pressed against the bowl’s anti-skid ring. When the bowl wobbles a bit, the chuck will follow it. Ideal spring dimensions are: 1/32″ wire thickness, 7/8″ long, 3/8″ diameter, 10 coils.

Other springs will work as long as they provide a force of about ½lb to 1lb when compressed about ¼”. You could cut down a spring that’s too long or stretch a spring that’s too short.

21. Put a slight bend in aluminum strip A and drill a 1/16″ hole into the bowl-turning screwdriver housing — just into the housing, not anything behind it. (Wrap tape on the drill bit as a stop.) Attach the strip to the screwdriver with a #4×¼”-long sheet metal screw so the button is held in.

22. Using two #6×½” sheet metal screws, assemble the block, spring, and aluminum strip B, then attach the assembly to the screwdriver support. Ensure the spring applies pressure to the screwdriver so it will maintain contact with the bowl’s rubber ring. The screwdriver must slightly — and freely — pivot about its hanging dowel.

23. Attach aluminum strip C to the screwdriver holder, and around the
stirrer screwdriver, with a #6×½” sheet metal screw. Add a #6-32 × 3/8″ machine screw to hold one button in while the big hole in the strip clears the opposite button.

24. Hold the bowl-turning screwdriver roughly vertical, with its chuck sitting on the circle you drew around the bowl in Step 11. If the chuck is out of position, check your work — especially the hinge location — and for possible binding. Draw with pencil around the chuck’s tip and drill a 3/8″ hole. This hole’s locating dimensions in Figure C are approximate. The hole, for now, will be too small for the chuck to enter.


25. The chuck needs to drop about 1/8″ below the top of the base so it will always engage the bowl’s anti-skid ring. So enlarge the top of the hole with a round file or ¼”-diameter Dremel cutter to clear the end of the chuck. Install the bowl and rotate it 360˚. Even with a bit of wobble, the chuck must always press on the bowl’s anti-skid ring and not hit the base. Otherwise you’ll have a bowl o’ burnt beans.

FINISHING TOUCHES

26. Attach a heat shield for the bowl-turning screwdriver. Cut it from thin aluminum sheet (flashing), 25/8″×4″, and mount it to the screwdriver holder with two #6×½” sheet metal screws.

Also add about 4″ of ¼” dowel to the back edge of the screwdriver holder to keep the screwdrivers from tilting back too far.

27. Both screwdrivers should be vertical while running. If they lean in a bit too much and/or the chuck drops more than ¼” below the base surface, add a small flat-head stop screw.

WIRE IT UP

28. With the power supply disconnected, connect everything else. My switch panel is plastic laminate (“Formica”) about 2″×3″, mounted with two screws; your mileage may vary depending on switches. Allow enough power supply wire to reach even when the screwdrivers are tilted back.

Before you solder anything, plug in the power supply and check each screwdriver’s rotation direction (sequentially; your power supply will thank you). If a screwdriver doesn’t run, check for power and that a reverse/forward button is firmly held in. Looking from the top, the bowl should turn clockwise and the stirrer counter-clockwise. Reverse wires if necessary.

Solder, and use heat-shrink tubing to cover bare connections. Staple the power supply wire to the base.

MOUNT THE HEAT GUN

29. You’ll mount both heat gun holders with #8×1½” flat-head wood screws. (Drywall screws work well.)

Mount the front holder to the base after drilling 1/16″ pilot holes in its bottom using the corresponding holes and spacing on the base.

30. Similarly, mount the rear heat gun holder, but with only one screw (at first) so it pivots, allowing some alignment. Set the heat gun in both holders, then add the second screw.

31. Lightly tighten the two ¼”-20 screws into the heat gun bosses.

NOW ROAST THOSE BEANS

Roasting a batch should take around
10–15 minutes. I’ve roasted coffee outside
at 50°F (with no wind) and warmer with
no problems.

1. Use the roaster in a dry, well-
ventilated place without fire hazards, preferably outdoors.

2. Insert the stirrer into its chuck. You may have to tweak the chuck end of the copper wire so that it’s difficult to push in; this should keep it from falling out. It must spin freely, just clearing the bowl’s inner surfaces, but with no scraping.

If the stirrer occasionally falls out when swinging the screwdrivers back, drill a 1/16″ hole in one side of the chuck: file a flat on one side of the chuck, and use cutting oil and a new bit. Then push a thick (1/16″) bare retaining wire into the hole through the end of the stirrer’s inverted U shape. Wrap the wire around the chuck a couple turns.

3. Before adding any green beans to the bowl, test your screwdrivers and heat gun one more time. Read the Harbor Freight heat gun manual. Note that the switch does not have a “cool” setting. Leave the heat gun off.

4. Easy to forget: When positioning the bowl-rotating screwdriver, push it out against its spring, then drop its chuck in its hole in the base and release, so the spring can push the screwdriver chuck against the dog bowl’s anti-skid ring. Keep the anti-skid ring clean and free of any contamination, such as oil and dust.

5. Put 1 cup of green coffee beans into the bowl (Figure  ). With the heat gun off, switch both screwdrivers on (sequentially, remember?) for a minute. The bowl must turn slowly and reliably and the stirrer must robustly agitate the beans with no interference. Take your time with this step.

6. With both screwdrivers running, switch the heat gun to high. Beware the hot nozzle!

7. After a few minutes, the heat gun should blow a considerable amount of tan, light, and thin chaff from the beans as they expand. They’ll begin to yellow, then gradually darken. You’ll hear them crackle (aficionados call that the “first crack”) as they expand and release oils. Also note the stirrer changing to lovely shades of red and purple as it’s exposed to heat. No worries there.


8. When the beans are roasted to your liking and/or just starting to crack again (“second crack”), turn the heat gun off, but leave the screwdrivers running in position. Let the bowl and stirrer rotate for a few minutes in the cooler air until the bowl and beans cool enough to touch.


9. Swing the screwdrivers out of the way, remove the bowl, dump the beans into a container and seal it. Purists wait anywhere from 4 to 24 hours before grinding the coffee. Good luck with that!