raspberry-pi-week_banner-1

YouTube player

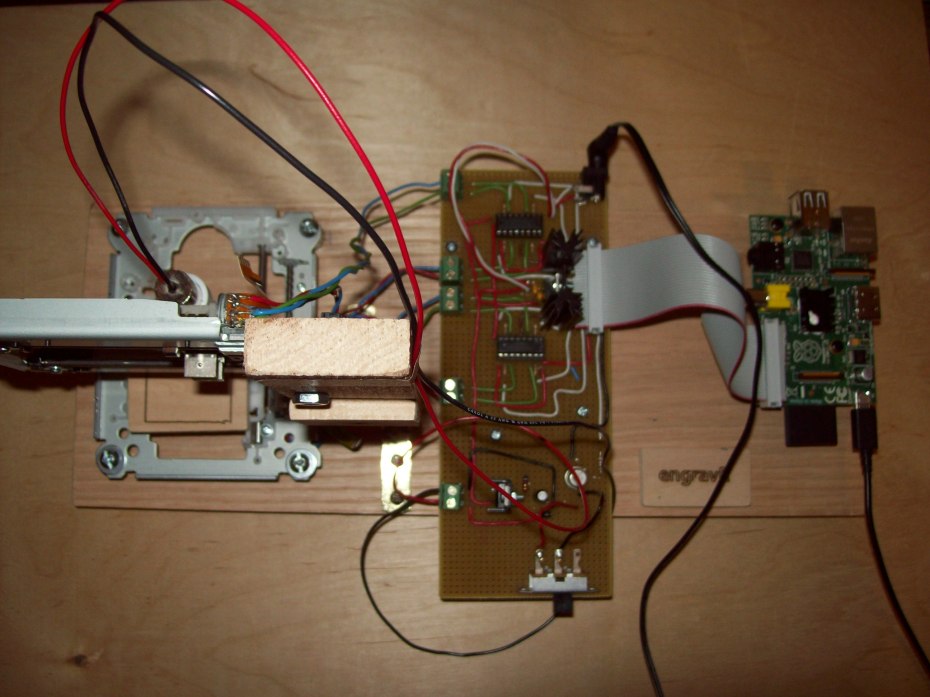
engravR is a Raspberry Pi-powered laser engraver built primarily from two old DVD-RW drives. The idea of using DVD drives to make a laser engraver is not particularly new, but most systems use an Arduino and external stepper drivers. The advantage of using the Pi is that the system can be entirely self-contained. With the addition of a wi-fi dongle, the user can print remotely from another computer over the local network instead of having to connect an Arduino via USB to a host computer. Others have even taken advantage of the Raspberry Pi camera board to email a picture of a completed engraving when it has finished.

The engraver uses the laser diode out of an old DVD RW drive, and hence is somewhat limited in what it can engrave and cut. It can cut black construction paper, but not much else. Wood can be burned. Clear acrylic can be engraved, but the acrylic first needs to be colored with a black marker. The marker can be removed with rubbing alcohol later. The print area is approximately 35mm x 35mm, which is enough to engrave most small items.

100_1860

What follows is a brief overview tutorial of the construction of the engraver. If you are seriously interested in building one of these for yourself, I suggest consulting Daniel Chai’s excellent tutorial. He goes into much more detail than I do. Also, please realize that lasers capable of engraving are serious eye hazards. Wearing laser protective eyewear is a good idea. Always know which way the laser is pointing, and be aware of your own body position. In short: use common sense.

Project Steps

Disassemble the DVD Drives

The first major task is to disassemble the DVD RW drives. It is important that at least one is RW, because other drives do not have powerful enough laser diodes. The only part that you are interested in from the drive is the large metal frame and laser sled.

Once you have the frame removed, pop off the cover of the laser sled and remove the two laser diodes. The method for getting these diodes out varies from drive to drive. You may have to use brute force to pull the diodes out of their enclosure. Be careful, since the diodes are sensitive.

Once you have them out, determine which one is the burning red laser diode. The other is infrared. This can be done with 2 AA batteries in series. Make sure that the diode is pointed AWAY from you and connect the batteries across the diode pins. You may have to try some different combinations, but if you see a flood of red light, you have the correct diode. Once you have removed and identified the correct diode, install it in the AixiZ housing by use of a clamp.

Wire It Up

Now you can wire up the circuit, referring to the above circuit diagram. Click here to see a larger version.

It may be a good idea to prototype a single H-Bridge stepper driver on a breadboard before you attempt something more permanent. It is also a good idea to test the laser driver circuit by using four 1N4001 diodes in series in place of the laser itself. Make sure that the voltage across those diodes is around 3V and that the current through them is around 300mA before you try using the actual laser diode.

Once you actually start to use the laser itself, be very careful. Do not connect or disconnect any wires while power is supplied. Make sure that you discharge the capacitor before you attach the laser. The laser is extremely sensitive to ESD, and the capacitor can slightly charge when the laser is disconnected and then kill the laser when it is reconnected. I killed two diodes this way. Be very careful.

Mount DVD Drive Frames

Once you have the electronics working, it is time to actually mount the DVD drive frames. One will be mounted to the base, and the other mounted at a right angle above it.

I used wood and some right angle braces from the hardware store, but there are any number of methods of how to do this. I used a small piece of wood glued to the laser sled as the platform, and an old clip for a whiteboard marker to hold the laser. Once the laser has been focused to a point, it is important that the laser be able to move up and down in order to engrave objects of varying heights.

Set Up the Raspberry Pi

The software for the Raspberry Pi is available on Github. Also included in this package is a small Python script for running on another computer that allows for engraving remotely over the local network. If you prefer to use terminal, the Python script on the Raspberry Pi is set up to work like any regular terminal command:

sudo laserengraver -f [file]

This will print from any G-code file. Make sure to run using sudo or as root, since the Python library that controls the GPIO pins, RPi.GPIO, requires root access to be able to run. G-code can be generated using the open source GcodeTools extension for Inkscape.

While this engraver has relatively modest capabilities, changes could be made to make it much more powerful. Stepper motors from scanners could be used instead to gain a much larger build area. A more powerful laser could be purchased to allow for faster engraving speeds, and potentially giving the user the ability to cut entirely through some materials. I am currently in the process of using similar techniques detailed here to build a 3D printer, also controlled directly by the Raspberry Pi.