Halloween has always been my favorite holiday, but when it comes to dessert, my tastes have matured towards the gourmet. But just because I am an adult doesn’t mean I can’t enjoy the fun of Halloween candy.

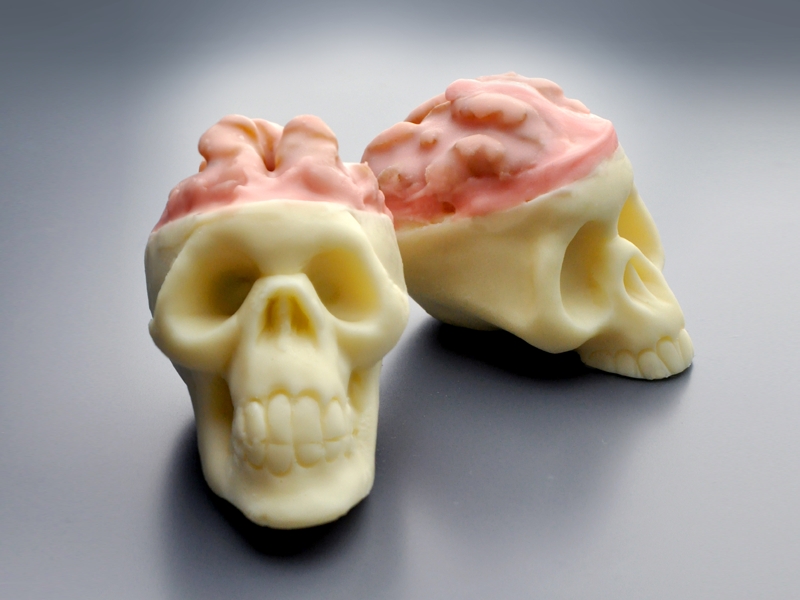
I wanted to create a Halloween treat for adults. Something not to be gobbled, but savored. As a kid, I thought shelled walnuts looked like tiny little brains. This gave me an idea: What if I coated them with candy for Halloween? I envisioned eating handfuls of tiny candy brains…laughing maniacally. That could be fun, but if they were placed in miniature edible skulls, it would really put them over the top. If those skulls were white chocolate… Well, now we’re talking!

I just needed a way to make the skulls. Sculpting each one with modeling chocolate would quickly become tedious, so making some sort of mold seemed like the obvious solution. Besides, modeling chocolate isn’t exactly the best-tasting stuff on the planet. Perhaps it would be worthwhile to make them into some sort of crazy truffle. A white chocolate shell with a surprise bittersweet center sounded tasty.

The trouble with skulls is they’re quite complex with lots of nooks and crannies and undercuts. To do a somewhat realistic version would normally require sophisticated (i.e. expensive) multi-part molds. Luckily, I recently learned there are several companies that sell food-grade silicone mold materials. The extreme elasticity of silicone made it the perfect choice for this project. I could use a one-part mold and still get all the detail I wanted.

I ordered the silicone from MakeYourOwnMolds. I plan to try the silicone Plastique in the future, an easy to use 2-part putty, when I have a less ambitious shape to mold. This time, I got the CopyFlex 2-part liquid silicone set with platinum. It’s a bit expensive, costing me around $30 for enough material to cast a 4-skull mold. But the mold is pretty durable and reusable.

Project Steps

Sculpt four walnut-sized skulls in polymer clay. The clay is easy to work with and readily available at craft and art supply stores. Make sure to test fit some walnut halves so you know the finished truffles will be the right size.

When sculpting your skulls, it is important to simplify the shapes, avoiding deep undercuts or holes that penetrate all the way through. Notice that the bony arches on the side of the skulls behind the eye sockets are filled in. If I hadn’t done that, it would have been impossible to remove the skulls from the mold.

Brush the finished surface down with denatured alcohol to smooth it out before baking it. The alcohol melts the clay a bit and will blend in any fingerprints you might have left on the surface of the sculpture. The silicone mold will pick up every detail, including fingerprints, so it is best to take care of this up front, or you will have unappetizing prints all over your chocolates.

Bake the finished skulls according to the directions on the clay packaging. Once baked the clay becomes rock hard and can be sanded or even painted to achieve a smooth finish. I skipped the sanding step since I didn’t think the finished truffles needed to have a glossy sheen.

Make a simple box mold using acrylic sheet for the base and hot-gluing four strips of acrylic about 1/4” to 1/2” from the edges of the skulls.

Make sure the side pieces are deep enough to leave a minimum of 1/4” above the highest point of your original sculpted pieces. Seal all of the sides thoroughly, so no silicone can ooze through the cracks.
 Have a roll of tape handy in case you need to seal up any leaks that appear when you pour the mold.

Secure the skulls upside-down on the base. You can use double-sided tape, Anchor-Dit (from MYOM) or hot glue like I did.
 If you care about keeping your originals intact, avoid the hot glue. I didn’t care about them, so I just used what I had. This is a very important step, because the last thing you want is to have your originals break free and float in the silicone. You would then need to wait for it to cure, cut them out and start over with fresh silicone.

Once your mold is assembled and dry, pour in rice or tapioca pearls all the way to the top of the mold.

Pour the rice or tapioca out of the mold into one of your measured mixing cups. Mark the amount on the cup and you now know how much silicone to mix up.
 You will need to make a little bit more than this, because the silicone can be thick and will adhere to the sides of your mixing container. You will not be able to get it all out and into your mold.

Brush out your mold and make sure it is clean with no dust or bits of rice or tapioca.


The silicone comes in two parts that you need to mix together to cure. One part is a bright Halloween-appropriate orange.

Thoroughly mix a small quantity and brush a skim coat over the pieces to be cast. The point is to embed the silicone in the details so no air bubbles are trapped against the nooks and crannies of the surface, ruining your mold.

Now stir the remaining silicone together, carefully scraping down the sides until all swirls disappear and it appears to be a uniform color.
 Do your best to avoid mixing in too many air bubbles as these will impair the quality of your mold.

Pour the silicone from a height of about 12” above your mold. Called a ‘stretch pour’ it will help eliminate air bubbles incorporated in the silicone during the mixing. Pour it in one spot, like a corner or somewhere not directly on top of the original, and allow it to slowly creep up over the original pieces until they are totally immersed.

This brand of silicone cured completely in about 4 hours. You can easily check to see if it is done by pressing a coin in the surface to see if it leaves a mark. Cured silicone will spring back immediately, leaving no imprint at all. Once set, you can break away the walls of the acrylic mold box. Pry the silicone off the originals, being careful not to cut or damage the surface. I used an X-Acto knife to remove some silicone that had seeped under the skulls.

Making ganache is the easy part of the project. I used Callebaut bittersweet chocolate for the centers and white for the skulls. I think it is essential to use the best quality chocolate you can afford. A lot of cheap brands of chocolate use wax as filler and won’t give you delicious results.

Simply chop up whatever quantity of the dark chocolate you want and place it in a bowl. At least a pound is best.

For whatever quantity of chocolate you use, heat about half that amount of cream in a double boiler, stirring until small bubbles form around the edge.

Pour the hot cream over the chocolate and stir until all the chocolate melts.

Pour into a bowl and press plastic wrap down over the surface to seal out any air and moisture. Place in the freezer for a couple of hours or in the fridge overnight.

Once it’s set, use a small melon baller to scoop out pieces and place them on a cookie sheet covered with parchment or silpat.
 It helps to dip the melon baller in hot water or hold it over the stove flame for a few seconds before scooping.

Roll the chunks between your palms to roughly form them into balls.

Return them to the freezer.

Tempering chocolate is exacting and requires the right equipment and precise timing. You need to follow a specific three-step process. If you let the chocolate fall out of the tempered zone by even one or two degrees, you need to start the whole process all over again.

Chop the quantity of chocolate into fine pieces.
 It helps to make it in batches of close to a pound or more, so the residual heat will keep it in the tempering zone longer.

Scoop 3/4 of the chocolate into a dry bowl or your double boiler.
 Make sure there are NO drops of water in the bowl or the chocolate will seize up and can’t be tempered. Water and steam are to be kept out of the bowl at all costs or you will need to start over with fresh chocolate.


Tempering chocolate requires taking the chocolate through three temperature zones. A good chocolate thermometer is essential… I know what you are thinking and NO…a meat or candy thermometer won’t work.

1) Heat the chocolate pieces in a double boiler to 115°F-120°F to melt the crystals.

2) Add reserved chunks and stir over an ice-water bowl until the temperature drops to 85°F-86°F.

3) Place it back over the double boiler in 10-second increments, stirring well until it hits 86°F-88°F. It should now be tempered.

Dip a clean knife blade in the chocolate and wait 3-5 minutes to see if it hardens to a satin shell. I have heard that placing the bowl on a heating pad works well to maintain the temperature. I didn’t have one, so I took it on-and-off of the double boiler…constantly stirring and checking to see if I was in that magic zone.

This is the part that was the most difficult. Keeping a bowl of chocolate in a 2-degree window is crazy without the right equipment. In the end, after having to re-temper 4 times, I just crossed my fingers and hoped I had done everything right. I got lucky. I highly recommend doing this part with a helper. If you have the cash, a tempering machine will make this part effortless.

Once you have tempered chocolate, you can fill the molds. Scoop the white chocolate into the mold, filling it completely. Place it in the freezer for 2 min.

Remove the molds from the freezer and lightly press the bittersweet ganache centers into the center of the cranial area, making sure not to push too far (if you do, the dark center will touch the mold and you will have a dark spot visible on the surface of your white chocolate skull).

Return the molds to the freezer for 5 more min.

Cut the tops flush with a metal spatula and let the truffles set up completely.

The skulls are a bit difficult to remove from the mold, but a gloved finger wedged under the cranium seemed to be the best way to pop them out without any damage.

Pour the candy melts into the double-boiler.

I had to thin mine out a bit to get them to glaze the walnuts without obscuring the details too much. The brand of candy coating I had called for vegetable shortening, but I added coconut oil, since I don’t use shortening.

Once the candy is melted, use a truffle fork to dip the walnut halves and transfer them to a plate to set up.

Assemble the skulls with a dollop of candy or chocolate to glue the ‘brains’ in place.

If you want, you can pipe a little candy around the edge to seal the brain to the skull and complete the illusion.

I chose to box the finished skulls in black tins with red velvet lining. Everyone I have given them to has been surprised…and delighted. A few even laughed out loud! That’s what satisfies me the most about creative projects. They bring out the kid in all of us.

Conclusion

A unique take on Halloween candy that both kids and adults can appreciate.