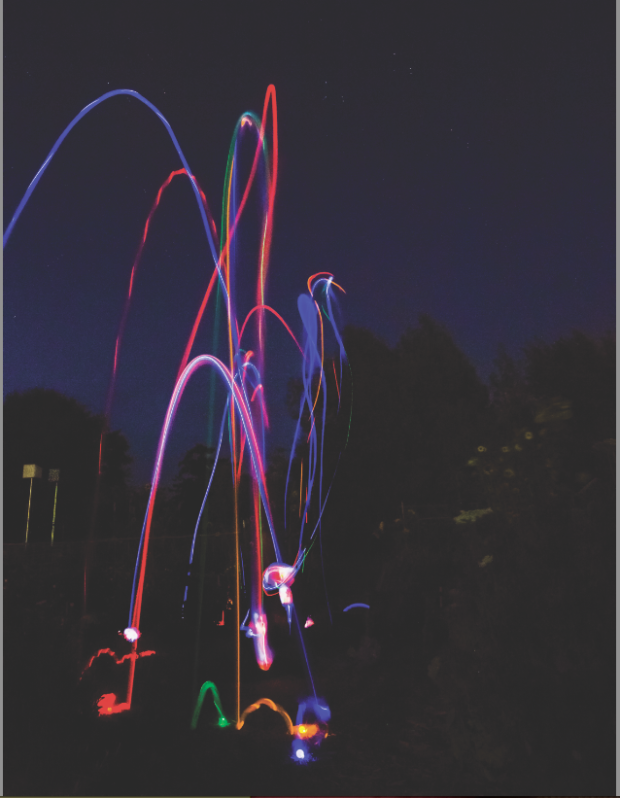
opener

This article appeared in Make: Volume 41.

Fireworks originated in ancient China and have been making people look to the night sky with delight ever since. Firework formulas are closely guarded secrets handed down from generation to generation and the overall concept has not changed much over the centuries: mix chemical compounds, place them in a delivery device, light a fuse, and watch the fun. That was until now, of course. We wondered if we could use LEDs to create a firework display? The answer is a resounding yes, we can!

YouTube player

While there are many forms of fireworks, we focused on the aerial fireworks that make the big displays in the sky. An aerial firework has several components: a lifting charge to send it in the air, and a container that holds fuses, charges, and stars. The stars are what paint the sky with light, and they’re traditionally made of various chemical compositions.

After some thought we settled on soda bottle rockets, like those found in Make: Volume 05, to be our delivery device: the lifting charge is compressed air and water, the container is a 2-liter bottle, and the stars and fuse are LEDs. The charge that disperses the stars is usually black powder — that’s what makes the big boom before the stars light. We’re not using black powder, so our charge is going to be gravity and the wind.

What about the boom? If you’ve launched soda bottle rockets before, you know they make a big whoom when released. So we have all the elements of a successful firework: loud noise, pretty lights, and the element of surprise.

LED Soda Bottle Rocket
Big Bertha bottle rocket firework loaded and ready for action.

During our experiments we created the LED Chutie, which we demonstrated at the 2013 World Maker Faire in New York City as part of our Soldering Sunday group for makers. It’s an aerial version of the popular LED Throwie — in addition to the usual LED and 3-volt coin cell battery, it’s got a plastic bag for a parachute. (It’s perfect for indoor fun too.)

YouTube player

The Chutie is the basis for the stars in our firework. By combing the Chuties with ping pong balls, plastic practice golf balls, balloons, and drinking straws, we can make a wide array of effects in the sky. Just remember that everything that goes up must come down — your stars should be lightweight and not a threat if they were to fall on someone or something.  The stars with parachutes fall the slowest and spread out the widest from the rocket. The ping pong balls and plastic golf balls travel higher and fall faster. If you’re over asphalt or concrete the ping pong balls make fun sounds when they hit the ground.

LED_Stars
LED “stars” provide the show.

To launch the rockets, I use a combination of the launcher from the MAKE Soda Bottle Project and the release mechanism from this launcher on Instructables. Before you try all this at night, I suggest you test during the day to get comfortable with how everything works and how your rockets behave. Besides, it’s another excuse to do more launches. Keep safety always and first in mind. These fireworks may be filled with water instead of fire but they still pack a lot of energy. During tests our launch crew decided to put on helmets for safety (but mostly for fun).

Fireworks always bring smiles!

We hope you have a lot of fun with your Soda Bottle LED Fireworks. We’re hooked. We already have plans for other forms of LED Fireworks, and we’re thinking about building a Raspberry Pi launch controller. Keep in touch and check us out at SolderingSunday.com and at the 2014 World Maker Faire in New York.

LED Fireworks - Big Bertha daytime launch
Big Bertha’s daytime launch showed us we needed more air pressure.

Project Steps

Prepare the soda bottles.

You’ll need two 2-liter bottles for each rocket: one for the rocket body and the other for the nose cone, which holds the LED stars.

Despite the obvious shape difference, most 2-liter bottles have similar dimensions.

While you work you can keep bottles from rolling around by making a rack out of bamboo skewers and a piece of foam.

Clean the bottles and remove any labels.

Cut the nose cone.

Cut the bottom off one of the bottles, using one of the ridges as a guide.

If you want more payload area, cut a longer shape.

If you want to a traditional, pointy rocket shape, try a 2-liter from the Coca-Cola company.

NOTE: The nose cone and body are not attached with a cord like a model rocket. We want the two to separate completely so the payload, the stars, can fall out.

Install the fuse (optional).

Using an LED inside the body of the rocket we can re-create the effect of seeing the fuse as the firework flies through the air.

In the bottom of the second soda bottle (the top of the rocket body) drill a 1/4″ hole. Conveniently the bottle molding process has left a nice mark where that center is. Use a hobby knife or a small file to clean up any burrs in the plastic.

Use a long straw (or 2 taped together) to carefully insert a 10mm LED’s leads into the hole from inside the bottle. The flat base of the LED’s lens should sit flush against the inside of the bottle.

Bend the LED leads over to hold it in place temporarily, so you can add the 5-minute epoxy.

Epoxy the fuse and chute ring.

Stand the rocket body bottle on end. Using the bamboo skewer rack you made earlier helps.

Mix your 5-minute epoxy and apply it to glue the LED “fuse” in place and seal up the hole. I use a bamboo skewer to do this. The epoxy should flow into the hole and onto the back of the LED.

The chute ring is where we attach the main chute for the rocket body. Make this from a zip-tie and epoxy it to the top of the rocket body (bottom of the bottle).

TIPS: Five minutes sounds like a lot of time, but it’s not. If you’re building more than one rocket, build them all first, install all the LEDs, and then epoxy them all at once. Also, keep the container you used to mix the epoxy. If you want to know if your epoxy is cured, you don’t need to poke your project — just check the mixing container.

Insert a drinking straw to cover the LED and diffuse the light. You can epoxy it or just friction-fit it on; it’ll stay. We recommend using two straws taped together, long enough to extend out the bottle neck; then you can easily guide it down the launch tube when it’s time to launch.

Add a 3V coin cell battery and tape in place.

Cut and attach the fins.

Fins add stability in flight. You can go without them but your flight results will be much less predictable. Fins with a slight angle will make the rocket spin and make it more stable. Think of how a quarterback throws a football — adding spin to the ball makes it stable in the air.

Use 1/8″ to 1/4″ cardboard, foamcore board, or fan-fold foam insulation.

Cut 4 fins 1″x9″ inches, then cut each end at a 45° angle, parallel to each other. (You can make them bigger, as we did for our “Big Bertha” rocket. Try different shapes and sizes.)

An easy way to mark the bottle for fin placement is to wrap a long piece of paper around the center of the bottle and mark the paper where it meets. Then place the paper flat on your workbench and measure between your marks. That’s the circumference of the bottle. Divide by 4 and mark the paper accordingly. Wrap the paper once again around the bottle and transfer your marks to the bottle.

TIP: An old-school method for aligning your fins is to place the bottle along a door jamb and use the molding as a straightedge to help you draw a straight line at your mark. (Just be sure not to mark the wall, or there will be a different type of fireworks.)

Glue the fins with hot glue.

If you want to cant the fins to provide rotation, angle them just slightly off your lines. A small angle goes a long way here.

Make some LED Chuties.

The Chuties will be used for the stars. You’ll also make a couple of extra parachutes for the nose cone and the rocket body.

Slip a 3V coin cell battery between the leads of an LED so that the LED lights up. The LED’s short leg is the negative (–) lead or cathode. The long leg is the positive (+) lead or anode.

Tape the battery in place. We’ve seen these LEDs last over 2 weeks on a single battery, so don’t worry about it losing power before tonight’s firework display.

Attach 6″–9″ of string to each corner of a plastic bag. We punched holes and reinforced them with round “paper savers”, but you can also just use masking tape.

Tie the strings to the LED/battery. Fold and roll the parachute neatly but lightly. Repeat to make more Chuties.

Make 2 extra parachutes for the nose cone and the rocket body (don’t add LEDs to these).

Attach the parachutes.

You’ll use rubber bands as shock cords, to prevent the parachute from ripping when it is deployed.

Tie a rubber band through the chute ring you epoxied to the rocket body. Then tie the main parachute to the rubber band.

For the nose cone chute, tie a loop of string around the bottle’s neck collar, then run the string down inside the bottleneck and tighten the bottle cap to secure it. Inside the nose cone, attach the chute to the string, using a rubber band as before.

Put a small amount of clay in the nose to increase the mass of the nose cone. Newton’s law of inertia tells us that its greater mass means it will have greater inertia then the main rocket body. In other words, the nose cone will continue further along the trajectory, while the body of the rocket will be more susceptible to the wind and gravity changing its path. Thus the rocket will open and release the payload.

Fold and roll the parachutes neatly and lightly. If you do it tight, it won’t unfurl in the air. Too loose, and it will become wadding in the nose and keep the stars from falling out. Test your chutes by gently throwing the rocket parts in the air. They should unfurl and float to the ground.

Make the stars.

Stars are what’s are at the center of an aerial firework. They’re what you see in the sky making all the colors and twinkles that we love.

Our stars are made from LED Chuties and common household items. Placing the LEDs inside a ping pong ball, a plastic golf ball, a balloon, or a straw diffuses the light and enhances it to the eye.

Cut the ping pong balls halfway and you can insert the LED and battery into them. A hobby knife works fine for this.

The golf balls require a saw and a little more effort.

For balloons, stretch them and blow them up first before inserting the LEDs and batteries.

For added effect you can use slow-blinking LEDs that cycle through red, green, and blue.

Not every star needs a parachute. Those without parachutes will fly higher and fall faster. Use common sense — what goes up must come down and should not be dangerous if it hits someone.

Prepare for launch

Carefully stow the folded main chute on top of the rocket body. If you made a “fuse,” tape a coin cell battery between its leads so it lights up.

Pack the nose cone by placing the nose cone chute first, then golf balls, then ping pong balls, then the Chuties. (Try variations of this to see what works best for your rockets.)

Place the nose cone on the rocket. You should be able to shake the rocket and see some movement of the stars inside. If it’s packed too tight the stars won’t release.

The nose cone should sit straight on the rocket, but not be pushed down too far or too tight. If you think it’s not on tight enough, it’s probably just fine. As long as it’s straight you should be good. Again, this is what daytime testing is for. Experiment.

Fill your rocket about two-thirds full of water.

A bicycle pump is fine for pumping up your rocket. We wanted to to launch a lot of rockets so we used a portable air compressor with a 12-volt battery.

Practice.

Test everything in the daytime to avoid the fun of fumbling around in the dark. Try different pressures, angles of launch, and payloads. We found that 70 to 75lbs of pressure worked well with our rockets.

CAUTION: Be safe. The same energy that makes the rockets go up can make the rocket explode. Stay 15 to 20 feet away while the rocket is pressurized. Typical 2-liter soda bottles should be able to hold up to 120lbs of air pressure. However, that is a good-case scenario and anything can go wrong.

Too much pressure in your bottle, say 90+ lbs of air, and the rocket will take off so fast it embeds itself into the nose cone and becomes a missile instead of a firework. Don’t ask how we know that one.

If you put too much weight in the nose, the nose cone falls to earth too fast and makes a thunderous boom when it hits your car. Don’t ask how we know that one either. Just know that it made a spectacularly loud sound.

Launch your fireworks!

You’re ready for some fun! Prep several rockets ahead of time so you can have fun launching and not loading.

Try embellishing your launcher with LED lights. It makes loading easier and looks cool.

Just as with regular fireworks, it is best to keep the crowd back. The closer you are to the rocket, the less you’ll see.

Switch off between being a launcher and a spectator so you can enjoy too.

Let the OOOOHs and AAAAHs begin …