Out of the blue sky — or was it wildfire gray at the time? — I received a call to build a crazy origami folding kayak designed by Hong Wong. Like any hungry, cooped-up human who loves boats and the river, I seized the moment! If you like boats and boat building, you will appreciate the economy of materials, tools, and engineering in this boat.

this project is from the latest issue of Make: Magazine. Get yours now!

Over two weeks, I built a few versions, trying as many melting, hot iron-fusing, and dim-witted thermoforming techniques as I could think of. In the end, the path was simple — a clothes iron is all that’s needed to bond the plastic sheets. The final boat was built in two days and here’s a time-lapse video to prove it!

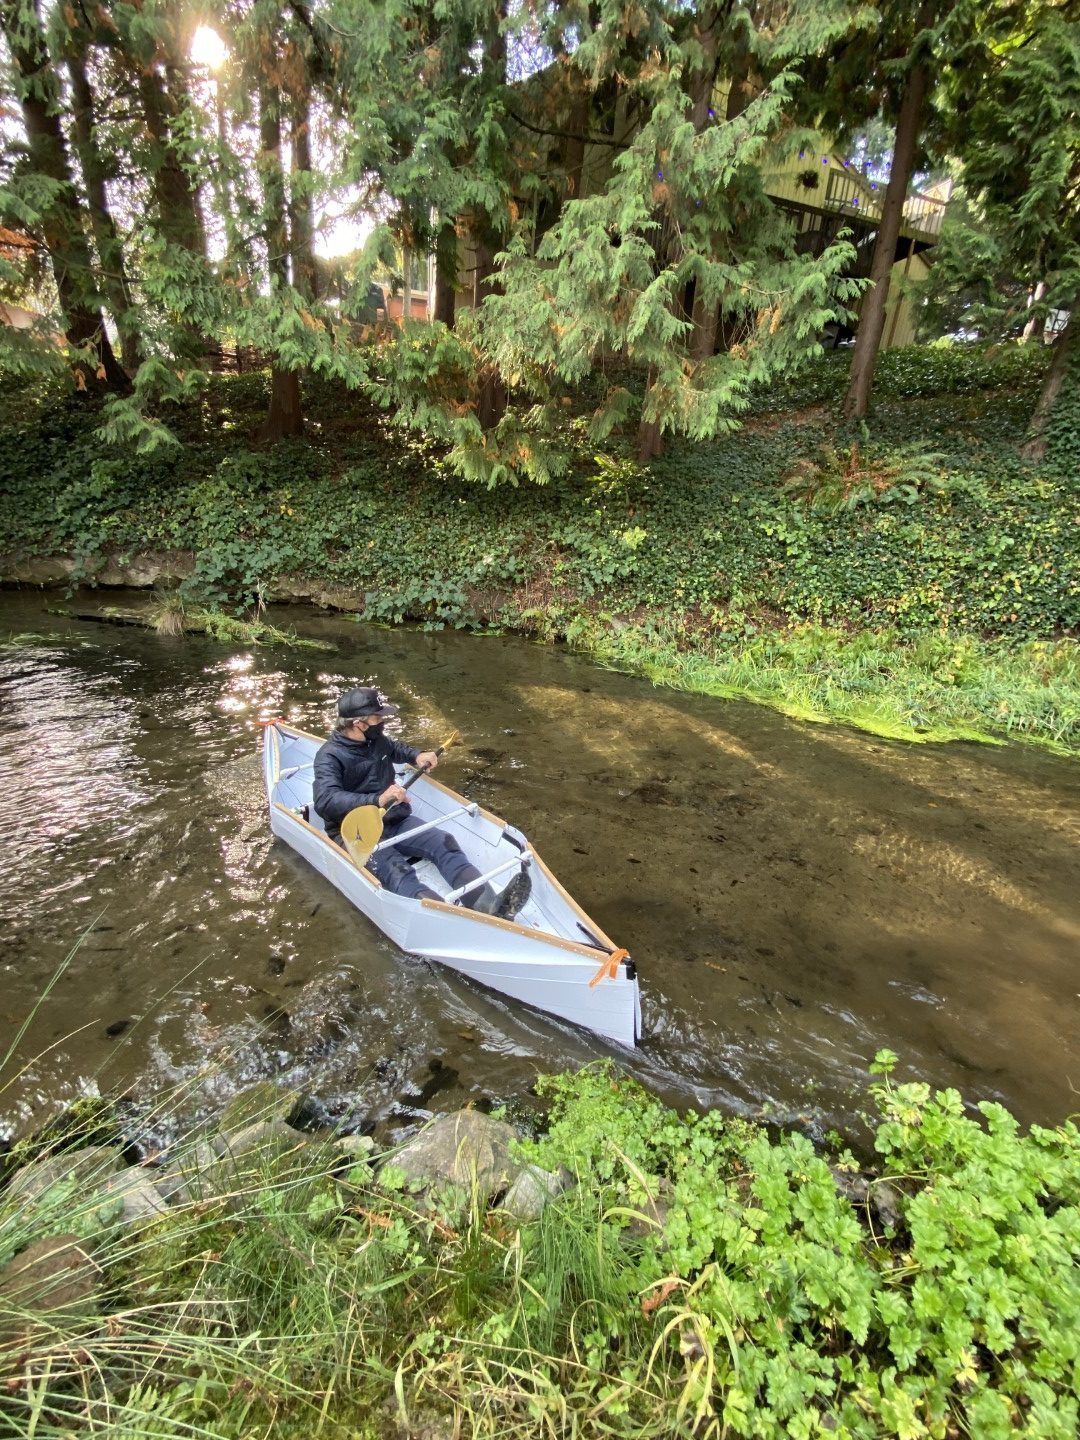
This 12-foot, corrugated plastic origami boat is a low-cost build for those of us who like to experiment on the water or land. It paddles great and costs a fraction of the store-bought variety. And it’s just a cool way to build with plastic sheet. The folding, origami-like transformation from flat to boat to refolded for transport is awesome.

Hong has other versions of his boats and even one for low-cost disaster relief. Whatever, man! It’s just good to get outside. Let’s build a folding plastic kayak!

CAUTION: This is an experimental boat. We cannot guarantee your safety. You assume all the risks of building and using this boat. Read the liability waivers here and here.

YouTube player


BUILD YOUR ORIGAMI KAYAK

Before you build, download the free PDF plans here and watch the folding/unfolding video here.

Why did you start building these boats?

I came from a poor family. As a kid, I lived near the sea and I wanted a boat but never had money for one. Now I can afford a boat, but I don’t have space to keep one! Inflatable boats need more maintenance, and foldable kayaks are expensive, so I started learning how to design and build foldable boats. I want to share my learning so others can enjoy the fun of kayaking without spending a lot of money and time.

Does the folding affect the boat strength?

Yes, so we must add structural elements to compensate. This can be a cross-beam made with PVC pipe, or double layers of Coroplast on the floor, or a properly designed seat. There are other tricks too.

Which Coroplast is best for folding boats?

I use 6mm thickness, and there are 5mm boats on the market, but many of my YouTube viewers asked how to build with 4mm sheets from Home Depot or Lowes. Last summer I discovered the heat fusion method and I’m glad Nathaniel improved it!


Project Steps

FUSE TWO PLASTIC SHEETS

LASTIC SHEETS

Fuse two 4’×8′ sheets of the corrugated polypropylene together using a hot clothes iron set to high, with a large piece of parchment paper protecting the sheet always. Align the sheets with an overlap equal to your iron width.

Go slowly and move the iron back and forth over the overlap. Take care to heat the sheet slightly wider than needed, in order to create a rolling edge to the overlap. Press down and wait a bit. If there’s a mistake, patch it with more Coroplast!

Coroplast melts at 375°F. Let it soak up the heat into the lower layers so that all the layers fuse together. Use the lumber to hold the sheets flat and to rest your hands on while working over the sheets.

Flip the sheets and fuse them on the other side too. All edges of the overlaps fused? No huge holes in the boat? You’re ready to move on.

LAY OUT THE PLAN

The plans are drawn for easy layout. Use marking and measuring tools to draw the plan onto the two fused sheets. Start with the midsection line at the best location for the boat centerline. The boat plan lines are mirrored; measure equally on all sides, front to back.

Pay attention to the front versus back fold lines on the plans.

To project the back fold lines to the other side, hold the sheets up to the light. Clearly mark the cut lines.

Tip: Try printing out the plans and folding a paper model first — it really brings some understanding of how the folds work

CUT OUT THE BOAT

Cut out the entire flat shape, following the red trim lines. Keep all the waste; you’ll use this to form a seat and some of the rail assembly.

BUILD THE ROLLER

This is kind of like a rolling pin for creating fold lines in the sheet. The wheel is shaped so that it presses a wide deformation into the corrugated sheet with less friction than other folding tools. If it’s too narrow, the pointed load will tear the sheet. Find a solid rubber or similar wheel that can shaped into an ovaloid shape as shown. A rollerblade or dolly wheel can work. Insert a shaft through the wheel and trap the roller midpoint on the shaft with two shaft collars. Make sure it can roll smoothly.

ROLL THE FOLDS

5. ROLL THE FOLDS

Drink some water! Work out those shut-in abs and get rolling. Roll along the lines to create creases. Roll everything that needs rolling. Roll it again, front and back.

FOLD THE SHEET

Fold the plastic sheet as you roll the lines, front and back, to create the valley and mountain folds. Wrestle the sheet until the kayak takes shape. Welcome to the second part of the staycation workout plan. Coroplast is forgiving. Continue to fold and shape the kayak along the plan lines before the gunwales go on.

It’s probably the end of day one, or about halfway through the project. Take a break and start daydreaming of a safe test-pond location.

CUT THE STRAP SLOT

OT

Once the boat can fold into its basic shape, create a slot on both ends though all the front-folds to “sew” a strap through and bind the folds together in boat form. Make this slot slightly larger than the width of your strap.

With the boat folded, drill two through-holes, so that when unfolded, these holes make registration marks for the slots. Unfold the boat, cut each slot with a mat knife connecting the two-hole pattern, and open the slot by melting it with a hot soldering iron.

MAKE THE GUNWALES

Cut the gunwales from the plastic lattice cap: the midsection gunwale is 25½” long, and the front and back gunwales are equal length, made from what’s left over. Then mark the screw holes every 2″, beginning and ending 1″ from each end.

While you’re at it, mark the holes for bolting on the pipe clamps as shown in the plans.

Pre-drill all the holes now. This will help with alignment of the thread tap, and screws, passing through the rail-and-Coroplast sandwich later.

MAKE THE INSERT TABS

Cut the two insert tabs from one of the waste sections of Coroplast, with the vertical corrugation following the short dimension. Their sole purpose is to hold the folded floor insert that adds rigidity to the boat.

MOUNT THE MIDSECTION GUNWALES

Take the midsection gunwale and sandwich the insert tab and the boat midsection into the lattice cap slot. If necessary, use the hot iron to flatten the edge of the sheet, or use a carpet knife to carefully cut down the center of the sheet edge, cutting only the ribbing. Build a good sandwich.

Tap threads in one of the end holes. Insert the first 5mm×16mm screw to hold the gunwale in place. Insert your tap into a drill to speed this way up! Tap the threads quickly and do not bottom out the tap. To speed up driving the fasteners in, buy a proper hex bit or make one from a hex L-key.

Continue to tap and screw the 5mm×16mm screws into the midsection gunwale. Keep in mind any sharp points: Make sure there are none!

Repeat these steps to mount the other midsection gunwale.

MOUNT THE FRONT AND BACK GUNWALES

Fill the slot in the lattice cap with 100% silicone, then press the silicone-filled slot over the boat edge. Tap threads for the machine screws in place, right through the silicone and the boat sandwich, using the predrilled holes as guides.

Again, you can put your tap and hex bits in a power drill to go faster.

MOUNT THE PIPE CLAMPS

Bolt each pipe clamp in place at the locations you marked in Step 8. Make sure you use lock washers or lock nuts here.

BUILD THE THWARTS

Use ¾” PVC pipe and create 90°-bent ends with the correct width as marked on the plan. There are a few ways to do this. Heat-bending the pipe is one reliable way. Creating an assembly out of plumbing parts (elbow fittings) is another. Both work well.

An optional version, as tested, is to build thwarts like tent poles with elastic hook ends. Thwarts should be built for rigidity.

BUILD THE FOLDED INSERT

This cross-brace stiffens the boat. Follow the layout pattern to orient the sheet in the correct direction, then cut the patterns. Fold and tape 2 patterns together, or use an extra sheet to make 4 for more support.

BUILD THE SEAT

With the remaining material, build a seat. Use black Gorilla tape to hold it all together.

SEAL THE CENTER SEAMS

Your fused center seams may look watertight, but let’s make sure. Tape the center seams with the white Gorilla weather seal tape. Do this on the outside and inside, making sure to overlap your fused seam on both sides (the two opposing tapes will be offset). This will waterproof your seam.

TAPE ANY TROUBLE SPOTS

Use the black Gorilla tape over all exposed open cells and any sharp points. Tape the bottom fold line intersections too, as these will wear the most. Tape whatever’s good for your boat.

PATCH ANY LEAKS

Check the boat for leaks or punctures by holding it up to the sun and looking for light leaks. Patch these with the weather seal tape or by heat-fusing a small patch of Coroplast over the hole

You’re ready to water test! Good luck. Be safe and wear a life vest.

FOLD AND FLOAT!

FOLD AND FLOAT!

This kayak is fun to build. It folds into a form that you can transport in a car trunk and refolds into a boat in about 3 minutes. That’s fun too! And of course it’s fun to paddle around.

Keep your kayak clean, store it indoors, add paint if you like. Avoid sharp hazards and shorelines.

I would have enjoyed thicker material for the Coroplast. I used what I could find. The plastic corrugated kayak industry uses 5mm. Hong uses 6mm! I was on the weak side with the 4mm sheet, and as I paddled along, one passerby yelled, “Nice coffin!” As an experimental boat, not so far from the truth, yet, I disagree. On the second trip, I added an additional folded insert at an offset, and I felt confident I could paddle on a calm lake or pond, so I made a day of it. But the thicker material could lower the fear of puncturing the boat.

Now that I have a few hulls, my thoughts are drifting toward experimenting with different ideas and modifications. Yesterday I figured out a way to make a shelter out of two of them.

All in all, a fun project for those of us that like to get wet and tinker in the water. Build a boat by spring and enjoy some outdoor water adventures when the weather warms up again. Yahoo!

Special thanks to SkanlanKemperBard (skbcos.com) for the use of their amazing loft!


Conclusion

BOAT DREAMS

Hong W. Wong is an inventor at heart. A retired engineer with 100+ patents, he shares plans and tutorials at diyusa.org for making musical instruments, paper crafts, and especially, Coroplast boats. When he presented a new folding boat at Virtually Maker Faire in 2020, we had to know more.

—Keith Hammond