This is the world’s newest trebuchet design and it’s already setting new hurling records. Not only is the Walking Arm Trebuchet simple, it’s also extremely efficient. Using this trebuchet, my 8-year-old son set the all-time record for best design at the 2018 Vermont Pumpkin Chuckin’ Festival. His lightweight 20-pound, 41-inch tall trebuchet threw a 3-ounce ball 266 feet — scaled up, that’s equivalent to 780 feet in the heavyweight division. My 500-pound, 10-foot version threw a 5-pound cantaloupe over 700 feet — also a new record — but it went so high and so far that the spotter never saw it pass over him on its way into the woods!

This year my 500-pounder threw a 5-pound rice-filled soccer ball 870 feet (and it rolled to 975) but unfortunately at the 2019 Pumpkin Chuckin’ it threw so hard that all the real fruits were crushed during launch. My son won the grand prize again.

The instructions provided here show how to make a 20-pound, 41-inch version, like my son’s. The dimensions were chosen to adhere to the lightweight division rules at the Vermont festival. As you’ll see, my son did all the work himself. I did help out by holding some things in place and showing him how to complete the steps.

I’ve made other versions of this trebuchet with longer arms, mostly for throwing the excess apples that fall in our yard. While they would not be legal at our state competition, they can really whip an apple.

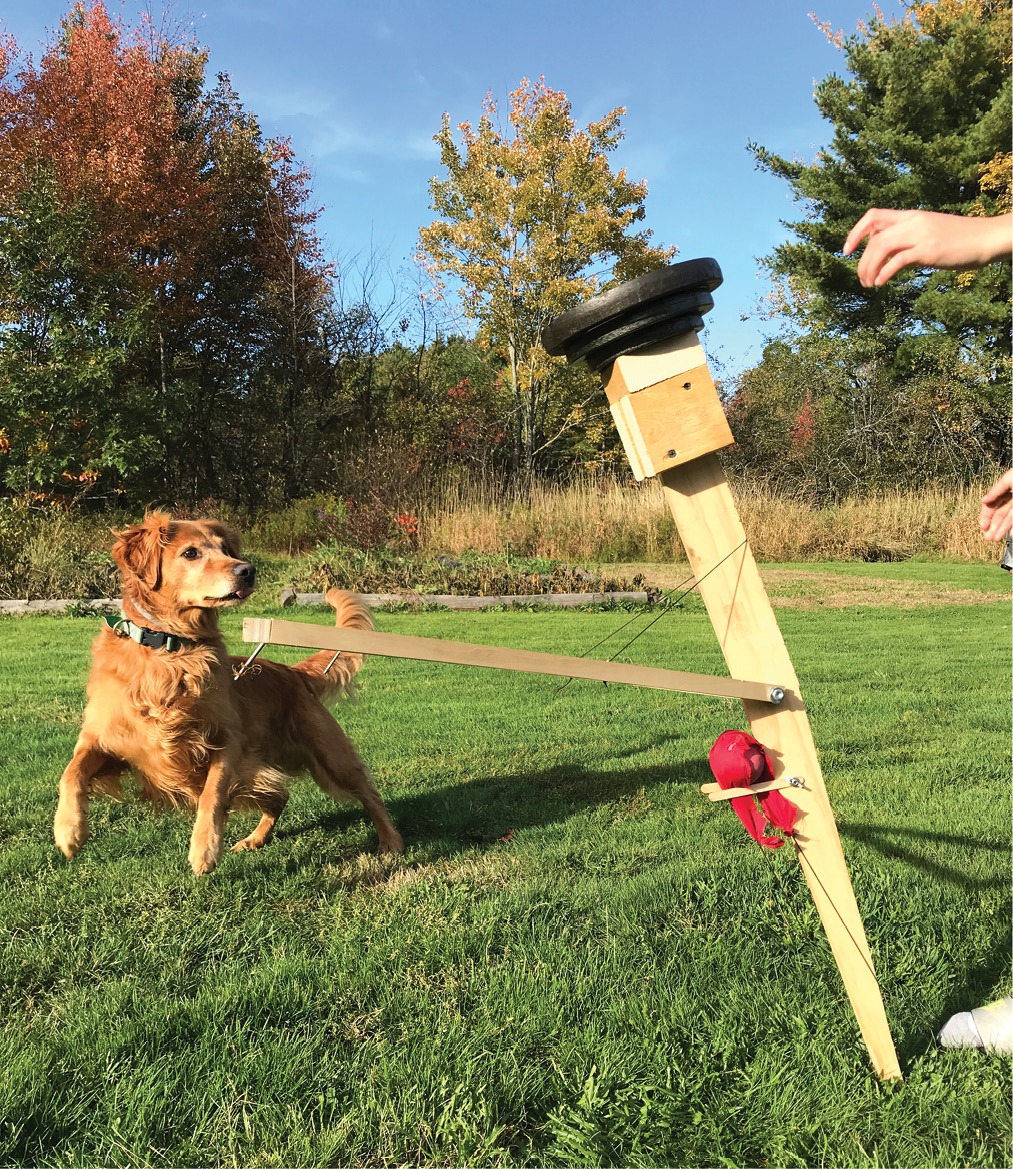
A STRIPPED-DOWN HURLER

The Walking Arm Trebuchet has many of the advantages of a floating arm trebuchet, but with fewer parts, less friction, and a unique projectile launch path: as the trebuchet walks forward, the projectile never swings backward beyond its starting point, reducing the danger to bystanders behind the trebuchet.

The triangle spikes, which serve to keep the triangle from slipping when it hits the ground, are most visible in the front and side views.

AT MY SIGNAL, UNLEASH FUN!

LOAD AND FIRE

To load your trebuchet, stand it upside down — with the counterweight on the ground. Put a tennis ball in the sling pouch, position the pouch below the popsicle sticks, and loop the sling over the finger. Adjust the sticks to hold the pouch snugly.

On grass or dirt, turn the trebuchet right-side up (counterweight on top) and hold it there while you set the triangle string into a tuning notch of your choice. Aim your trebuchet downrange and make sure it’s all clear.

To fire, just nudge the trebuchet forward so that it falls squarely onto the triangle … step back, and watch it walk and hurl!

TUNE IT UP

There are a few relatively easy ways to fine-tune the trebuchet’s performance. Here they are in order of decreasing ease and utility.

• Adjust the triangle’s position before firing by moving the tuning string to different notches. If you have a camera with slow-motion capability, take videos of your launches. As a general rule, the counterweight should be at its lowest point when the projectile releases. The counterweight should also be moving as slowly as possible at this point.

If the trebuchet flops over forward after firing, or if the shot has a very low trajectory, the triangle is probably too low. If the projectile is released early, flies too high, or the counterweight hits the ground before the projectile is released, the triangle is probably
too high.

• Adjust the sling length. This is more of a hassle. It requires not only changing the sling, but also moving the projectile platform.

• Adjust the finger. I haven’t needed to adjust the fingers on any recent trebuchets of this type, but bending the finger forward or backward is one way to control when the projectile is released. Bending the finger forward holds the projectile in its sling longer. Bending it backward causes the projectile to be released earlier.

COMPETITION LAUNCH SETUP

In competition we fire this trebuchet from a platform, and we release it with a simple “trigger” mechanism. Without the platform, the trebuchet doesn’t fall from as high as it is legally entitled to fall. The maximum allowed height is 41″, but the top of the counterweight is probably at about 39″ when we just stand the trebuchet in the grass. The triggering system is in place to prevent us from adding any extra energy by giving the trebuchet a push.

The racquetball that my son launched in competition was partially filled with water to bring it up to a regulation weight of 3 ounces. The water was inserted using a needle and syringe. Water-filled racquetballs make fun projectiles.

SCALE IT DOWN

In response to one of my Instructables readers, I made a small 3D-printed version of the Walking Arm Trebuchet. I was going for a desktop version, but really it seems at home on carpet. It’s a rough version 1.0, but I posted the .stl file on Instructables if you’d like to print one.

I used pieces of a large paper clip for the spikes and the finger. For good measure, I sharpened the spikes with sandpaper. I used fishing line for the sling and the tuning string. There’s no pouch; the sling is just a loop of fishing line that’s permanently attached to the projectile. They fly off together. The proportions are different from the larger versions, which may be why I needed to bend the finger forward on this one to get a good release angle.

SCALE IT UP!

My heavyweight competition trebuchet is 10′ tall and 500 pounds. The 5-pound cantaloupe that it threw was never found! On its debut two years ago, the big trebuchet was so heavy that it sank into the ground and broke itself — repeatedly. So last year I modified it: I set it up so that the triangle lands on a 1½” thick plywood pad and is stopped by a lip made of 2×6s.


EVOLUTION OF THE WALKING ARM

The Walking Arm Trebuchet’s evolution was driven by the unique rules of the Vermont Pumpkin Chuckin’ Festival. Dave Jordan, founder of the festival, set a limit on overall trebuchet weight, rather than the counterweight. If it hadn’t been trying to keep my design as light as possible, I never would have invented this trebuchet.

Counterweight trebuchet

I wanted a design that would allow the counterweight to fall as far as possible, to maximize potential energy, with a long throwing arm and minimal friction. I also wanted the trebuchet to “shift gears” on its own.

DESIGN #1

The floating arm trebuchet (FAT) invented by Ron Toms seemed like a good place to start, because the FAT’s weight falls nearly its entire height and it “shifts gears”: because the throwing arm’s axle floats, rather than having a fixed axis, each small movement of the falling counterweight results in an increasingly greater movement of the projectile. (Adding wheels to a medieval hanging counterweight trebuchet (HCW) has a similar effect.)

My first attempt didn’t walk. It was an arm standing on end, with the weight on top, supported at its center by an axle. The axle was on a simple stand that pivoted on the ground, allowing the axle itself to swing forward or backward. As the counterweight’s inertia carried it downward in a relatively straight path, the axle and arm were forced backward, then pulled forward again. This motion flung the projectile in a path similar to that of a FAT, but without all the extra structural weight.

The main problem with this design was that it required high-tension guy wires to hold everything in the right launch position. And creating a trigger to release all the parts simultaneously was tricky.

DESIGN #2

I added a joint in the arm, like the King Arthur (KA) trebuchet invented by Chris Gerow. This let me get rid of the guy wires. At rest, the trebuchet had become a tripod, with the throwing arm standing on the ground behind an axle stand that extended forward. When fired, the forward inertia of the arm’s top segment pulled the whole trebuchet with it, causing the arm to walk forward and swing over the axle. I was smitten by the simplicity and the walking nature of this design. My daughter used it to win the lightweight division in 2015, but it just didn’t throw things as far as the first design. It was also harder to tune. So I tried to marry the two.

DESIGN #3: EUREKA!

Eventually I realized that if I lifted the axle stand off the ground, the trebuchet would tip forward onto the axle stand, walk, and throw. It worked, but not until I added spikes to keep the axle stand from slipping on the ground. The axle stand that had been rooted to the ground in Design #1 became the triangle in my fully evolved Walking Arm Trebuchet.

The idea of staging the projectile on a platform attached to the arm came from a whipper trebuchet, a HCW variant invented by the late, great Raymond “Ripcord” Goodsell, that I’d seen — where else? — at the Vermont Pumpkin Chuckin’ Festival.

Project Steps

MAKE THE THROWING ARM

Make the arm from the ½”×3″×36″ pine board. Drill a ¼” hole centered 20″ from one end. This will be the finger end of the arm. Taper the arm from a full 3″ at the axle to 1″ at the finger end. We used a band saw to cut the board, but a handsaw would work.

Now determine the length of the counterweight end of the arm. Figure B shows the counterweight end extending 14¾” from the axle hole. That was the length that worked for us. That distance may need to be different for your arm, depending on the height of your stack of weights, because the weights need to clear the triangle. To determine how long to make the counterweight end of your throwing arm, measure the height of your stack of weights and subtract that number from 17¼”. That should give you nearly 1″ of clearance for the counterweight to swing through the triangle. If you allow too much clearance, then your weight doesn’t fall as far, so you’re giving up energy.

Using the length you just calculated, measure from the center of the axle hole toward the non-tapered end of the board. Make a mark and cut off the board.

MARK AND CUT THE TRIANGLE

The point here is to build a strong triangle with a base 20½” inches from the axle. The triangle needs to be wide enough so that the counterweight can safely swing through without hitting it, and it needs to be strong enough to withstand extreme forces during the launch. To keep it simple, we made an equilateral triangle with plenty of extra room; feel free to make your triangle a little narrower.

Lay the three 36″ square dowels on a floor and arrange them in a triangle. Lay a ½” scrap on top of the triangle legs as shown, and use it to mark the locations where you’ll cut. It’s important that this scrap is ½” thick because it represents the thickness of the throwing arm.

Now mark the axle hole. This mark should be perpendicular to the cut marks that you already made, and, therefore, perpendicular to the throwing arm.

Without moving the legs of the triangle, shift the triangle base toward the axle mark until the bottom of the base is 20½” from the axle mark. Make sure you still have an equilateral triangle; the legs should be the same length. Our legs ended up being about 233/8″ inches, when measured as shown.

Keeping the legs in this position, mark both legs and the base for cutting. Then cut off both ends of the triangle legs, and both ends of the base.

DRILL AND ASSEMBLE THE TRIANGLE

Drill ¼” axle holes, centered in each leg, parallel to the lines you drew. It’s easiest to drill the side where the hole will be perpendicular to the wood. To be extra sure he drilled in the right spot, my son first carefully made a pencil mark where he wanted to drill. Next he made an indentation with a center punch, and then he pre-drilled with a 1/8″ bit before finally drilling with the ¼” bit.

Hot-glue the legs to the base, then secure these joints with drywall screws. First drill 1/8″ pilot holes, then screw 2″ drywall screws into the pilot holes

. You’re drilling near the ends of the dowels, so you may split the wood. We split one end, then glued and clamped it. We’ve had no problems with it.

BUILD THE PROJECTILE PLATFORM

Drill a ¼” hole 4″ from the axle hole, on the finger side of the arm. Our hole was about ¾” from the edge of the arm.

Drill a ¼” hole centered near the end of a popsicle stick. To reduce the chance of splitting, clamp the popsicle stick firmly against a piece of waste wood, and drill through the stick and into the wood. You may want to drill a small pilot hole first, to make sure your hole is in the center of the stick. (Popsicle sticks are handy but they’re barely big enough to drill a ¼” hole. Any thin, strong, drillable material would work well here. It just needs to hold up the projectile.) Repeat this with one more popsicle stick. While you’re at it, make some extras.

Use the 1″ hex bolt and the wing nut to attach the popsicle sticks to the arm.

MAKE THE SLING POUCH

We used fabric for our design because it is readily available. For my son’s competition trebuchet we used a piece of net, which seems lighter and has less wind resistance.

Cut a 10″×10″ square of fabric. Nylon works well because you can melt the holes in it and seal frayed edges. Draw a diagonal line from one corner to the opposite corner. Find and mark the center of the diagonal line.

Draw two pairs of dots. Each pair should be about 1½” apart, and 1½” from the diagonal line.

Now make holes where you drew the dots. Because we used nylon, we could melt holes with a nail that we heated with a propane torch. My son held the nail firmly with a pair of vise-grip pliers.

At each end of the diagonal line, tie the corner of the fabric in a knot, tight and close to the edge of the fabric. Then use cable ties to cinch each pair of holes together. Clip off the cable tie excess.

Test your pouch. Place your projectile of choice in the pouch. We used a “high bounce Pinky” ball for the projectile. A small apple or just about any other roundish object should work. See if the projectile stays in place when you hold both ends of the pouch. Then let go of one end of the pouch and see if the projectile rolls out. If the projectile either won’t stay in or won’t come out, cut the cable ties and make new pairs of holes. Spacing the holes more widely (before cinching with cable ties) should hold the projectile more securely in place. More closely spaced holes should help it roll out. Placing the holes closer to the centerline may also help the projectile roll out more easily.

Trim off excess fabric.

MAKE THE FINGER

Cut the head off one of the nails, so that the remaining headless nail is about 2″ long. This will be the trebuchet finger. It looks like a round dowel in this drawing, but for this small-sized trebuchet we only need a nail.

Drill a small pilot hole into the finger end of the arm. The pilot hole should be a little narrower than the nail that will become the finger. The purpose of the pilot hole is to prevent splitting as you hammer in the nail. It would be a good idea to try a practice hole on some waste wood first.

Nail the pointy end of the clipped nail into the pilot hole, so that ½” sticks out. If the end that’s sticking out is sharp, file it down until it is rounded. You don’t want it to scratch someone.

TIE THE SLING CORDS

Tie a long length (maybe 30″) of cord next to one of the sling knots. The knot in the sling fabric keeps the knot in the cord from slipping off.

In the same way, attach another length of cord to the opposite corner.

ATTACH THE SLING TO THE ARM

Drill a hole through the throwing arm, barely larger than the cord, centered 2″ from the finger end of the arm. This hole needs to be far enough from the end so that it doesn’t hit the buried end of the nail that forms the finger.

Insert one sling cord through the hole so that it enters the arm on the flat side and comes out on the tapered side. Place your projectile in the sling pouch, and arrange both cords. Snug the projectile into its position beneath the platform (popsicle sticks) and make the cords taut. The popsicle sticks should stick out perpendicular to the arm.

Mark the point where the sling cord exits the tapered side of the arm, and then tie a knot about ½” beyond that point. The purpose of this knot is to prevent the cord from pulling through the arm. After you make the knot, check to see that the sling cord is the correct length. If it’s too long, shorten it by tying one or more additional knots near the first one.

Take the other sling cord, loop it around the finger, and tie a knot to create a loop at the end of the sling cord.

At this point, you have created a weapon called a “staff sling.” A video on the Instructables page for this project shows my son testing his, to make sure the projectile platform and sling work properly. Don’t overdo it on the first try. My daughter tried it, and our Pinky ball is now lost in the woods.

BUILD THE COUNTERWEIGHT BASE

GHT BASE

The counterweights need to have a strong base connecting them to the arm. To make it, cut three 3½” lengths of 2×4 lumber. Sandwich two of the 2×4s around the end of the arm, and screw the sandwich together with 3″ drywall screws. Don’t put a screw in the center, because it may interfere with the lag screw that will hold the weights in place.

Attach the third 2×4 to the ends of first two. Don’t put a screw in the center of this one either, because that’s the location of the lag screw. You’ve built your counterweight base.

Now drill a hole into the center of the counterweight base, a little bit smaller than the lag screw. I think we used a 5/16″ bit for the ½” lag screw, but a 3/8″ should also work.

You may want to drill a test hole in some scrap wood first, and try the screw’s fit. You’ll want it to be nice and tight.

ATTACH THE WEIGHTS

Stand up the arm on its finger end. Stack the weights with the smallest (2½lb) on the bottom. The 5lb goes next and the largest (10lb) goes on the top. Why? You want the largest weight to fall as far as possible, to give your projectile the most energy.

I cut a section of ¾” PVC pipe and placed it in the weights’ holes. That helped keep the weights aligned, but it isn’t necessary.

Place the ½” washer on the 6″ lag screw. Tighten the screw to clamp the weights in place by screwing it tightly into the counterweight base. The screw should take a ¾” or 19mm wrench.

ADD THE TRIANGLE SPIKES

The spikes run 45° diagonally through the triangle base, corner edge to corner edge. Make these holes about 6″ from the triangle legs (far enough so the legs won’t interfere with your drill or hammer).

To make drilling into the edge easier, first sand, cut, or file a notch into the triangle base where you want to drill. My son also likes to use a center punch to make an indentation before drilling. Drill holes small enough to keep the spikes tightly in place, but big enough to prevent splitting; we drilled 1/8″ holes.

Hammer the remaining two nails through the holes. File or cut the ends of the spikes so they’re not so sharp and scratchy. They just need to be able to stick into grass or dirt.

ADD THE TUNING STRING

Mark each leg 15″ from the base corner, as shown in Figure Bb. At each mark, drill a hole barely larger than the cord.

Cut a length of cord at least 24″. Tie a knot in one end, insert the other end through both leg holes, then tie a knot in the free end so it won’t pull back through, so that the length of cord between the two legs is 16″.

ATTACH TRIANGLE TO ARM

13. ATTACH TRIANGLE TO ARM

Attach the triangle to the arm using the 2½” hex bolt. Use a washer on each side of each piece of wood — 4 washers in all. Turn the nut by hand until it begins to tighten; don’t overtighten it. At this point, the total weight of the trebuchet should be around 20 pounds.

CUT THE TUNING NOTCHES

Using a file or a saw, make a series of notches on the back of the arm. These notches are used to hold the tuning string in place. To begin, position the string so that the triangle makes a 45° angle with the arm, and the first notch here. Make other notches on other sides of this notch. It’s helpful to label the notches so that you can keep track of where you set the tuning string during each launch.

Your Walking Arm Trebuchet is complete!