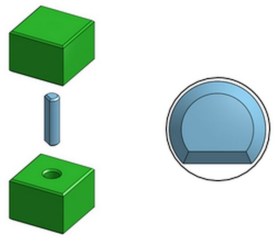
There’s common adage that you shouldn’t attempt to fit a square peg into a round hole, which seems to imply that you should use a round peg instead. While that may be true in a number of metaphorical and literal applications, I’m about to argue that when it comes to designing press-fits for your 3D printed projects, a round peg may be the last thing you want for an easy, predictable, first-try-fit into a round hole. When you’re done reading this, you’ll have a basic toolbox of design ideas that will help you make press-fit pins that fit the first time, every time.
To be completely fair, a round pin and a round hole is exactly what you want for a typical machine design application where the parts are metal. The exact dimensions and tolerances required for a permanent or semi-permanent fit are called out in any number of references, and they are easily achieved with a drill press and a lathe. When it’s time to assemble the parts, a hydraulic press, liquid nitrogen, or torches can get involved.
Let’s say, hypothetically, you don’t own a machine shop. Instead you’re limited to what you can do on your new 3D printer. You’ve designed some parts but, for one reason or another, those parts need to be assembled after they come off of the build tray. There are several different ways to do that, of course, but I’m going to focus on the press-fit option for now. I like press-fits because they are easier to draw in CAD compared to snap-fit and they avoid the necessity of glue but also don’t preclude it. Lastly, press-fits are an entirely 3D printed solution so you don’t have to worry about having the right hardware on hand.
Let’s start where I started a few years ago when I got my first 3D printer, with a basic and seemingly obvious press-fit design that looked a lot like what you see in this figure. I added a flat spot to a slightly undersized pin so it would print horizontally, but this is essentially a round peg / round hole design. I also added chamfers to the ends of the pin and the two mating pieces. Simple enough.

After no fewer than six tries resulting in too loose or too tight of a fit, I finally zeroed in on the perfect sized pin. I have used this design in a number of projects (like the purple paddle boat) and it works just fine if you’re willing to go through a few design iterations, but what I found was that any variation in design dimensions (eg. length or diameter of pin) or printing conditions (eg. a different printer, different material, different orientation) left me guessing what that right clearance should be between the pin and the hole.

As one of the organizers for the Moat Boat Paddle Battle held at the Bay Area Maker Faire this year, I was on the hook to design a 3D printed camera mount for the race course. I wanted to use a press-fit design but didn’t feel I had time to fool around with many iterations to get the perfect fit, so I was motivated to try something different.
The problem, I decided, with the round peg / round hole configuration was twofold. The first issue is that it provides too narrow of a design window. The fit quickly changes from too loose to too tight in an almost unnoticeable change in clearance between the mating parts. The second shortcoming is that once you’ve found that window, you’re stuck with having to remember, and then draw, all of those precise clearances in your 3D modeling software.
I felt like a better solution might be to make the pin and the hole different shapes like shown in the next figure. The idea was that by limiting contact to the corners it would concentrate the stresses caused by forcing the pin into the hole and make both parts have more ‘give’. This would hopefully increase the design window enough so that I could design the parts for a zero-clearance fit which would mean no more guessing or remembering. If the mating piece has a 1.00” hole, the cross-corner dimension of the pin also wants to be 1.00”.

The final design is what you see below. This particular part was designed to fit into either 3/4” PVC pipe or the larger diameter of 3/4” PVC fittings, so I had an opportunity to test two different ‘pin’ cross sections. In both cases I didn’t bother with guessing how much clearance was needed, I just gave my press-fit cross sections a shape that would provide some flexibility, and made sure my contacting surfaces came off the build tray the exact same dimensions as hole they were intended to go into.

The larger of the two cross sections was a fancy ‘spline’ design that ended up not having any advantages over the much easier to draw hexagonal octagonal cross section intended for the smaller hole. If I had to design this again, I would just stick the hexagon octagon cross section for both. Regardless, I was happy with how both cross sections fit into their mating parts, and was able to achieve that satisfaction on the first try — something I know I wouldn’t have been able to do with a completely round cross section.
This explanation isn’t intended to dictate what shape to make your press fit parts. The takeaway here is that by changing the shape of your press-fit piece, you can design a more forgiving fit — one that will let you skip the hassle of figuring out what clearance you need and simply design around zero clearance. I’ve had time to experiment with some other shapes which are presented below along with the earlier examples.

Each has its advantages and disadvantages but the last one (bottom right) is my favorite for now. The hexagon octagon shape is easy to draw, the hole through the center provides a little bit more flexibility and the presence of this feature in most CAD software makes establishing concentricity with other parts easier. The flat bottom allows for strong horizontal prints and the 45 degree angles print great. I’d encourage anyone reading this to try these and try their own as well.
ADVERTISEMENT


